Chapter 6 X Configuration
- Table of Contents
- 6.1 xorgconfig
- 6.2 xorgsetup
- 6.3 xinitrc
- 6.4 xwmconfig
- 6.5 xdm
Starting with Slackware-10.0, the X Window environment in Slackware is provided by Xorg. X is responsible for providing a graphical user interface. It is independent from the operating system, unlike Windows or the MacOS.
The X Window System is implemented through many programs that run in userland. The two main components are the server and the window manager. The server provides the lowlevel functions for interacting with your video hardware, thus it is system specific. The window manager sits on top of the server and provides the user interface. The advantage to this is you can have many different graphical interfaces by simply changing the window manager you use.
Configuring X can be a complex task. The reason for this is the vast numbers of video cards available for the PC architecture, most of which use different programming interfaces. Luckily, most cards today support basic video standards known as VESA, and if your card is among them you'll be able to start X using the startx command right out of the box.
If this doesn't work with your card, or if you'd like to take advantage of the high-performance features of your video card such as hardware acceleration or 3-D hardware rendering, then you'll need to reconfigure X.
To configure X, you'll need to make an /etc/X11/xorg.conf file. This file contains lots of details about your video hardware, mouse, and monitor. It's a very complex configuration file, but fortunately there are several programs to help create one for you. We'll mention a few of them here.
6.1 xorgconfig
This is a simple menu driven frontend that's similar in feel to the Slackware installer. It simply tells the X server to take a look at the card, and then set up the best initial configuration file it can make based on the information it gathers. The generated /etc/X11/xorg.conf file should be a good starting point for most systems (and should work without modification).
This is a text-based X configuration program that's designed for the advanced system administrator. Here's a sample walkthrough using xorgconfig. First, start the program:
# xorgconfig |
This will present a screenful of information about xorgconfig. To continue, press ENTER. xorgconfig will ask you to verify you have set your PATH correctly. It should be fine, so go ahead and hit ENTER.
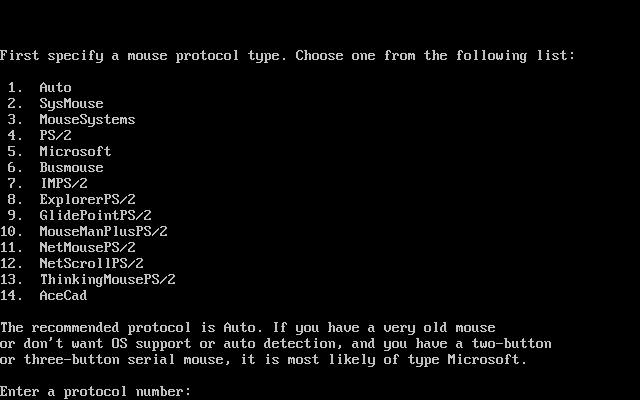
Select your mouse from the menu presented. If you don't see your serial mouse listed, pick the Microsoft protocol -- it's the most common and will probably work. Next xorgconfig will ask you about using ChordMiddle and Emulate3Buttons. You'll see these options described in detail on the screen. Use them if the middle button on your mouse doesn't work under X, or if your mouse only has two buttons (Emulate3Buttons lets you simulate the middle button by pressing both buttons simultaneously). Then, enter the name of your mouse device. The default choice, /dev/mouse, should work since the link was configured during Slackware setup. If you're running GPM (the Linux mouse server) in repeater mode, you can set your mouse type to /dev/gpmdata to have X get information about the mouse through gpm. In some cases (with busmice especially) this can work better, but most users shouldn't do this.
xorgconfig will ask you about enabling special key bindings. If you need this say “y”. Most users can say “n” -- enter this if you're not sure.
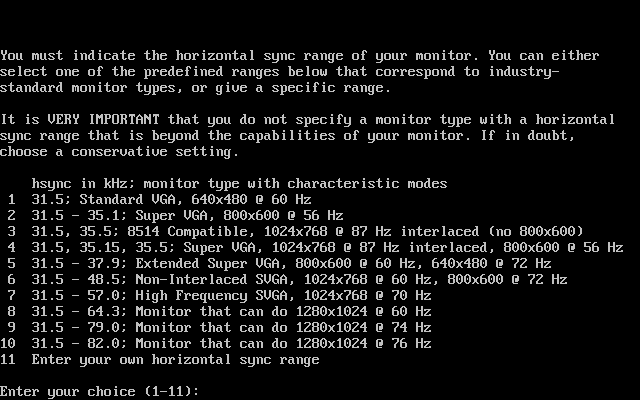
In the next section you enter the sync range for your monitor. To start configuring your monitor, press ENTER. You will see a list of monitor types -- choose one of them. Be careful not to exceed the specifications of your monitor. Doing so could damage your hardware.
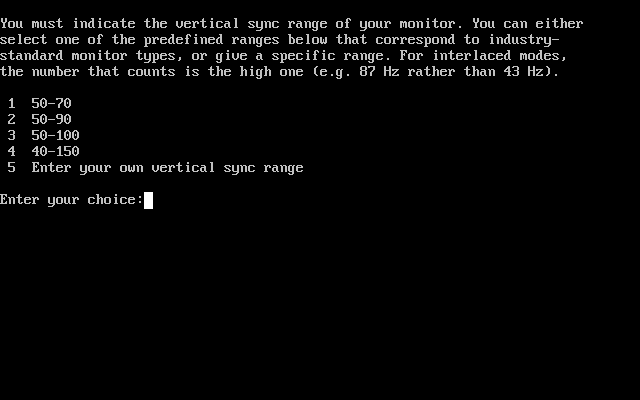
Specify the vertical sync range for your monitor (you should find this in the manual for the monitor). xorgconfig will ask you to enter strings to identify the monitor type in the xorg.conf file. Enter anything you like on these 3 lines (including nothing at all).
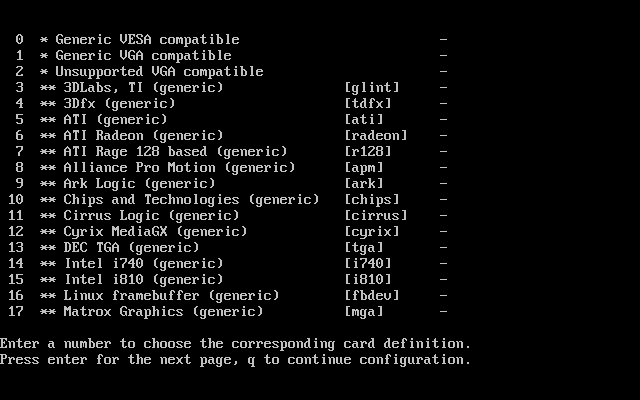
Now you have the opportunity to look at the database of video card types. You'll want to do this, so say “y”, and select a card from the list shown. If you don't see your exact card, try selecting one that uses the same chipset and it will probably work fine.
Next, tell xorgconfig how much RAM you have on your video card. xorgconfig will want you to enter some more descriptive text about your video card. If you like, you can enter descriptions on these three lines.
You'll then be asked which display resolutions you want to use. Again, going with the provided defaults should be fine to start with. Later on, you can edit the /etc/X11/xorg.conf file and rearrange the modes so 1024x768 (or whatever mode you like) is the default.
At this point, the xorgconfig program will ask if you'd like to save the current configuration file. Answer yes, and the X configuration file is saved, completing the setup process. You can start X now with the startx command.