Slackware Linux Essentials
![]()
Alan Hicks
Chris Lumens
David Cantrell
Logan Johnson
Copyright © 1998, 1999, 2000, 2001, 2002, 2003, 2004, 2005 Slackware Linux, Inc.
Slackware Linux is a registered trademark of Patrick Volkerding and Slackware Linux, Inc.
Linux is a registered trademark of Linus Torvalds.
America Online and AOL are registered trademarks of America Online, Inc. in the United States and/or other countries.
Apple, FireWire, Mac, Macintosh, Mac OS, Quicktime, and TrueType are trademarks of Apple Computer, Inc., registered in the United States and other countries.
IBM, AIX, EtherJet, Netfinity, OS/2, PowerPC, PS/2, S/390, and ThinkPad are trademarks of International Business Machines Corporation in the United States, other countries, or both.
IEEE, POSIX, and 802 are registered trademarks of Institute of Electrical and Electronics Engineers, Inc. in the United States.
Intel, Celeron, EtherExpress, i386, i486, Itanium, Pentium, and Xeon are trademarks or registered trademarks of Intel Corporation or its subsidiaries in the United States and other countries.
Microsoft, IntelliMouse, MS-DOS, Outlook, Windows, Windows Media and Windows NT are either registered trademarks or trademarks of Microsoft Corporation in the United States and/or other countries.
Netscape and the Netscape Navigator are registered trademarks of Netscape Communications Corporation in the U.S. and other countries.
Red Hat, RPM, are trademarks or registered trademarks of Red Hat, Inc. in the United States and other countries.
XFree86 is a trademark of The XFree86 Project, Inc.
Many of the designations used by manufacturers and sellers to distinguish their products are claimed as trademarks. Where those designations appear in this document, and Slackware Linux, Inc. was aware of the trademark claim, the designations have been followed by the “™” or the “®” symbol.
- Table of Contents
- Preface
- 1 An Introduction to Slackware Linux
-
- 1.1 What is Linux?
-
- 1.1.1 A Word on GNU
- 1.2 What is Slackware?
- 1.3 Open Source and Free Software
- 2 Help
-
- 2.1 System Help
-
- 2.1.1 man
- 2.1.2 The /usr/doc Directory
- 2.1.3 HOWTOs and mini-HOWTOs
- 2.2 Online Help
- 3 Installation
-
- 3.1 Getting Slackware
-
- 3.1.1 The Official Disc and Box Sets
- 3.1.2 Via the Internet
- 3.2 System Requirements
-
- 3.2.1 The Software Series
- 3.2.2 Installation Methods
- 3.2.3 Boot Disk
- 3.2.4 Root Disk
- 3.2.5 Supplemental Disk
- 3.2.6 Making the Disks
- 3.3 Partitioning
- 3.4 The setup Program
- 4 System Configuration
-
- 4.1 System Overview
-
- 4.1.1 File System Layout
- 4.1.2 Finding Files
- 4.1.3 The /etc/rc.d Directory
- 4.2 Selecting a Kernel
- 5 Network Configuration
-
- 5.1 Introduction: netconfig is your friend.
- 5.2 Network Hardware Configuration
-
- 5.2.1 Loading Network Modules
- 5.2.2 LAN (10/100/1000Base-T and Base-2) cards
- 5.2.3 Modems
- 5.2.4 PCMCIA
- 5.3 TCP/IP Configuration
-
- 5.3.1 DHCP
- 5.3.2 Static IP
- 5.3.3 /etc/rc.d/rc.inet1.conf
- 5.3.4 /etc/resolv.conf
- 5.3.5 /etc/hosts
- 5.4 PPP
- 5.5 Wireless
-
- 5.5.1 Hardware Support
- 5.5.2 Configure the Wireless Settings
- 5.5.3 Configure the Network
- 5.6 Network File Systems
-
- 5.6.1 SMB/Samba/CIFS
- 5.6.2 Network File System (NFS)
- 6 X Configuration
-
- 6.1 xorgconfig
- 6.2 xorgsetup
- 6.3 xinitrc
- 6.4 xwmconfig
- 6.5 xdm
- 7 Booting
-
- 7.1 LILO
- 7.2 LOADLIN
- 7.3 Dual Booting
- 8 The Shell
-
- 8.1 Users
-
- 8.1.1 Logging In
- 8.1.2 Root: The Superuser
- 8.2 The Command Line
-
- 8.2.1 Running Programs
- 8.2.2 Wildcard Matching
- 8.2.3 Input/Output Redirection and Piping
- 8.3 The Bourne Again Shell (bash)
-
- 8.3.1 Environment Variables
- 8.3.2 Tab Completion
- 8.4 Virtual Terminals
-
- 8.4.1 Screen
- 9 Filesystem Structure
-
- 9.1 Ownership
- 9.2 Permissions
- 9.3 Links
- 9.4 Mounting Devices
-
- 9.4.1 fstab
- 9.4.2 mount and umount
- 9.5 NFS Mounts
- 10 Handling Files and Directories
- 11 Process Control
-
- 11.1 Backgrounding
- 11.2 Foregrounding
- 11.3 ps
- 11.4 kill
- 11.5 top
- 12 Essential System Administration
-
- 12.1 Users and Groups
-
- 12.1.1 Supplied Scripts
- 12.1.2 Changing Passwords
- 12.1.3 Changing User Information
- 12.2 Users and Groups, the Hard Way
- 12.3 Shutting Down Properly
- 13 Basic Network Commands
-
- 13.1 ping
- 13.2 traceroute
- 13.3 DNS Tools
- 13.4 finger
- 13.5 telnet
-
- 13.5.1 The other use of telnet
- 13.6 The Secure shell
- 13.7 email
- 13.8 Browsers
- 13.9 FTP Clients
- 13.10 Talking to Other People
- 14 Security
-
- 14.1 Disabling Services
- 14.2 Host Access Control
-
- 14.2.1 iptables
- 14.2.2 tcpwrappers
- 14.3 Keeping Current
-
- 14.3.1 slackware-security mailing list
- 14.3.2 The /patches directory
- 15 Archive Files
- 16 Vi
-
- 16.1 Starting vi
- 16.2 Modes
-
- 16.2.1 Command Mode
- 16.2.2 Insert Mode
- 16.3 Opening Files
- 16.4 Saving Files
- 16.5 Quitting vi
- 16.6 vi Configuration
- 16.7 Vi Keys
- 17 Emacs
-
- 17.1 Starting emacs
-
- 17.1.1 Command Keys
- 17.2 Buffers
- 17.3 Modes
-
- 17.3.1 Opening files
- 17.4 Basic Editing
- 17.5 Saving Files
-
- 17.5.1 Quitting Emacs
- 18 Slackware Package Management
-
- 18.1 Overview of Package Format
- 18.2 Package Utilities
-
- 18.2.1 pkgtool
- 18.2.2 installpkg
- 18.2.3 removepkg
- 18.2.4 upgradepkg
- 18.2.5 rpm2tgz/rpm2targz
- 18.3 Making Packages
-
- 18.3.1 explodepkg
- 18.3.2 makepkg
- 18.3.3 SlackBuild Scripts
- 18.4 Making Tags and Tagfiles (for setup)
- 19 ZipSlack
-
- 19.1 What is ZipSlack?
-
- 19.1.1 Advantages
- 19.1.2 Disadvantages
- 19.2 Getting ZipSlack
-
- 19.2.1 Installation
- 19.3 Booting ZipSlack
- Glossary
- A. The GNU General Public License
- List of Tables
- 2-1. Man Page Sections
- 3-1. Slackware Linux, Inc. Contact Information
- 3-2. System Requirements
- 3-3. Software Series
- 9-1. Octal Permission Values
- 13-1. ftp commands
- 16-1. Movement
- 16-2. Editing
- 16-3. Searching
- 16-4. Saving and Quitting
- 17-1. Basic Emacs Editing Commands
- 18-1. installpkg Options
- 18-2. removepkg Options
- 18-3. Tagfile Status Options
- List of Figures
- 4-1. Kernel Configuration Menu
- 6-1. xorgconfig Mouse Configuration
- 6-2. xorgconfig Horizontal Sync
- 6-3. xorgconfig Vertical Sync
- 6-4. xorgconfig Video Card
- 6-5. Desktop Configuration with xorgconfig
- 7-1. liloconfig
- 7-2. liloconfig Expert Menu
- 11-1. Basic ps output
- 13-1. Telnetting to a webserver
- 13-2. The Pine main menu
- 13-3. Elm main screen
- 13-4. Mutt main screen
- 13-5. Lynx default start page
- 13-6. Links, with the file menu open
- 13-7. Two users in a talk session
- 13-8. Two users in a ytalk session
- 16-1. A vi session.
- 18-1. Pkgtool's main menu.
- 18-2. Pkgtool view mode
- List of Examples
- 8-1. Listing Environment Variables with set
Preface
Intended Audience
The Slackware Linux operating system is a powerful platform for Intel-based computers. It is designed to be stable, secure, and functional as both a high-end server and powerful workstation.
This book is designed to get you started with the Slackware Linux operating system. It's not meant to cover every single aspect of the distribution, but rather to show what it is capable of and give you a basic working knowledge of the system.
As you gain experience with Slackware Linux, we hope you find this book to be a handy reference. We also hope you'll lend it to all of your friends when they come asking about that cool Slackware Linux operating system you're running.
While this book may not an edge-of-your-seat novel, we certainly tried to make it as entertaining as possible. With any luck, we'll get a movie deal. Of course, we also hope you are able to learn from it and find it useful.
And now, on with the show.
Changes from the First Edition
This second edition is the culmination of years of hard work by the dedicated members of the Slackware Documentation Project. The following are the major changes in this new edition:
-
Chapter 3, Installation, has been modified with new screenshots of the installer, and reflects changes in disk-sets, and CD installation.
-
Chapter 4, System Configuration, has been updated with new information about Linux 2.6.x kernels.
-
Chapter 5, Network Configuration, has been expanded with further explanation of Samba, NFS, and DHCP. A section on wireless networking has also been added. This chapter now reflects major changes in how Slackware handles network setup.
-
Chapter 6, X Window System, has been substantially rewritten for Xorg based systems. This chapter now also covers the xdm graphical login manager.
-
Chapter 13, Basic Network Commands, has been enhanced with information about additional network utilities.
-
Chapter 14, Security, is a new chapter with this edition. It explains how to keep a Slackware Linux system secure.
-
Chapter 17, Emacs, is a new chapter with this edition. It describes how to use Emacs, a powerful editor for Unix.
-
Chapter 18, Package Management, has been updated with information about SlackBuild scripts.
-
There are many other changes, both minor and major, to reflect changes in Slackware as it has matured.
Organization of this Book
- Chapter 1, Introduction
-
Provides introductory material on Linux, Slackware, and the Open Source and Free Software Movements.
- Chapter 2, Help
-
Describes the help resources available on a Slackware Linux system and online.
- Chapter 3, Installation
-
Describes the installation process step-by-step with screenshots to provide an illustrative walk-through.
- Chapter 4, System Configuration
-
Describes the important configuration files and covers kernel recompilation.
- Chapter 5, Network Configuration
-
Describes how to connect a Slackware Linux machine to a network. Covers TCP/IP, PPP/dial-up, wireless networking, and more.
- Chapter 6, The X Window System
-
Describes how to setup and use the graphical X Window System in Slackware.
- Chapter 7, Booting
-
Describes the process by which a computer boots into Slackware Linux. Also covers dual-booting with Microsoft Windows operating systems.
- Chapter 8, The Shell
-
Describes the powerful command line interface for Linux.
- Chapter 9, Filesystem Structure
-
Describes the filesystem structure, including file ownership, permission, and linking.
- Chapter 10, Handling Files and Directories
-
Describes the commands used to manipulate files and directories from the command line interface.
- Chapter 11, Process Control
-
Describes the powerful Linux process management commands used to manage multiple running applications.
- Chapter 12, Essential System Administration
-
Describes basic system administration tasks such as adding and removing users, shutting down the system properly, and more.
- Chapter 13, Basic Network Commands
-
Describes the collection of network clients included with Slackware.
- Chapter 14, Security
-
Describes many different tools available to help keep your Slackware system secure, including iptables and tcpwrappers.
- Chapter 15, Archive Files
-
Describes the different compression and archive utilities available for Linux.
- Chapter 16, vi
-
Describes the powerful vi text editor.
- Chapter 17, Emacs
-
Describes the powerful Emacs text editor.
- Chapter 18, Slackware Package Management
-
Describes the Slackware package utilities and the process used to create custom packages and tagfiles.
- Chapter 19, ZipSlack
-
Describes the ZipSlack version of Linux that can be used from Windows without requiring an installation.
- Appendix A, The GNU General Public License
-
Describes the license terms under which Slackware Linux and this book can be copied and distributed.
Conventions used in this book
To provide a consistent and easy to read text, several conventions are followed throughout the book.
Typographic Conventions
- Italic
-
An italic font is used for commands, emphasized text, and the first usage of technical terms.
- Monospace
-
A monospaced font is used for error messages, commands, environment variables, names of ports, hostnames, user names, group names, device names, variables, and code fragments.
- Bold
-
A bold font is used for user input in examples.
User Input
Keys are shown in bold to stand out from other text. Key combinations that are meant to be typed simultaneously are shown with `+' between the keys, such as:
Ctrl+Alt+Del
Meaning the user should type the Ctrl, Alt, and Del keys at the same time.
Keys that are meant to be typed in sequence will be separated with commas, for example:
Ctrl+X, Ctrl+S
Would mean that the user is expected to type the Ctrl and X keys simultaneously and then to type the Ctrl and S keys simultaneously.
Examples
Examples starting with E:\> indicate a MS-DOS® command. Unless otherwise noted, these commands may be executed from a “Command Prompt” window in a modern Microsoft® Windows® environment.
D:\> rawrite a: bare.i |
Examples starting with # indicate a command that must be invoked as the superuser in Slackware. You can login as root to type the command, or login as your normal account and use su(1) to gain superuser privileges.
# dd if=bare.i of=/dev/fd0 |
Examples starting with % indicate a command that should be invoked from a normal user account. Unless otherwise noted, C-shell syntax is used for setting environment variables and other shell commands.
% top |
Acknowledgments
This project is the accumulation of months of work by many dedicated individuals. It would not have been possible for me to produce this work in a vacuum. Many people deserve our thanks for their selfless acts: Keith Keller for his work on wireless networking, Joost Kremers for his great work in single-handedly writing the emacs section, Simon Williams for the security chapter, Jurgen Phillippaerts for basic networking commands, Cibao Cu Ali G Colibri for the inspiration and a good kick in the pants. Countless others have sent in suggestions and fixes. An incomplete list includes: Jacob Anhoej, John Yast, Sally Welch, Morgan Landry, and Charlie Law. I'd also like to thank Keith Keller for hosting the mailing list for this project, as well as Carl Inglis for the initial web hosting. Last but not least, I'd like to thank Patrick J. Volkerding for Slackware Linux, and David Cantrell, Logan Johnson, and Chris Lumens for Slackware Linux Essentials 1st Edition. Without their initial framework, none of this would have ever happened. Many others have contributed in small and large ways to this project and have not been listed. I hope they will forgive me for a poor memory.
Alan Hicks, May 2005
Chapter 1 An Introduction to Slackware Linux
1.1 What is Linux?
Linus Torvalds started Linux, an operating system kernel, as a personal project in 1991. He started the project because he wanted to run a Unix-based operating system without spending a lot of money. In addition, he wanted to learn the ins and outs of the 386 processor. Linux was released free of charge to the public so that anyone could study it and make improvements under the General Public License. (See Section 1.3 and Appendix A for an explanation of the license.) Today, Linux has grown into a major player in the operating system market. It has been ported to run on a variety of system architectures, including HP/Compaq's Alpha, Sun's SPARC and UltraSPARC, and Motorola's PowerPC chips (through Apple Macintosh and IBM RS/6000 computers.) Hundreds, if not thousands, of programmers all over the world now develop Linux. It runs programs like Sendmail, Apache, and BIND, which are very popular software used to run Internet servers. It's important to remember that the term “Linux” really refers to the kernel - the core of the operating system. This core is responsible for controlling your computer's processor, memory, hard drives, and peripherals. That's all Linux really does: It controls the operations of your computer and makes sure that all of its programs behave. Various companies and individuals bundle the kernel and various programs together to make an operating system. We call each bundle a Linux distribution.
1.1.1 A Word on GNU
The Linux kernel project began as a solo endeavor by Linus Torvalds in 1991, but as Isaac Newton once said, “If I have seen further, it is by standing on the shoulders of giants.” When Linus Torvalds began the kernel the Free Software Foundation had already established the idea of collaborative software. They entitled their effort GNU, a recursive acronym that means simply “GNU's Not Unix”. GNU software ran atop the Linux kernel from day 1. Their compiler gcc was used to compile the kernel. Today many GNU tools from gcc to gnutar are still at the basis of every major Linux distribution. For this reason many of the Free Software Foundation's proponents fervently state that their work should be given the same credit as the Linux kernel. They strongly suggest that all Linux distributions should refer to themselves as GNU/Linux distributions.
This is the topic of many flamewars, surpassed only by the ancient vi versus emacs holy war. The purpose of this book is not to fan the fires of this heated discussion, but rather to clarify the terminology for neophytes. When one sees GNU/Linux it means a Linux distribution. When one sees Linux they can either be referring to the kernel, or to a distribution. It can be rather confusing. Typically the term GNU/Linux isn't used because it's a mouth full.
1.2 What is Slackware?
Slackware, started by Patrick Volkerding in late 1992, and initially released to the world on July 17, 1993, was the first Linux distribution to achieve widespread use. Volkerding first learned of Linux when he needed an inexpensive LISP interpreter for a project. One of the few distributions available at the time was SLS Linux from Soft Landing Systems. Volkerding used SLS Linux, fixing bugs as he found them. Eventually, he decided to merge all of these bugfixes into his own private distribution that he and his friends could use. This private distribution quickly gained popularity, so Volkerding decided to name it Slackware and make it publicly available. Along the way, Patrick added new things to Slackware; a user friendly installation program based on a menuing system, as well as the concept of package management, which allows users to easily add, remove, or upgrade software packages on their systems.
There are many reasons why Slackware is Linux's oldest living distribution. It does not try to emulate Windows, it tries to be as Unix-like as possible. It does not try to cover up processes with fancy, point-and-click GUIs (Graphical User Interfaces). Instead, it puts users in control by letting them see exactly what's going on. Its development is not rushed to meet deadlines-each version comes out when it is ready.
Slackware is for people who enjoy learning and tweaking their system to do exactly what they want. Slackware's stability and simplicity are why people will continue to use it for years to come. Slackware currently enjoys a reputation as a solid server and a no-nonsense workstation. You can find Slackware desktops running nearly any window manager or desktop environment, or none at all. Slackware servers power businesses, acting in every capacity that a server can be used in. Slackware users are among the most satisfied Linux users. Of course, we'd say that. :^)
1.3 Open Source and Free Software
Within the Linux community, there are two major ideological movements at work. The Free Software movement (which we'll get into in a moment) is working toward the goal of making all software free of intellectual property restrictions. Followers of this movement believe these restrictions hamper technical improvement and work against the good of the community. The Open Source movement is working toward most of the same goals, but takes a more pragmatic approach to them. Followers of this movement prefer to base their arguments on the economic and technical merits of making source code freely available, rather than the moral and ethical principles that drive the Free Software Movement.
At the other end of the spectrum are groups that wish to maintain tighter controls over their software.
The Free Software movement is headed by the Free Software Foundation, a fund-raising organization for the GNU project. Free software is more of an ideology. The oft-used expression is “free as in speech, not free as in beer”. In essence, free software is an attempt to guarantee certain rights for both users and developers. These freedoms include the freedom to run the program for any reason, to study and modify the source code, to redistribute the source, and to share any modifications you make. In order to guarantee these freedoms, the GNU General Public License (GPL) was created. The GPL, in brief, provides that anyone distributing a compiled program which is licensed under the GPL must also provide source code, and is free to make modifications to the program as long as those modifications are also made available in source code form. This guarantees that once a program is “opened” to the community, it cannot be “closed” except by consent of every author of every piece of code (even the modifications) within it. Most Linux programs are licensed under the GPL.
It is important to note that the GPL does not say anything about price. As odd as it may sound, you can charge for free software. The “free” part is in the liberties you have with the source code, not in the price you pay for the software. (However, once someone has sold you, or even given you, a compiled program licensed under the GPL they are obligated to provide its source code as well.)
Another popular license is the BSD license. In contrast to the GPL, the BSD license gives no requirement for the release of a program's source code. Software released under the BSD license allows redistribution in source or binary form provided only a few conditions are met. The author's credentials cannot be used as a sort of advertisement for the program. It also indemnifies the author from liability for damages that may arise from the use of the software. Much of the software included in Slackware Linux is BSD licensed.
At the forefront of the younger Open Source movement, the Open Source Initiative is an organization that solely exists to gain support for open source software, that is, software that has the source code available as well as the ready-to-run program. They do not offer a specific license, but instead they support the various types of open source licenses available.
The idea behind the OSI is to get more companies behind open source by allowing them to write their own open source licenses and have those licenses certified by the Open Source Initiative. Many companies want to release source code, but do not want to use the GPL. Since they cannot radically change the GPL, they are offered the opportunity to provide their own license and have it certified by this organization.
While the Free Software Foundation and the Open Source Initiative work to help each other, they are not the same thing. The Free Software Foundation uses a specific license and provides software under that license. The Open Source Initiative seeks support for all open source licenses, including the one from the Free Software Foundation. The grounds on which each argues for making source code freely available sometimes divides the two movements, but the fact that two ideologically diverse groups are working toward the same goal lends credence to the efforts of each.
Chapter 2 Help
Often there are times when you might need help with a specific command, setting up a program, or getting a piece of hardware to work. Maybe you simply want to understand a given command better, or see what other options are available to use with it. Luckily, there are a variety of ways that you can get the help you're looking for. When you install Slackware you have the option of installing packages from the “F” series which includes FAQs and HOWTOs. Programs also come with help about their options, configuration files, and usage.
2.1 System Help
2.1.1 man
The man command (short for “manual”) is the traditional form of online documentation in Unix and Linux operating systems. Comprised of specially formatted files, the “man pages”, are written for the vast majority of commands and are distributed with the software itself. Executing man somecommand will display the man page for (naturally) the command specified, in our example this would be the imaginary program somecommand.
As you might imagine, the amount of man pages can quickly add up, becoming overly confusing and seriously complicated, even for an advanced user. So, for this reason, man pages are grouped into enumerated sections. This system has been around for a very long time; enough so that you will often see commands, programs, and even programming library functions referred to with their man section number.
For example:
You might see a reference to man(1). The numbering tells you that “man” is documented in section 1 (user commands); you can specify that you want the section 1 man page for “man” with the command man 1 man. Specifying the section that man should look in is useful in the case of multiple items with the same name.
Table 2-1. Man Page Sections
| Section | Contents |
|---|---|
| Section 1 | user commands (intro only) |
| Section 2 | system calls |
| Section 3 | C library calls |
| Section 4 | devices (e.g., hd, sd) |
| Section 5 | file formats and protocols (e.g., wtmp, /etc/passwd, nfs) |
| Section 6 | games (intro only) |
| Section 7 | conventions, macro packages, etc. (e.g., nroff, ascii) |
| Section 8 | system administration (intro only) |
In addition to man(1), there are the commands whatis(1) and apropos(1) available to you, whose shared purpose is to make it easier to find information in the man system.
The command whatis gives a very brief description of system commands, somewhat in the style of a pocket command reference.
Example:
% whatis whatis whatis (1) - search the whatis database for complete words |
The command apropos is used to search for a man page containing a given keyword.
Example:
% apropos wav cdda2wav (1) - a sampling utility that dumps CD audio data into wav sound files netwave_cs (4) - Xircom Creditcard Netwave device driver oggdec (1) - simple decoder, Ogg Vorbis file to PCM audio file (WAV or RAW) wavelan (4) - AT&T GIS WaveLAN ISA device driver wavelan_cs (4) - AT&T GIS WaveLAN PCMCIA device driver wvlan_cs (4) - Lucent WaveLAN/IEEE 802.11 device driver |
If you'd like further information on any of these commands, read their man pages for the details. ;)
2.1.2 The /usr/doc Directory
The source for most packages that we build comes with some sort of documentation: README files, usage instructions, license files, etc. Any sort of documentation that comes with the source is included and installed on your system in the /usr/doc directory. Each program will (usually) install its own documentation in the order of:
/usr/doc/$program-$version
Where $program is the name of the program you are wanting to read about, and $version is (obviously) the appropriate version of software package installed on your system.
For example, to read the documentation for the command man(1) you would want to cd to:
% cd /usr/doc/man-$version |
If reading the appropriate man page(s) doesn't provide you with enough information, or address what you're looking for in particular, the /usr/doc directory should be your next stop.
2.1.3 HOWTOs and mini-HOWTOs
It is in the truest spirit of the Open Source community that brings us to the HOWTO/mini-HOWTO collection. These files are exactly what they sound like - documents and guides describing how to do stuff. If you installed the HOWTO collection, the HOWTOs will be installed to /usr/doc/Linux-HOWTOs and the mini-HOWTOs to /usr/doc/Linux-mini-HOWTOs.
Also included in the same package series is a collection of FAQs, which is an acronym which stands for
These documents are written in a “Question and answer” style for (surprise) Frequently Asked Questions. The FAQs can often be a very useful place to look if you're just looking for a “Quick Fix” to something. If you decide to install the FAQs during setup, you will find them installed to the /usr/doc/Linux-FAQs directory.
These files are well worth reading whenever you're not quite sure how to proceed with something. They cover an amazing range of topics, more often than not in a surprisingly detailed manner. Good stuff!
2.2 Online Help
In addition to the documentation provided and installable with the Slackware Linux Operating System, there are a vast multitude of online resources available for you to learn from as well.
2.2.1 The Official Website and Help Forums
The Official Slackware Website
The Official Slackware Linux website is sometimes out of date, but still contains information relevant to the latest Slackware versions. At one time an active help forum existed there before a horde of trolls, troublemakers, and whiners descended on the forum. Maintaining the forum was beginning to be too much work, and so Pat shut it down. One can find that old forum back up and running complete with searchable archives of the old data at http://www.userlocal.com/phorum/.
After the forums were taken down on http://slackware.com, several other sites sprang up that offered forum support for Slackware. After much thought, Pat chose to endorse www.linuxquestions.org as the official forum for Slackware Linux.
2.2.2 E-mail Support
Everyone who purchases an official CD set is entitled to free installation support via e-mail from the developer. That having been said, please keep in mind that we, the developers, (and a vast majority of users) of Slackware are of “The Old School”. That means that we prefer to help those who have a sincere interest and are willing to help themselves in the process. We will always do our best to help everyone who emails us with support questions. However, Please check your documentation and the website (especially the FAQs and maybe some of the forums listed below) before e-mailing. You may get a faster answer that way, and the less e-mail we have to answer, obviously the sooner we will be of assistance to those that need it.
The e-mail address for technical support is: support@slackware.com. Other e-mail addresses and contact information are listed on the website.
2.2.2.1 Slackware Linux Project Mailing Lists
We have several mailing lists, available in digest and normal forms. Check the instructions for how to subscribe.
To subscribe to a mailing list, email:
majordomo@slackware.com
with the phrase “subscribe [name of list]” in the body of the email. The list choices are described below (use one the names below for the name of the list).
Archives of the mailing list can be found on Slackware's website at:
http://slackware.com/lists/archive/
- slackware-announce
-
The slackware-announce mailing list is for announcements of new versions, major updates and other general information.
- slackware-security
-
The slackware-security mailing list is for announcements relating to security issues. Any exploits or other vulnerabilities directly pertaining to Slackware will get posted to this list immediately.
These lists are also available in digest format. This means that you get one large message per day instead of several messages throughout the day. Since the slackware mailing lists do not allow users to post, and the lists are such low traffic, most users find little advantage in the digest lists. Still, they are available if you want them by subscribing to slackware-announce-digest or slackware-security-digest.
2.2.3 Non-Official Websites and Help Forums
2.2.3.1 Websites
-
The Kung-Fu Master of Search Engines. When you absolutely, positively gotta find every last kernel of information on a subject: Accept no substitutes.
- Google:Linux
-
Linux-Specific searches
- Google:BSD
-
BSD-Specific searches. Slackware is so generic as a Unix work-a-like operating system that one can as often as not find very detailed information that is almost 100% relevant to Slackware here. Many times a BSD search reveals far more technical information than the often PR-related Linux searches.
- Google:Groups
-
Search through decades of Usenet posts for your pearls of wisdom.
- http://userlocal.com
-
A virtual treasure-trove of knowledge, good advice, first-hand experience and interesting articles. Often the first place you'll hear about new developments in the world of Slackware.
2.2.3.2 Web-based Resources
- linuxquestions.org
-
The officially sanctioned web-forum for Slackware users.
- LinuxISO.org Slackware Forum
-
“A place to download and get help with Linux.”
- alt.os.linux.slackware FAQ
-
Another FAQ
2.2.3.3 Usenet Groups (NNTP)
Usenet has long been a place for geeks to gather and help one another. There are few newsgroups dedicated to Slackware Linux, but they tend to be filled with very knowledgeable people.
alt.os.linux.slackware
alt.os.linux.slackware, better known as aols (not to be confused with AOL®!) is one of the most active places to find technical help with Slackware problems. Like every Usenet newsgroup, a few unhelpful participants (“trolls”) can mar the experience with constant arguing. Learning to ignore the trolls and identifying the truly helpful people is key to making the most of this resource.
Chapter 3 Installation
Before you can use Slackware Linux, you'll have to obtain and install it. Getting Slackware is as easy as purchasing it or downloading it for free over the Internet. Installing it is also easy as long as you have some basic knowledge about your computer and are willing to learn a few other things. The installation program itself is very much a step-by-step process. Because of this, you can be up and running very quickly. In fact, Slackware boasts one of the lowest installation times of any full-featured Linux distribution.
3.1 Getting Slackware
3.1.1 The Official Disc and Box Sets
The official Slackware Linux CD set is available from Slackware Linux, Inc. The CD set consists of 4 discs. The first disk contains all the software needed for a basic server install, and the X window system. The second cd is a “live” cd; that is, a bootable cd that installs into RAM and gives you a temporary installation to play around with or do a data or machine rescue. This cd also contains a few packages such as the KDE and GNOME desktop environments. A few other goodies are included on the second cd including many non-vital packages in the “extra” folder. The third and fourth CDs contain the source code to all of Slackware, along with the original edition of this book.
One may also purchase a boxed set that includes the 4 discs and a copy of this book, as well as lots of neat Slackware gear to show off your geek pride. CD subscriptions are available at a reduced rate also.
The preferred method for shopping for Slackware merchandise is online at the Slackware store.
You can also call or e-mail your order in.
3.1.2 Via the Internet
Slackware Linux is also freely available over the Internet. You may email in your support questions, but higher priority will be given to those who have purchased the official CD set. With that said, we get a lot of e-mails and our time is rather limited. Before e-mailing for support consider reading Chapter 2 first.
The official Slackware Linux Project website is located at:
The primary FTP location for Slackware Linux is:
ftp://ftp.slackware.com/pub/slackware/
Bear in mind that our ftp site, while open for general use, does not have unlimited bandwidth. Please consider using a mirror near you to download Slackware. An incomplete list of mirrors can be found on our site at http://www.slackware.com/getslack.
3.2 System Requirements
An easy Slackware installation requires, at minimum, the following:
Table 3-2. System Requirements
| Hardware | Requirement |
|---|---|
| Processor | 586 |
| RAM | 32 MB |
| Disk Space | 1GB |
| Media Drive | 4x CD-ROM |
If you have the bootable CD, you will probably not need a floppy drive. Of course, it stands to reason that if you don't possess a CD-ROM drive, you will need a floppy drive to do a network install. A network card is required for an NFS install. See the section called NFS for more information.
The disk space requirement is somewhat tricky. The 1GB recommendation is usually safe for a minimal install, but if you do a full install, you will need around two gigabytes of available hard disk space plus additional space for personal files.. Most users don't do a full install. In fact, many run Slackware on as little as 100MB of hard disk space.
Slackware can be installed to systems with less RAM, smaller hard drives, and weaker CPUs, but doing so will require a little elbow grease. If you're up for a little work, take a look at the LOWMEM.TXT file in the distribution tree for a few helpful hints.
3.2.1 The Software Series
For reasons of simplicity, Slackware has historically been divided into software series. Once called “disk sets” because they were designed for floppy-based installation, the software series are now used primarily to categorize the packages included in Slackware. Today, floppy installation is no longer possible.
The following is a brief description of each software series.
Table 3-3. Software Series
| Series | Contents |
|---|---|
| A | The base system. Contains enough software to get up and running and have a text editor and basic communication program. |
| AP | Various applications that do not require the X Window System. |
| D | Program development tools. Compilers, debuggers, interpreters, and man pages are all here. |
| E | GNU Emacs. |
| F | FAQs, HOWTOs, and other miscellaneous documentation. |
| GNOME | The GNOME desktop environment. |
| K | The source code for the Linux kernel. |
| KDE | The K Desktop Environment. An X environment which shares a lot of look-and-feel features with MacOS and Windows. The Qt library, which KDE requires, is also in this series. |
| KDEI | Internationalization packages for the KDE desktop. |
| L | Libraries. Dynamically linked libraries required by many other programs. |
| N | Networking programs. Daemons, mail programs, telnet, news readers, and so on. |
| T | teTeX document formatting system. |
| TCL | The Tool Command Language. Tk, TclX, and TkDesk. |
| X | The base X Window System. |
| XAP | X Applications that are not part of a major desktop environment (for example, Ghostscript and Netscape). |
| Y | BSD Console games |
3.2.2 Installation Methods
3.2.2.1 Floppy
While it was once possible to install all of Slackware Linux from floppy disks, the increasing size of software packages (indeed, of some individual programs) has forced the abandonment of the floppy install. As late as Slackware version 7.1 a partial install was possible using floppy disks. The A and N series could be nearly entirely installed, providing a base system from which to install the rest of the distribution. If you are considering a floppy install (typically on older hardware), it is typically recommended to find another way, or use an older release. Slackware 4.0 is still very popular for this reason, as is 7.0.
Please note that floppy disks are still required for a CD-ROM install if you do not have a bootable CD, as well as for an NFS install.
3.2.2.2 CD-ROM
If you have the bootable CD, available in the official disc set published by Slackware Linux, Inc. (see the section called Getting Slackware), a CD-based installation will be a bit simpler for you. If not, you will need to boot from floppies. Also, if you have special hardware that makes usage of the kernel on the bootable CD problematic, you may need to use specialized floppies.
As of Slackware version 8.1, a new method is used for creating the bootable CDs, which does not work as well with certain flaky BIOS chips (it is worth noting that most all Linux CDs suffer from this these days). If that is the case, we recommend booting from a floppy disk.
Section 3.2.3 and Section 3.2.5 provide information on choosing and creating floppies from which to boot, should this be necessary.
3.2.2.3 NFS
NFS (the Network File System) is a way of making filesystems available to remote machines. An NFS install allows you to install Slackware from another computer on your network. The machine from which you are installing needs to be configured to export the Slackware distribution tree to the machine to which you're installing. This, of course, involves some knowledge of NFS, which is covered in Section 5.6.
It is possible to perform an NFS install via such methods as PLIP (over a parallel port), SLIP, and PPP (though not over a modem connection). However, we recommend the use of a network card if available. After all, installing an operating system through your printer port is going to be a very, very slow process.
3.2.3 Boot Disk
The boot disk is the floppy you actually boot from to begin the installation. It contains a compressed kernel image which is used to control the hardware during installation. Therefore, it is very much required (unless you're booting from CD, as is discussed in the section called CD-ROM). The boot disks are located in the bootdisks/ directory in the distribution tree.
There are more Slackware boot disks than you can shake a stick at (which is to say about 16). A complete list of boot disks, with a description of each, is available in the Slackware distribution tree in the file bootdisks/README.TXT. However, most people are able to use the bare.i (for IDE devices) or scsi.s (for SCSI devices) boot disk image.
See Section 3.2.6 for instructions on making a disk from an image.
After booting, you will be prompted to insert the root disk. We recommend that you just humor the boot disk and play along.
3.2.4 Root Disk
The root disks contain the setup program and a filesystem which is used during installation. They are also required. The root disk images are located in the directory rootdisks in the distribution tree. You'll have to make two root disks from the install.1 and install.2 images. Here you can also find the network.dsk, pcmcia.dsk, rescue.dsk, and sbootmgr.dsk disks.
3.2.5 Supplemental Disk
A supplemental disk is needed if you are performing an NFS install or installing to a system with PCMCIA devices. Supplemental disks are in the rootdsks directory in the distribution tree, with the filenames network.dsk and pcmcia.dsk. Recently other supplemental disks such as rescue.dsk and sbootmgr.dsk have been added. The rescue disk is a small floppy root image that runs in a 4MB RAM drive. It includes some basic networking utilities and the vi editor for quick fixes on busted machines. The sbootmgr.dsk disk is used to boot other devices. Boot off this disk if your bootable CD-ROM drive doesn't want to boot the Slackware CDs. It will prompt you for different things to boot and may offer a convenient way to work around a buggy BIOS.
The root disk will instruct you on the use of supplemental disks when it is loaded.
3.2.6 Making the Disks
Once you've selected a boot disk image, you need to put it on a floppy. The process is slightly different depending on which operating system you're using to make the disks. If you're running Linux (or pretty much any Unix-like OS) you'll need to use the dd(1) command. Assuming bare.i is your disk image file and your floppy drive is /dev/fd0, the command to make a bare.i floppy is:
% dd if=bare.i of=/dev/fd0 |
If you're running a Microsoft OS, you'll need to use the RAWRITE.EXE program, which is included in the distribution tree in the same directories as the floppy images. Again assuming that bare.i is your disk image file and your floppy drive is A:, open a DOS prompt and type the following:
C:\ rawrite a: bare.i |
3.3 Partitioning
After booting from your preferred media, you will need to partition your hard disk. The disk partition is where the Linux filesystem will be created and is where Slackware will be installed. At the very minimum we recommend creating two partitions; one for your root filesystem (/) and one for swap space.
After the root disk finishes loading, it will present you with a login prompt. Log in as root (there is no password). At the shell prompt, run either cfdisk(8) or fdisk(8). The cfdisk program provides a more user-friendly interface than the regular fdisk program, but does lack some features. We will briefly explain the fdisk program below.
Begin by running fdisk for your hard disk. In Linux, the hard disks do not have drive letters, but are represented by a file. The first IDE hard disk (primary master) is /dev/hda, the primary slave is /dev/hdb, and so on. SCSI disks follow the same type system, but are in the form of /dev/sdX. You will need to start fdisk and pass it your hard disk:
# fdisk /dev/hda |
Like all good Unix programs, fdisk gives you a prompt (thought you were getting a menu, right?). The first thing you should do is examine your current partitions. We do that by typing p at the fdisk prompt:
Command (m for help): p |
This will display all sorts of information about your current partitions. Most people pick a free drive to install to and then remove any existing partitions on it to create room for the Linux partitions.
 |
IT IS VERY IMPORTANT THAT YOU BACK UP ANY INFORMATION YOU WANT TO SAVE BEFORE DESTROYING THE PARTITION IT LIVES ON. |
There is no easy way to recover from deleting a partition, so always back up before playing with them.
Looking at the table of partition information you should see a partition number, the size of the partition, and its type. There's more information, but don't worry about that for now. We are going to delete all of the partitions on this drive to create the Linux ones. We run the d command to delete those:
Command (m for help): d Partition number (1-4): 1 |
This process should be continued for each of the partitions. After deleting the partitions we are ready to create the Linux ones. We have decided to create one partition for our root filesystem and one for swap. It is worth noting that Unix partitioning schemes are the subject of many flame wars, and that most users will tell you the best way to do it. At a minimum, you should create one partition for / and one for swap. Over time, you'll develop a method that works well for you.
I use two basic partition schemes. The first is for a desktop. I make 4 partitions, /, /home, /usr/local, and swap. This lets me re-install or upgrade the entire installation under / without wiping out my data files under /home or my custom compiled applications under /usr/local. For servers, I often replace the /usr/local partition with a /var partition. Many different servers store information on that partition and having it kept separate from / has certain performance benefits. For now, we're sticking with just two partitions: / and swap.
Now we create the partitions with the n command:
Command (m for help): n Command action e extended p primary partition (1-4) p Partition number (1-4):1 First cylinder (0-1060, default 0):0 Last cylinder or +size or +sizeM or +sizeK (0-1060, default 1060):+64M |
You need to make sure you create primary partitions. The first partition is going to be our swap partition. We tell fdisk to make partition number 1 a primary partition. We start it at cylinder 0 and for the ending cylinder we type +64M. This will give us a 64 megabyte partition for swap. (The size of the swap partition you need actually depends on the amount of RAM you have. It is conventional wisdom that a swap space double the size of your RAM should be created.) Then we define primary partition number 2 starting at the first available cylinder and going all the way to the end of the drive.
Command (m for help):n Command action e extended p primary partition (1-4) p Partition number (1-4):2 First cylinder (124-1060, default 124):124 Last cylinder or +size or +sizeM or +sizeK (124-1060, default 1060):1060 |
We are almost done. We need to change the type of the first partition to type 82 (Linux swap). Type t to change the type, select the first partition, and type 82. Before writing your changes to the disk, you should look at the new partition table one last time. Use the p in fdisk to display the partition table. If everything looks good, type w to write your changes to the disk and quit fdisk.
3.4 The setup Program
Once you have created your partitions, you are ready to install Slackware. The next step in the installation process is running the setup(8) program. To do so, simply type setup at the shell prompt. setup is a menu-driven system for actually installing the Slackware packages and configuring your system.
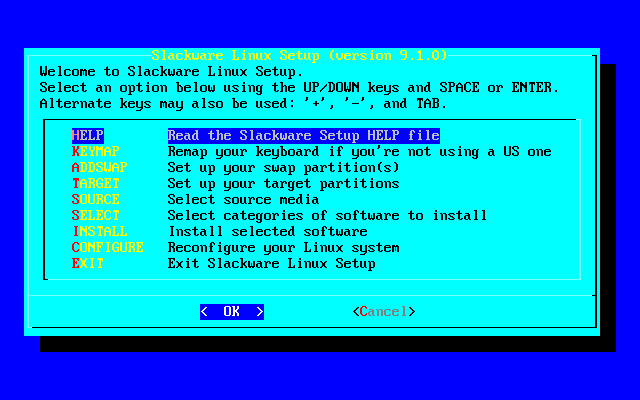
The setup process goes something like this: You step through each option in the setup program, in the order they are listed. (Of course, you are free to do things in almost any order you choose, but chances are it isn't going to work out very well.) Menu items are selected using the up and down arrow keys, and the “Okay” and “Cancel” buttons can be chosen by using the left and right arrow keys. Alternatively, each option has a corresponding key, which is highlighted in the option name. Options which are flaggable (those indicated with a [X]) are toggled using the spacebar.
Of course, all of that is described in the “help” section of setup, but we believe in giving our readers their money's worth.
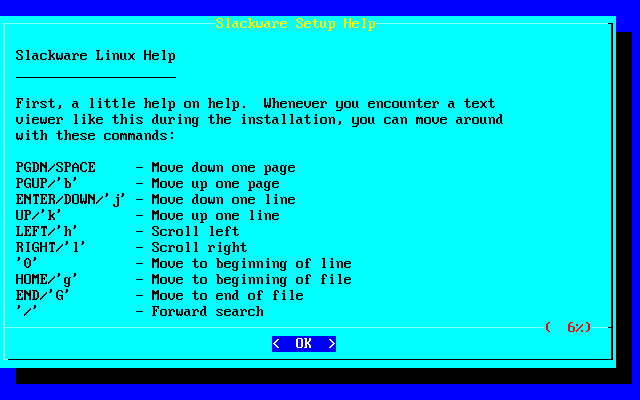
3.4.1 HELP
If this is your first time installing Slackware, you might want to take a look at the help screen. It will give a description of each part of setup (much like the one we're writing now, but less involved) and instructions for navigating the rest of the install.
3.4.2 KEYMAP
If you require a keymap other than the United States “qwerty” layout, you may want to take a look at this section. It offers a number of alternate layouts for your keyboarding enjoyment.

3.4.3 ADDSWAP

If you created a swap partition (back in Section 3.3), this section will allow you to enable it. It will autodetect and display the swap partitions on your hard drive, allowing you to select one to format and enable.
3.4.4 TARGET
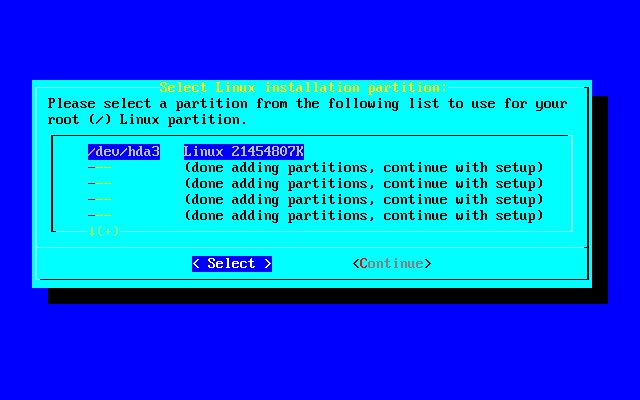
The target section is where your other (non-swap) partitions are formatted and mapped to filesystem mount points. A list of the partitions on your hard disk will be displayed. For each partition, you will be given the option of whether to format that partition or not. Depending on the kernel used, you can choose between reiserfs (the default), ext3, ext2, jfs, and xfs. Most people use either reiserfs or ext3. In the near future we may see support for reiserfs4 slip in.
The first option in the target section is the selection of a partition on which to install your root (/) filesystem. After that, you will be able to map other partitions to filesystems as you choose. (For instance, you may want your third partition, say /dev/hda3, to be your home filesystem. This is just an example; map the partitions as you see fit.)
3.4.5 SOURCE
The source section is where you select the source media from which you are installing Slackware. Currently there are four sources to choose from. These are CD-ROM, NFS, or a premounted directory.
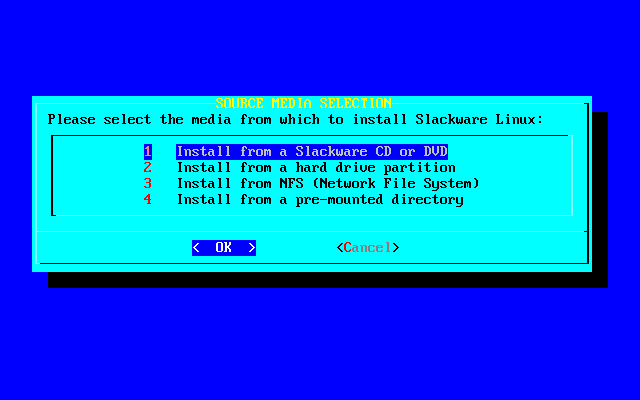
The CD-ROM selection enables a CD-ROM based installation. It will offer the option of scanning for a CD-ROM drive or displaying a list from which you can pick your drive type. Make sure you have the Slackware CD in your drive before allowing it to scan.
The NFS selection prompts for your network information and the network information for your NFS server. The NFS server must be set up in advance. Also note that you cannot use hostnames, you must use the IP addresses for both your machine and the NFS server (there is no name resolver on the setup disk). Naturally you must have used the network.dsk floppy to add support for your network controller.
The premounted directory offers the most flexibility. You can use this method to install from things such as Jaz disks, NFS mounts over PLIP, and FAT filesystems. Mount the filesystem to a location of your choosing before running setup, then specify that location here.
3.4.6 SELECT
The select option allows you to select the software series that you wish to install. These series are described in Section 3.2.1. Please note that you must install the A series to have a working base system. All other series are optional.
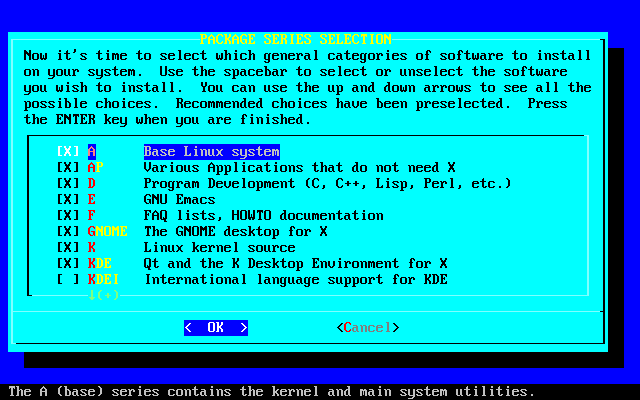
3.4.7 INSTALL
Assuming that you have gone through the “target”, “source”, and “select” options, the install option will allow you to select packages from your chosen software series. If not, it will prompt you to go back and complete the other sections of the setup program. This option allows you to select from six different installation methods: full, newbie, menu, expert, custom, and tag path.
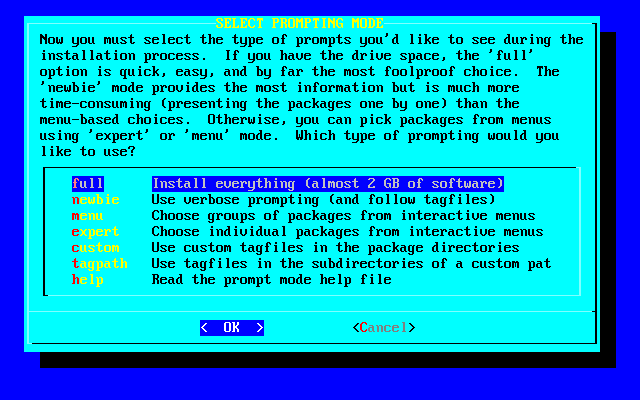
The full option will install every package from all the software series that you chose in the “select” section. There is no further prompting. This is the easiest installation method, since you do not need to make any decisions on the actual packages to install. Of course, this option also takes up the most hard drive space.
The next option is newbie. This option installs all of the required packages in the selected series. For all other packages, it offers a prompt where you can select “Yes”, “No”, or “Skip”. Yes and No do the obvious, while Skip will go ahead to the next software series. Additionally, you will see a description and size requirement for each package to help you decide if you need it. We recommend this option for new users, as it ensures that you get all the required packages installed. However, it is a little slow because of the prompting.
Menu is a faster and more advanced version of the newbie option. For each series, a menu is displayed, from which you can select all the non-required packages you want to install. Required packages are not displayed on this menu.
For the more advanced user, install offers the expert option. This allows you complete control over what packages get installed. You can deselect packages that are absolutely required, resulting in a broken system. On the other hand, you can control exactly what goes onto your system. Simply select the packages from each series that you want installed. This is not recommended for the new user, as it is quite easy to shoot yourself in the foot.
The custom and tag path options are also for advanced users. These options allow you to install based upon custom tag files that you created in the distribution tree. This is useful for installing to large numbers of machines fairly quickly. For more information on using tag files, see Section 18.4.
After selecting your installation method, one of a few things will happen. If you selected full or menu, a menu screen will appear, allowing you to select the packages to be installed. If you selected full, packages will immediately start getting installed to the target. If you selected newbie, packages will be installed until an optional package is reached.
Note that it is possible to run out of space while installing. If you selected too many packages for the amount of free space on the target device, you will have problems. The safest thing to do is to select some software and add more later, if you need it. This can easily be done using Slackware's package management tools. For this information, see Chapter 18.
3.4.8 CONFIGURE
The configure section allows you to do some basic system configuration, now that the packages have been installed. What you see here depends in large part upon which software you have installed. You will, however, always see the following:
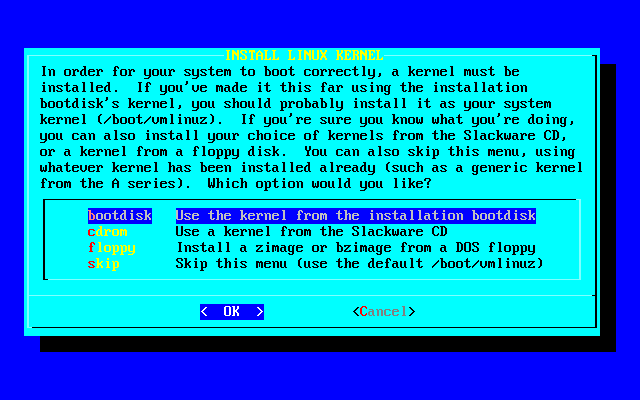
3.4.8.1 Kernel selection
Here you will be asked to select a kernel to install. You can install the kernel from the boot disk you used to install, the Slackware CD-ROM, or from another floppy which you (always thinking ahead) have prepared. Or you can elect to skip, in which case the default kernel will be installed and play will continue to the dealer's left.
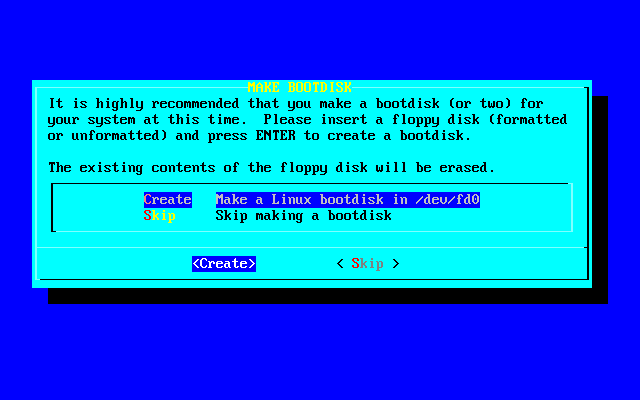
3.4.8.2 Make a boot disk
Making a boot disk for future use is probably a good idea. You will have the option of formatting a floppy and then creating one of two types of boot disk. The first type, simple, simply (go figure) writes a kernel to the floppy. A more flexible (and highly recommended) option is lilo, which will of course create a lilo boot disk. See LILO in Section 7.1 for more information. Of course, you may also choose to simply continue, in which case no boot disk will be made.
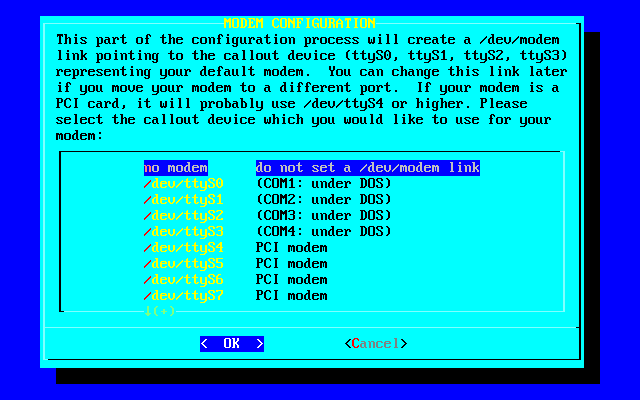
3.4.8.3 Modem
You will be prompted for modem information. More specifically, you will be asked whether you have a modem, and if so, what serial port it is on.
These next configuration subsections may or may not appear, depending on whether or not you installed their corresponding packages.
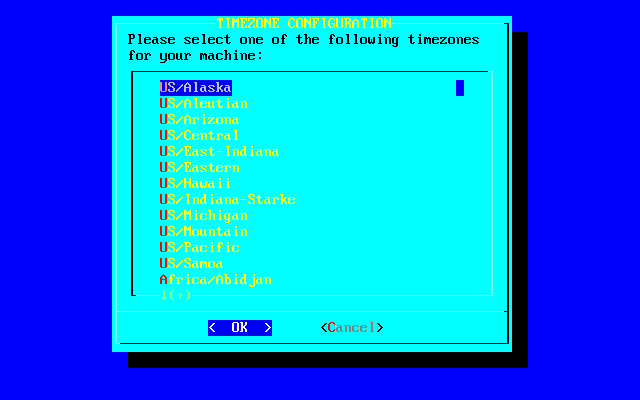
3.4.8.4 Timezone
This one's pretty straightforward: you will be asked what time zone you are in. If you operate on Zulu time, we are very sorry; the (extremely long) list is alphabetically ordered, and you're at the bottom.
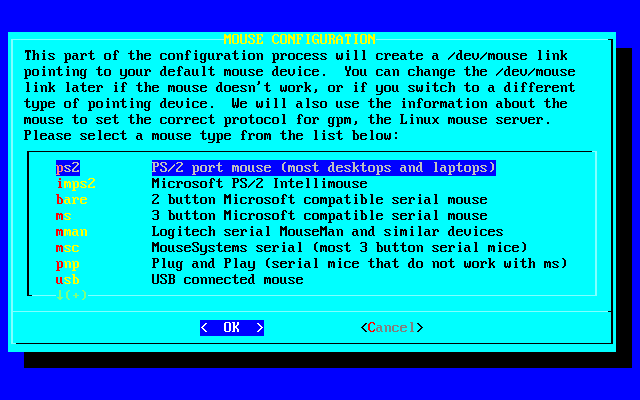
3.4.8.5 Mouse
This subsection simply asks what kind of mouse you have, and whether you want gpm(8) console mouse support enabled on bootup.
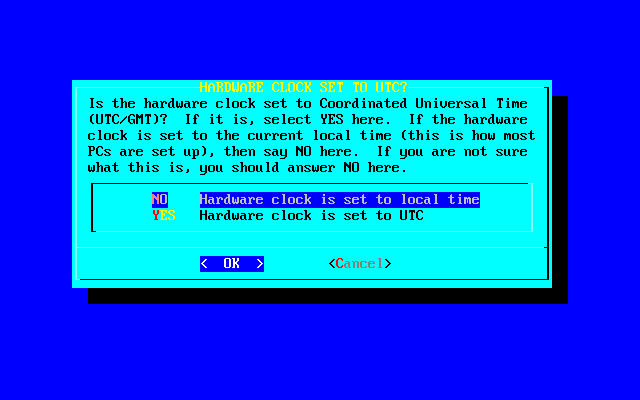
3.4.8.6 Hardware clock
This subsection asks if your computer's hardware clock is set to Coordinated Universal Time (UTC or GMT). Most PCs are not, so you should probably say no.
3.4.8.8 LILO
Here you are prompted for installation of LILO (the LInux LOader; see Section 7.1 for more information).

If Slackware is to be the only operating system on your computer, simple should work just fine for you. If you are dual-booting, the expert option is a better choice. See Section 7.3 for more information on dual-booting. The third option, do not install, is not recommended unless you know what you're doing and have a very good reason for not installing LILO. If you are performing an expert install, you will be given a choice as to where LILO will be put. You may place LILO in the MBR (Master Boot Record) of your hard drive, in the superblock of your root Linux partition, or on a floppy disk.
3.4.8.9 Network
The network configuration subsection is actually netconfig. See Section 5.1 for more information.
3.4.8.10 X Window Manager
This subsection will allow you to choose a default window manager for X. See Chapter 6 for more details on X and window managers.

No matter which packages you installed, the last thing configure will do is ask you whether you want to go ahead and set a root password. For security reasons, this is probably a good idea; however, like almost everything else in Slackware, this is your call.
Chapter 4 System Configuration
Before you can configure the more advanced parts of your system, it's a good idea to learn how the system is organized and what commands can be used to search for files and programs. It's also good to know if you need to compile a custom kernel and what the steps for doing that are. This chapter will familiarize you with system organization and configuration files. Then, you can move on to configuring the more advanced parts of the system.
4.1 System Overview
It's important to understand how a Linux system is put together before diving into the various configuration aspects. A Linux system is significantly different from a DOS, Windows, or Macintosh system (with the exception of the Unix-based Mac OS X), but these sections will help you get acquainted with the layout so that you can easily configure your system to meet your needs.
4.1.1 File System Layout
The first noticeable difference between Slackware Linux and a DOS or Windows system is the filesystem. For starters, we do not use drive letters to denote different partitions. Under Linux, there is one main directory. You can relate this to the C: drive under DOS. Each partition on your system is mounted to a directory on the main directory. It's kind of like an ever-expanding hard disk.
We call the main directory the root directory, and it's denoted with a single slash (/). This concept may seem strange, but it actually makes life easy for you when you want to add more space. For example, let's say you run out of space on the drive that has /home on it. Most people install Slackware and make one big root drive. Well, since a partition can be mounted to any directory, you can simply go to the store and pick up a new hard drive and mount it to /home. You've now grafted on some more space to your system. And all without having to move many things around.
Below, you will find descriptions of the major top level directories under Slackware.
- bin
-
Essential user programs are stored here. These represent the bare minimum set of programs required for a user to use the system. Things like the shell and the filesystem commands (ls, cp, and so on) are stored here. The /bin directory usually doesn't receive modification after installation. If it does, it's usually in the form of package upgrades that we provide.
- boot
-
Files that are used by the Linux Loader (LILO). This directory also receives little modification after an installation. The kernel is stored here as of Slackware 8.1. In earlier releases of Slackware, the kernel was simply stored under / , but common practice is to put the kernel and related files here to facilitate dual-booting.
- dev
-
Everything in Linux is treated as a file, even hardware devices like serial ports, hard disks, and scanners. In order to access these devices, a special file called a device node has to be present. All device nodes are stored in the /dev directory. You will find this to be true across many Unix-like operating systems.
- etc
-
This directory holds system configuration files. Everything from the X Window configuration file, the user database, to the system startup scripts. The system administrator will become quite familiar with this directory over time.
- home
-
Linux is a multiuser operating system. Each user on the system is given an account and a unique directory for personal files. This directory is called the user's home directory. The /home directory is provided as the default location for user home directories.
- lib
-
System libraries that are required for basic operation are stored here. The C library, the dynamic loader, the ncurses library, and kernel modules are among the things stored here.
- mnt
-
This directory contains temporary mount points for working on hard disks or removable drives. Here you'll find mount points for your CD-ROM and floppy drives.
- opt
-
Optional software packages. The idea behind /opt is that each software package installs to /opt/software-package, which makes it easy to remove later. Slackware distributes some things in /opt (such as KDE in /opt/kde), but you are free to add anything you want to /opt.
- proc
-
This is a unique directory. It's not really part of the filesystem, but a virtual filesystem that provides access to kernel information. Various pieces of information that the kernel wants you to know are conveyed to you through files in the /proc directory. You can also send information to the kernel through some of these files. Try doing cat /proc/cpuinfo.
- root
-
The system administrator is known as root on the system. root's home directory is kept in /root instead of /home/root. The reason is simple. What if /home was a different partition from / and it could not be mounted? root would naturally want to log in and repair the problem. If his home directory was on the damaged filesystem, it would make it difficult for him to log in.
- sbin
-
Essential programs that are run by root and during the system bootup process are kept here. Normal users will not run programs in this directory.
- tmp
-
The temporary storage location. All users have read and write access to this directory.
- usr
-
This is the big directory on a Linux system. Everything else pretty much goes here, programs, documentation, the kernel source code, and the X Window system. This is the directory to which you will most likely be installing programs.
- var
-
System log files, cache data, and program lock files are stored here. This is the directory for frequently-changing data.
You should now have a good feel for which directories contain what on the filesystem. More detailed information about the filesystem layout is available in the hier(7) man page. The next section will help you find specific files easily, so you don't have to do it by hand.
4.1.2 Finding Files
You now know what each major directory holds, but it still doesn't really help you find things. I mean, you could go looking through directories, but there are quicker ways. There are four main file search commands available in Slackware.
4.1.2.1 which
The first is the which(1) command. which is usually used to locate a program quickly. It just searches your PATH and returns the first instance it finds and the directory path to it. Take this example:
% which bash /bin/bash |
From that you see that bash is in the /bin directory. This is a very limited command for searching, since it only searches your PATH.
4.1.2.2 whereis
The whereis(1) command works similar to which, but can also search for man pages and source files. A whereis search for bash should return this:
% whereis bash bash: /bin/bash /usr/bin/bash /usr/man/man1/bash.1.gz |
This command not only told us where the actual program is located, but also where the online documentation is stored. Still, this command is limited. What if you wanted to search for a specific configuration file? You can't use which or whereis for that.
4.1.2.3 find
The find(1) command allows the user to search the filesystem with a rich collection of search predicates. Users may specify a search with filename wildcards, ranges of modification or creation times, or other advanced properties. For example, to search for the default xinitrc file on the system, the following command could be used.
% find / -name xinitrc /var/X11R6/lib/xinit/xinitrc |
find will take a while to run, since it has to traverse the entire root directory tree. And if this command is run as a normal user, there will be permission denied error messages for directories that only root can see. But find found our file, so that's good. If only it could be a bit faster...
4.1.2.4 slocate
The slocate(1) command searches the entire filesystem, just like the find command can do, but it searches a database instead of the actual filesystem. The database is set to automatically update every morning, so you have a somewhat fresh listing of files on your system. You can manually run updatedb(1) to update the slocate database (before running updatedb by hand, you must first su to the root user). Here's an example of slocate in action:
% slocate xinitrc # we don't have to go to the root /var/X11R6/lib/xinit/xinitrc /var/X11R6/lib/xinit/xinitrc.fvwm2 /var/X11R6/lib/xinit/xinitrc.openwin /var/X11R6/lib/xinit/xinitrc.twm |
We got more than what we were looking for, and quickly too. With these commands, you should be able to find whatever you're looking for on your Linux system.
4.1.3 The /etc/rc.d Directory
The system initialization files are stored in the /etc/rc.d directory. Slackware uses the BSD-style layout for its initialization files as opposed to System V init scripts, which tend to make configuration changes much more difficult without using a program specifically designed for that purpose. In BSD-init scripts, each runlevel is given a single rc file. In System V, each runlevel is given its own directory, each containing numerous init scripts. This provides an organized structure that is easy to maintain.
There are several categories of initialization files. These are system startup, runlevels, network initialization, and System V compatibility. As per tradition, we'll lump everything else into another category.
4.1.3.1 System Startup
The first program to run under Slackware besides the Linux kernel is init(8). This program reads the /etc/inittab(5) file to see how to run the system. It runs the /etc/rc.d/rc.S script to prepare the system before going into your desired runlevel. The rc.S file enables your virtual memory, mounts your filesystems, cleans up certain log directories, initializes Plug and Play devices, loads kernel modules, configures PCMCIA devices, sets up serial ports, and runs System V init scripts (if found). Obviously rc.S has a lot on its plate, but here are some scripts in /etc/rc.d that rc.S will call on to complete its work:
- rc.S
-
This is the actual system initialization script.
- rc.modules
-
Loads kernel modules. Things like your network card, PPP support, and other things are loaded here. If this script finds rc.netdevice, it will run that as well.
- rc.pcmcia
-
Probes for and configures any PCMCIA devices that you might have on your system. This is most useful for laptop users, who probably have a PCMCIA modem or network card.
- rc.serial
-
Configures your serial ports by running the appropriate setserial commands.
- rc.sysvinit
-
Looks for System V init scripts for the desired runlevel and runs them. This is discussed in more detail below.
4.1.3.2 Runlevel Initialization Scripts
After system initialization is complete, init moves on to runlevel initialization. A runlevel describes the state that your machine will be running in. Sound redundant? Well, the runlevel tells init if you will be accepting multiuser logins or just a single user, whether or not you want network services, and if you will be using the X Window System or agetty(8) to handle logins. The files below define the different runlevels in Slackware Linux.
- rc.0
-
Halt the system (runlevel 0). By default, this is symlinked to rc.6.
- rc.4
-
Multiuser startup (runlevel 4), but in X11 with KDM, GDM, or XDM as the login manager.
- rc.6
-
Reboot the system (runlevel 6).
- rc.K
-
Startup in single user mode (runlevel 1).
- rc.M
-
Multiuser mode (runlevels 2 and 3), but with the standard text-based login. This is the default runlevel in Slackware.
4.1.3.3 Network Initialization
Runlevels 2, 3, and 4 will start up the network services. The following files are responsible for the network initialization:
- rc.inet1
-
Created by netconfig, this file is responsible for configuring the actual network interface.
- rc.inet2
-
Runs after rc.inet1 and starts up basic network services.
- rc.atalk
-
Starts up AppleTalk services.
- rc.httpd
-
Starts up the Apache web server. Like a few other rc scripts, this one can also be used to stop and restart a service. rc.httpd takes arguments of stop, start, or restart.
- rc.news
-
Starts up the news server.
4.1.3.4 System V Compatibility
System V init compatibility was introduced in Slackware 7.0. Many other Linux distributions make use of this style instead of the BSD style. Basically each runlevel is given a subdirectory for init scripts, whereas BSD style gives one init script to each runlevel.
The rc.sysvinit script will search for any System V init scripts you have in /etc/rc.d and run them, if the runlevel is appropriate. This is useful for certain commercial software packages that install System V init scripts
4.1.3.5 Other Files
The scripts described below are the other system initialization scripts. They are typically run from one of the major scripts above, so all you need to do is edit the contents.
- rc.gpm
-
Starts up general purpose mouse services. Allows you to copy and paste at the Linux console. Occasionally, gpm will cause problems with the mouse when it is used under X windows. If you experience problems with the mouse under X, try taking away the executable permission from this file and stopping the gpm server.
- rc.font
-
Loads the custom screen font for the console.
- rc.local
-
Contains any specific startup commands for your system. This is empty after a fresh install, as it is reserved for local administrators. This script is run after all other initialization has taken place.
To enable a script, all you need to do is add the execute permissions to it with the chmod command. To disable a script, remove the execute permissions from it. For more information about chmod, see Section 9.2.
4.2 Selecting a Kernel
The kernel is the part of the operating system that provides hardware access, process control, and overall system control. The kernel contains support for your hardware devices, so picking one for your system is an important setup step.
Slackware provides more than a dozen precompiled kernels that you can pick from, each with a standard set of drivers and additional specific drivers. You can run one of the precompiled kernels or you can build your own kernel from source. Either way, you need to make sure that your kernel has the hardware support your system needs.
4.2.1 The /kernels Directory on the Slackware CD-ROM
The precompiled Slackware kernels are available in the /kernels directory on the Slackware CD-ROM or on the FTP site in the main Slackware directory. The available kernels change as new releases are made, so the documentation in that directory is always the authoritative source. The /kernels directory has subdirectories for each kernel available. The subdirectories have the same name as their accompanying boot disk. In each subdirectory you will find the following files:
| File | Purpose |
|---|---|
| System.map | The system map file for this kernel |
| bzImage | The actual kernel image |
| config | The source configuration file for this kernel |
To use a kernel, copy the System.map and config files to your /boot directory and copy the kernel image to /boot/vmlinuz. Run /sbin/lilo(8) to install LILO for the new kernel, and then reboot your system. That's all there is to installing a new kernel.
The kernels that end with a .i are IDE kernels. That is, they include no SCSI support in the base kernel. The kernels that end with .s are SCSI kernels. They include all the IDE support in .i kernels, plus SCSI support.
4.2.2 Compiling a Kernel from Source
The question “Should I compile a kernel for my system?” is often asked by new users. The answer is a definite maybe. There are few instances where you will need to compile a kernel specific to your system. Most users can use a precompiled kernel and the loadable kernel modules to achieve a fully working system. You will want to compile a kernel for your system if you are upgrading kernel versions to one that we do not currently offer in Slackware, or if you have patched the kernel source to get special device support that is not in the native kernel source. Anyone with an SMP system will definitely want to compile a kernel with SMP support. Also, many users find a custom compiled kernel runs much faster on their machine. You may find it useful to compile the kernel with optimizations for the specific processor in your machine.
Building your own kernel is not that hard. The first step is to make sure you have the kernel source installed on your system. Make sure that you installed the packages from the K series during the installation. You will also want to make sure you have the D series installed, specifically the C compiler, GNU make, and GNU binutils. In general, it's a good idea to have the entire D series installed if you plan on doing any kind of development. You can also download the latest kernel source from http://www.kernel.org/mirrors.
4.2.2.1 Linux Kernel version 2.4.x Compilation
% su - Password: # cd /usr/src/linux |
The first step is to bring the kernel source into its base state. We issue this command to do that (note, you may wish to back-up the .config file as this command will delete it without warning):
# make mrproper |
Now you can configure the kernel for your system. The current kernel offers three ways of doing this. The first is the original text-based question and answer system. It asks a bunch of questions and then builds a configuration file. The problem with this method is that if you mess up, you must start over. The method that most people prefer is the menu driven one. Lastly, there is an X-based kernel configuration tool. Pick the one you want and issue the appropriate command:
# make config (text-based Q&A version) # make menuconfig (menu driven, text-based version) # make xconfig (X-based version, make sure you are in X first) |
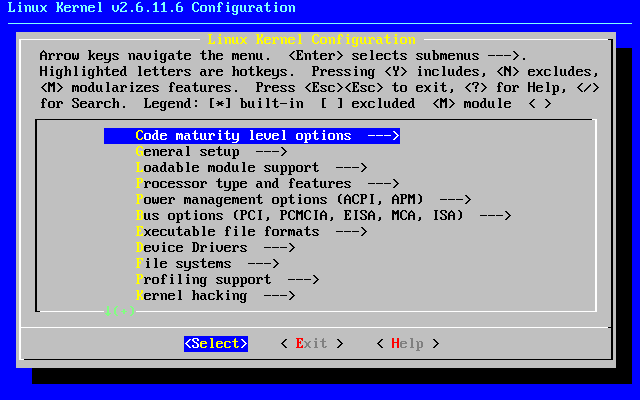
New users will probably find menuconfig to be the easiest to use. Help screens are provided that explain the various parts of the kernel. After configuring your kernel, exit the configuration program. It will write the necessary configuration files. Now we can prepare the source tree for a build:
# make dep # make clean |
The next step is to compile the kernel. First try issuing the bzImage command below.
# make bzImage |
This may take a while, depending on your CPU speed. During the build process, you will see the compiler messages. After building the kernel image, you will want to build any parts of the kernel that you flagged as modular.
# make modules |
We can now install the kernel and modules that you compiled. To install the kernel on a Slackware system, these commands should be issued:
# mv /boot/vmlinuz /boot/vmlinuz.old # cat arch/i386/boot/bzImage > /vmlinuz # mv /boot/System.map /boot/System.map.old # cp System.map /boot/System.map # make modules_install |
You will want to edit /etc/lilo.conf and add a section to boot your old kernel in case your new one does not work. After doing that, run /sbin/lilo to install the new boot block. You can now reboot with your new kernel.
4.2.2.2 Linux Kernel Version 2.6.x
The compilation of a 2.6 kernel is only slightly different from a 2.4 or a 2.2 kernel, but it is important that you understand the differences before delving in. It's no longer necessary to run make dep and make clean. Also, the kernel compilation process is not as verbose in the 2.6 kernel series. This results in a build process that is easier to understand, but has some short comings as well. If you have trouble building the kernel, it's highly recommended that you turn verbosity back up. You do this simply by appending V=1 to the build. This allows you to log more information that could help a kernel developer or other friendly geek aid you in resolving the issue.
# make bzImage V=1 |
4.2.3 Using Kernel Modules
Kernel modules are another name for device drivers that can be inserted into a running kernel. They allow you to extend the hardware supported by your kernel without needing to pick another kernel or compile one yourself.
Modules can also be loaded and unloaded at any time, even when the system is running. This makes upgrading specific drivers easy for system administrators. A new module can be compiled, the old one removed, and the new one loaded, all without rebooting the machine.
Modules are stored in the /lib/modules/kernel version directory on your system. They can be loaded at boot time through the rc.modules file. This file is very well commented and offers examples for major hardware components. To see a list of modules that are currently active, use the lsmod(1) command:
# lsmod Module Size Used by parport_pc 7220 0 parport 7844 0 [parport_pc] |
You can see here that I only have the parallel port module loaded. To remove a module, you use the rmmod(1) command. Modules can be loaded by the modprobe(1) or insmod(1) command. modprobe is usually safer because it will load any modules that the one you're trying to load depends on.
A lot of users never have to load or unload modules by hand. They use the kernel autoloader for module management. By default, Slackware includes kmod in its kernels. kmod is a kernel option that enables the kernel to automatically load modules as they are requested. For more information on kmod and how it is configured, see /usr/src/linux/Documentation/kmod.txt. You'll have needed to have the kernel source package, or downloaded kernel source from http://kernel.org.
More information can be found in the man pages for each of these commands, plus the rc.modules file.
Chapter 5 Network Configuration
5.1 Introduction: netconfig is your friend.
When you initially installed Slackware, the setup program invoked the netconfig program. netconfig attempted to perform the following functions for you:
-
It asked you for the name of your computer, and the domain name for your computer.
-
It gave a brief explanation of the various types of addressing schemes, told when they should be used, and asked you which IP addressing scheme you wished to use to configure your network card:
-
Static-IP
-
DHCP
-
Loopback
-
-
It then offered to probe for a network card to configure.
netconfig will generally take care of about 80% of the work of configuring your LAN network connection if you will let it. Note that I would strongly suggest that you review your config file for a couple of reasons:
-
You should never trust a setup program to properly configure your computer. If you use a setup program, you should review the configuration yourself.
-
If you are still learning Slackware and Linux system management, viewing a working configuration can be helpful. You'll at least know what the configuration should look like. This will allow you to correct problems due to misconfiguration of the system at a later date.
5.2 Network Hardware Configuration
Having decided that you wish to bring your Slackware machine on to some form of network, the first thing you'll need is a Linux-compatible network card. You will need to take a little care to ensure that the card is truly Linux-compatible (please refer to the Linux Documentation Project and/or the kernel documentation for information on the current status of your proposed network card). As a general rule, you will most likely be pleasantly surprised by the number of networking cards that are supported under the more modern kernels. Having said that, I'd still suggest referring to any of the various Linux hardware compatibility lists (such as The GNU/Linux Beginners Group Hardware Compatibility Links and The Linux Documentation Project Hardware HOWTO) that are available on the Internet before purchasing your card. A little extra time spent in research can save days or even weeks trying to troubleshoot a card that isn't compatible with Linux at all.
When you visit the Linux Hardware Compatibility lists available on the Internet, or when you refer to the kernel documentation installed on your machine, it would be wise to note which kernel module you'll need to use to support your network card.
5.2.1 Loading Network Modules
Kernel modules that are to be loaded on boot-up are loaded from the rc.modules file in /etc/rc.d or by the kernel's auto module loading started by /etc/rc.d/rc.hotplug. The default rc.modules file includes a Network device support section. If you open rc.modules and look for that section, you'll notice that it first checks for an executable rc.netdevice file in /etc/rc.d/. This script is created if setup successfully autoprobes your network device during installation.
Below that “if” block is a list of network devices and modprobe lines, each commented out. Find your device and uncomment the corresponding modprobe line, then save the file. Running rc.modules as root should now load your network device driver (as well as any other modules that are listed and uncommented). Note that some modules (such as the ne2000 driver) require parameters; make sure you select the correct line.
5.2.2 LAN (10/100/1000Base-T and Base-2) cards
This heading encompasses all of the internal PCI and ISA networking cards. Drivers for these cards are provided via loadable kernel modules as covered in the previous paragraph. /sbin/netconfig should have probed for your card and successfully set up your rc.netdevice file. If this did not occur, the most likely problem would be that the module that you're attempting to load for a given card is incorrect (it is not unheard of for different generations of the same brand of card from the same manufacturer to require different modules). If you are certain that the module that you're attempting to load is the correct one, your next best bet would be to refer to the documentation for the module in an attempt to discover whether or not specific parameters are required during when the module is initialized.
5.2.3 Modems
Like LAN cards, modems can come with various bus support options. Until recently, most modems were 8 or 16 bit ISA cards. With the efforts of Intel and motherboard manufacturers everywhere to finally kill off the ISA bus completely, it is common now to find that most modems are either external modems that connect to a serial or USB port or are internal PCI modems. If you wish for your modem to work with Linux, it is VITALLY important to research your prospective modem purchase, particularly if you are considering purchasing a PCI modem. Many, if not most, PCI modems available on store shelves these days are WinModems. WinModems lack some basic hardware on the modem card itself: the functions performed by this hardware are typically offloaded onto the CPU by the modem driver and the Windows operating system. This means that they do not have the standard serial interface that PPPD will be expecting to see when you try to dial out to your Internet Service Provider.
If you want to be absolutely sure that the modem you're purchasing will work with Linux, purchase an external hardware modem that connects to the serial port on your PC. These are guaranteed to work better and be less trouble to install and maintain, though they require external power and tend to cost more.
There are several web sites that provide drivers and assistance for configuring WinModem based devices. Some users have reported success configuring and installing drivers for the various winmodems, including Lucent, Conexant, and Rockwell chipsets. As the required software for these devices is not an included part of Slackware, and varies from driver to driver, we will not go into detail on them.
5.2.4 PCMCIA
As part of your Slackware install, you are given the opportunity to install the pcmcia package (in the “A” series of packages). This package contains the applications and setup files required to work with PCMCIA cards under Slackware. It is important to note that the pcmcia package only installs the generic software required to work with PCMCIA cards under Slackware. It does NOT install any drivers or modules. The available modules and drivers will be in the /lib/modules/`uname -r`/pcmcia directory. You may need to do some experimentation to find a module that will work with your network card.
You will need to edit /etc/pcmcia/network.opts (for an Ethernet card) or /etc/pcmcia/wireless.opts (if you have a wireless networking card). Like most Slackware configuration files, these two files are very well commented and it should be easy to determine which modifications need to be made.
5.3 TCP/IP Configuration
At this point, your network card should be physically installed in your computer, and the relevant kernel modules should be loaded. You will not yet be able to communicate over your network card, but information about the network device can be obtained with ifconfig -a.
# ifconfig -a eth0 Link encap:Ethernet HWaddr 00:A0:CC:3C:60:A4 UP BROADCAST NOTRAILERS RUNNING MULTICAST MTU:1500 Metric:1 RX packets:110081 errors:1 dropped:0 overruns:0 frame:0 TX packets:84931 errors:0 dropped:0 overruns:0 carrier:0 collisions:0 txqueuelen:100 RX bytes:114824506 (109.5 Mb) TX bytes:9337924 (8.9 Mb) Interrupt:5 Base address:0x8400 lo Link encap:Local Loopback inet addr:127.0.0.1 Mask:255.0.0.0 UP LOOPBACK RUNNING MTU:16436 Metric:1 RX packets:2234 errors:0 dropped:0 overruns:0 frame:0 TX packets:2234 errors:0 dropped:0 overruns:0 carrier:0 collisions:0 txqueuelen:0 RX bytes:168758 (164.8 Kb) TX bytes:168758 (164.8 Kb) |
If you just typed /sbin/ifconfig without the -a suffix, you would not see the eth0 interface, as your network card does not yet have a valid IP address or route.
While there are many different ways to setup and subnet a network, all of them can be broken down into two types: Static and Dynamic. Static networks are setup such that each node (geek lingo for thing with an IP address) always has the same IP address. Dynamic networks are setup in such a way that the IP addresses for the nodes are controlled by a single server called the DHCP server.
5.3.1 DHCP
DHCP (or Dynamic Host Configuration Protocol), is a means by which an IP address may be assigned to a computer on boot. When the DHCP client boots, it puts out a request on the Local Area Network for a DHCP server to assign it an IP address. The DHCP server has a pool (or scope) of IP addresses available. The server will respond to this request with an IP address from the pool, along with a lease time. Once the lease time for a given IP address lease has expired, the client must contact the server again and repeat the negotiation.
The client will then accept the IP address from the server and will configure the requested interface with the IP address. There is one more handy trick that DHCP clients use for negotiating the IP address that they will be assigned, however. The client will remember it's last assigned IP address, and will request that the server re-assign that IP address to the client again upon next negotiation. If possible, the server will do so, but if not, a new address is assigned. So, the negotiation resembles the following:
Client: Is there a DHCP server available on the LAN?
Server: Yes, there is. Here I am.
Client: I need an IP address.
Server: You may take 192.168.10.10 for 19200 seconds.
Client: Thank you.
Client: Is there a DHCP server available on the LAN?
Server:Yes, there is. Here I am.
Client:I need an IP address. The last time we
talked, I had 192.168.10.10;
May I have it again?
Server:Yes, you may (or No, you may not: take 192.168.10.12 instead).
Client: Thank you.
The DHCP client in Linux is /sbin/dhcpcd. If you load /etc/rc.d/rc.inet1 in your favorite text editor, you will notice that /sbin/dhcpcd is called about midway through the script. This will force the conversation shown above. dhcpcd will also track the amount of time left on the lease for the current IP address, and will automatically contact the DHCP server with a request to renew the lease when necessary. DHCP can also control related information, such as what ntp server to use, what route to take, etc.
Setting up DHCP on Slackware is simple. Just run netconfig and select DHCP when offered. If you have more than one NIC and do not wish eth0 to be configured by DHCP, just edit the /etc/rc.d/rc.inet1.conf file and change the related variable for your NIC to “YES”.
5.3.2 Static IP
Static IP addresses are fixed addresses that only change if manually told to. These are used in any case where an administrator doesn't want the IP information to change, such for internal servers on a LAN, any server connected to the Internet, and networked routers. With static IP addressing, you assign an address and leave it at that. Other machines know that you are always at that certain IP address and can contact you at that address always.
5.3.3 /etc/rc.d/rc.inet1.conf
If you plan on assigning an IP address to your new Slackware box, you may do so either through the netconfig script, or you may edit /etc/rc.d/rc.inet1.conf. In /etc/rc.d/rc.inet1.conf , you will notice:
    # Primary network interface card (eth0)
    IPADDR[0]=""
    NETMASK[0]=""
    USE_DHCP[0]=""
    DHCP_HOSTNAME[0]=""
|
Then further at the bottom:
GATEWAY=""
|
In this case, our task is merely to place the correct information between the double-quotes. These variables are called by /etc/rc.d/rc.inet1 at boot time to setup the nics. For each NIC, just enter the correct IP information, or put “YES” for USE_DHCP. Slackware will startup the interfaces with the information placed here in the order they are found.
The DEFAULT_GW variable sets up the default route for Slackware. All communications between your computer and other computers on the Internet must pass through that gateway if no other route is specified for them. If you are using DHCP, you will usually not need to enter anything here, as the DHCP server will specify what gateway to use.
5.3.4 /etc/resolv.conf
Ok, so you've got an IP address, you've got a default gateway, you may even have ten million dollars (give us some), but what good is that if you can't resolve names to IP addresses? No one wants to type in 72.9.234.112 into their web browser to reach www.slackbook.org. After all, who other than the authors would memorize that IP address? We need to setup DNS, but how? That's where /etc/resolv.conf comes into play.
Chances are you already have the proper options in /etc/resolv.conf. If you setup your network connection using DHCP, the DHCP server should handle updating this file for you. (Technically the DHCP server just tells dhcpcd what to put here, and it obeys.) If you need to manually update your DNS server list though, you'll need to hand edit /etc/resolv.conf. Below is an example:
# cat /etc/resolv.conf nameserver 192.168.1.254 search lizella.net |
The first line is simple. The nameserver directive tells us what DNS servers to query. By necessity these are always IP addresses. You may have as many listed there as you like. Slackware will happily check one after the other until one returns a match.
The second line is a little more interesting. The search directive gives us a list of domain names to assume whenever a DNS request is made. This allows you to contact a machine by only the first part of its FQDN (Fully Qualified Domain Name). For example, if “slackware.com” were in your search path, you could reach http://store.slackware.com by just pointing your web browser at http://store.
# ping -c 1 store PING store.slackware.com (69.50.233.153): 56 data bytes 64 bytes from 69.50.233.153 : icmp_seq=0 ttl=64 time=0.251 ms 1 packets transmitted, 1 packets received, 0% packet loss round-trip min/avg/max = 0.251/0.251/0.251 ms |
5.3.5 /etc/hosts
Now that we've got DNS working fine, what if we want to bypass our DNS server, or add a DNS entry for a machine that isn't in DNS? Slackware includes the oft-loved /etc/hosts file which contains a local list of DNS names and IP addresses they should match to.
# cat /etc/hosts 127.0.0.1 localhost locahost.localdomain 192.168.1.101 redtail 172.14.66.32 foobar.slackware.com |
Here you can see that localhost has an IP address of 127.0.0.1 (always reserved for localhost), redtail can be reached at 192.168.1.101, and foobar.slackware.com is 172.14.66.32.
5.4 PPP
Many people still connect to the Internet through some kind of dialup connection. The most common method is PPP, though SLIP is still occasionally used. Setting up your system to speak PPP to a remote server is pretty easy. We've included a few tools to help you in setting it up.
5.4.1 pppsetup
Slackware includes a program called pppsetup to configure your system to use your dialup account. It shares a look and feel similar to our netconfig program. To run the program, make sure you are logged in as root. Then type pppsetup to run it. You should see a screen like this:
The program will present a series of questions, to which you will feed it appropriate answers. Things like your modem device, the modem initialization string, and the ISP phone number. Some items will have a default, which you can accept in most cases.
After the program runs, it will create a ppp-go program and a ppp-off program. These are used to start and stop, respectively, the PPP connection. The two programs are located in /usr/sbin and need root privileges to run.
5.4.2 /etc/ppp
For most users, running pppsetup will be sufficient. However, there may be an instance where you want to tweak some of the values used by the PPP daemon. All of the configuration information is kept in /etc/ppp. Here is a list of what the different files are for:
| ip-down |
This script is run by pppd after the PPP connection is ended. |
| ip-up |
This script is run by pppd when there's a successful ppp connection. Put any commands you want run after a successful connection in this file. |
| options |
General configuration options for pppd. |
| options.demand |
General configuration options for pppd when run in demand dialing mode. |
| pppscript |
The commands sent to the modem. |
| pppsetup.txt |
A log of what you entered when you ran pppsetup. |
 |
Most of these files won't be there until after you run pppsetup. |
5.5 Wireless
Wireless networking is still a relatively new thing in the world of computers, yet is quickly catching on as more people begin to purchase laptops and want networking on the go, without having to fool with some old twisted pair cable. This trend doesn't appear to be slowing down. Unfortunately, wireless networking isn't yet as strongly supported in Linux as traditional wired networking.
There are three basic steps to configuring an 802.11 wireless Ethernet card:
-
Hardware support for the wireless card
-
Configure the card to connect to a wireless access point
-
Configure the network
5.5.1 Hardware Support
Hardware support for a wireless card is provided through the kernel, either with a module or built in to the kernel. Generally, most newer Ethernet cards are provided through kernel modules, so you'll want to determine the appropriate kernel module and load it through /etc/rc.d/rc.modules. netconfig may not detect your wireless card, so you'll probably need to determine the card yourself. See http://www.hpl.hp.com/personal/Jean_Tourrilhes/Linux/ for more information on kernel drivers for various wireless cards.
5.5.2 Configure the Wireless Settings
The vast majority of this work is done by iwconfig, so as always read the man page for iwconfig if you need more information.
First, you'll want to configure your wireless access point. Wireless access points vary quite a bit in their terminology, and how to configure them, so you may need to adjust a bit to accommodate your hardware. In general, you'll need at least the following information:
-
The domain ID, or name of the network (called the ESSID by iwconfig)
-
The channel the WAP uses
-
The encryption settings, including any keys used (preferably in hexadecimal)
|
A NOTE ABOUT WEP. WEP is quit flawed, but it's much better than nothing. If you wish a greater degree of security on your wireless network, you should investigate VPNs or IPSec, both of which are beyond the scope of this document. You might also configure your WAP not to advertise its domain ID/ ESSID. A thorough discussion of wireless policy is beyond the scope of this section, but a quick Google search will turn up more than you ever wanted to know. |
Once you've gathered the above information, and assuming you've used modprobe to load the appropriate kernel driver, you can edit rc.wireless.conf and add your settings. The rc.wireless.conf file is a bit untidy. The least effort is to modify the generic section with your ESSID and KEY, and CHANNEL if required by your card. (Try not setting CHANNEL, and if it works, great; if not, set the CHANNEL as appropriate.) If you're daring, you can modify the file so that only the necessary variables are set. The variable names in rc.wireless.conf correspond to the iwconfig parameters, and are read by rc.wireless and used in the appropriate iwconfig commands.
If you have your key in hexadecimal, that's ideal, since you can be fairly confident that your WAP and iwconfig will agree on the key. If you only have a string, you can't be sure how your WAP will translate that into a hexadecimal key, so some guesswork may be needed (or get your WAP's key in hex).
Once you've modified rc.wireless.conf, run rc.wireless as root, then run rc.inet1, again as root. You can test your wireless networking with standard testing tools such as ping, along with iwconfig. If you have a wired interface you may wish to use ifconfig to turn those interfaces off while you test your wireless networking to ensure there's no interference. You may also want to test your changes through a reboot.
Now that you've seen how to edit /etc/rc.d/rc.wireless for you default network, let's take a closer look at iwconfig and see how it all works. This will teach you the quick and dirty way of setting up wifi for those times when you find yourself at an Internet cafe, coffee shop, or any other wifi hot spot and wish to get online.
The first step is to tell your wireless NIC what network to join. Make sure you replace “eth0” with whatever network interface your wireless card uses and change “mynetwork” to the essid you wish to use. Yes, we know you're smarter than that. Next you'll have to specify the encryption key (if any) used on your wireless network. Finally specify the channel to use (if needed).
# iwconfig eth0 essid "mynetwork" # iwconfig eth0 key XXXXXXXXXXXXXXXXXXXXXXXXXXX # iwconfig eth0 channel n |
That should be all on the wireless end of things.
5.5.3 Configure the Network
This is done in the exact same way as wired networks. Simply refer to earlier sections of this chapter.
5.6 Network File Systems
At this point, you should have a working TCP/IP connection to your network. You should be able to ping other computers on your internal network and, if you have configured an appropriate gateway, you should also be able to ping computers on the Internet itself. As we know, the whole point in bringing a computer onto a network is to access information. While some people might bring a computer up on a network just for the fun of it, most people wish to be able to share files and printers. They wish to be able to access documents on the Internet or play an online game. Having TCP/IP installed and functional on your new Slackware system is a means to that end, but with just TCP/IP installed, functionality will be very rudimentary. To share files, we will have to transfer them back and forth using either FTP or SCP. We cannot browse files on our new Slackware computer from the Network Neighborhood or My Network Places icons on Windows computers. We'd like to be able to access files on other Unix machines seamlessly.
Ideally, we'd like to be able to use a network file system to allow us transparent access to our files on other computers. The programs that we use to interact with information stored on our computers really do not need to know on what computer a given file is stored; they just need to know that it exists and how to get to it. It is then the responsibility of the operating system to manage access to that file through the available file systems and network file systems. The two most commonly used network file systems are SMB (as implemented by Samba) and NFS.
5.6.1 SMB/Samba/CIFS
SMB (for Server Message Block) is a descendant of the older NetBIOS protocol that was initially used by IBM in their LAN Manager product. Microsoft has always been fairly interested in NetBIOS and it's successors (NetBEUI, SMB and CIFS). The Samba project has existed since 1991, when it was originally written to link an IBM PC running NetBIOS with a Unix server. These days, SMB is the preferred method for sharing file and print services over a network for virtually the entire civilized world because Windows supports it.
Samba's configuration file is /etc/samba/smb.conf; one of the most well commented and documented configuration files you will find anywhere. Sample shares have been setup for you to view and modify for your needs. If you need even tighter control the man page for smb.conf is indispensable. Since Samba is documented so well in the places I've mentioned above, we will not rewrite the documentation here. We will, however, quickly cover the basics.
smb.conf is broken down into multiple sections: one section per share, and a global section for setting options that are to be used everywhere. Some options are only valid in the global section; some are only valid outside the global section. Remember that the global section can be over-ridden by any other section. Refer to the man pages for more information.
You will most likely wish to edit your smb.conf file to reflect the network settings in your LAN. I would suggest modifying the items listed below:
[global] # workgroup = NT-Domain-Name or Workgroup-Name, eg: LINUX2 workgroup = MYGROUP |
Change the workgroup name to reflect the workgroup or domain name that you are using locally.
# server string is the equivalent of the NT Description field server string = Samba Server |
This will be the name of your Slackware computer displayed in the Network Neighborhood (or My Network Places) folder.
# Security mode. Most people will want user level security. See # security_level.txt for details. NOTE: To get the behaviour of # Samba-1.9.18, you'll need to use "security = share". security = user |
You'll almost certainly wish to implement user level security on your Slackware system.
# You may wish to use password encryption. Please read # ENCRYPTION.txt, Win95.txt and WinNT.txt in the Samba # documentation. # Do not enable this option unless you have read those documents encrypt passwords = yes |
If encrypt passwords is not enabled, you will not be able to use Samba with NT4.0, Win2k, WinXP, and Win2003. Earlier Windows operating systems did not require encryption to share files.
SMB is an authenticated protocol, meaning you must supply a correct username and password in order to use this service. We tell the samba server what usernames and passwords are valid with the smbpasswd command. smbpasswd takes a couple of common switches to tell it to either add traditional users, or add machine users (SMB requires that you add the computers' NETBIOS names as machine users, restricting what computers one can authenticate from).
Adding a user to the /etc/samba/private/smbpasswd file. # smbpasswd -a user Adding a machine name to the /etc/samba/private/smbpasswd file. # smbpasswd -a -m machine |
It's important to note that a given username or machine name must already exist in the /etc/passwd file. You can accomplish this simply with the adduser command. Note that when using the adduser command to add a machine name one must append a dollar sign (“$”) to the machine name. This should not however, be done with smbpasswd. smbpasswd appends the dollar sign on its own. Failing to mangle the machine name this way with adduser will result in an error when adding the machine name to samba.
# adduser machine$ |
5.6.2 Network File System (NFS)
NFS (or Network File System) was originally written by Sun for their Solaris implementation of Unix. While it is significantly easier to get up and running when compared to SMB, it is also significantly less secure. The primary insecurity in NFS is that it is easy to spoof user and group id's from one machine to another. NFS is an unauthenticated protocol. Future versions of the NFS protocol are being devised that enhance security, but these are not common at the time of this writing.
NFS configuration is governed by the /etc/exports file. When you load the default /etc/exports file into an editor, you'll see a blank file with a two line comment on top. We'll need to add a line to the exports file for each directory that we wish to export, with a listing of client workstations that will be allowed to access that file. For instance, if we wished to export directory /home/foo to workstation Bar, we would simply add the line:
/home/foo Bar(rw) |
to our /etc/exports. Below, you'll find the example from the man page for the exports file:
# sample /etc/exports file / master(rw) trusty(rw,no_root_squash) /projects proj*.local.domain(rw) /usr *.local.domain(ro) @trusted(rw) /home/joe pc001(rw,all_squash,anonuid=150,anongid=100) /pub (ro,insecure,all_squash) |
As you can see, there are various options available, but most should be fairly clear from this example.
NFS works under the assumption that a given user on one machine in a network has the same user ID on all machines across the network. When an attempt is made to read or write from a NFS client to an NFS server, a UID is passed as part of the read/write request. This UID is treated the same as if the read/write request originated on the local machine. As you can see, if one could arbitrarily specify a given UID when accessing resources on a remote system, Bad Things (tm) could and would happen. As a partial hedge against this, each directory is mounted with the root_squash option. This maps the UID for any user claiming to be root to a different UID, thus preventing root access to the files or folders in the exported directory. root_squash seems to be enabled by default as a security measure, but the authors recommend specifying it anyway in your /etc/exports file.
You can also export a directory directly from the command line on the server by using the exportfs command as follows:
# exportfs -o rw,no_root_squash Bar:/home/foo |
This line exports the /home/foo directory to the computer “Bar” and grants Bar read/write access. Additionally, the NFS server will not invoke root_squash, which means any user on Bar with a UID of “0” (root's UID) will have the same privileges as root on the server. The syntax does look strange (usually when a directory is specified in computer:/directory/file syntax, you are referring to a file in a directory on a given computer).
You'll find more information on the man page for the exports file.
Chapter 6 X Configuration
Starting with Slackware-10.0, the X Window environment in Slackware is provided by Xorg. X is responsible for providing a graphical user interface. It is independent from the operating system, unlike Windows or the MacOS.
The X Window System is implemented through many programs that run in userland. The two main components are the server and the window manager. The server provides the lowlevel functions for interacting with your video hardware, thus it is system specific. The window manager sits on top of the server and provides the user interface. The advantage to this is you can have many different graphical interfaces by simply changing the window manager you use.
Configuring X can be a complex task. The reason for this is the vast numbers of video cards available for the PC architecture, most of which use different programming interfaces. Luckily, most cards today support basic video standards known as VESA, and if your card is among them you'll be able to start X using the startx command right out of the box.
If this doesn't work with your card, or if you'd like to take advantage of the high-performance features of your video card such as hardware acceleration or 3-D hardware rendering, then you'll need to reconfigure X.
To configure X, you'll need to make an /etc/X11/xorg.conf file. This file contains lots of details about your video hardware, mouse, and monitor. It's a very complex configuration file, but fortunately there are several programs to help create one for you. We'll mention a few of them here.
6.1 xorgconfig
This is a simple menu driven frontend that's similar in feel to the Slackware installer. It simply tells the X server to take a look at the card, and then set up the best initial configuration file it can make based on the information it gathers. The generated /etc/X11/xorg.conf file should be a good starting point for most systems (and should work without modification).
This is a text-based X configuration program that's designed for the advanced system administrator. Here's a sample walkthrough using xorgconfig. First, start the program:
# xorgconfig |
This will present a screenful of information about xorgconfig. To continue, press ENTER. xorgconfig will ask you to verify you have set your PATH correctly. It should be fine, so go ahead and hit ENTER.
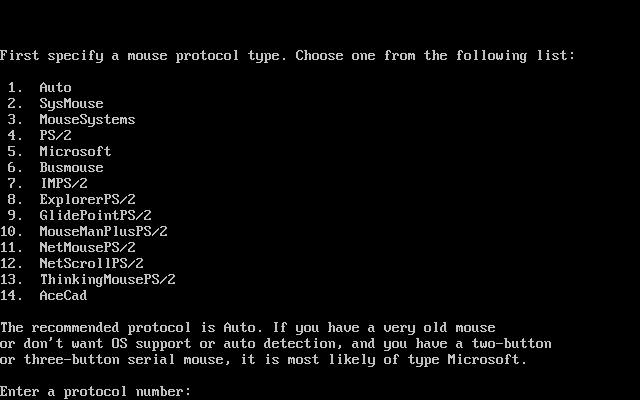
Select your mouse from the menu presented. If you don't see your serial mouse listed, pick the Microsoft protocol -- it's the most common and will probably work. Next xorgconfig will ask you about using ChordMiddle and Emulate3Buttons. You'll see these options described in detail on the screen. Use them if the middle button on your mouse doesn't work under X, or if your mouse only has two buttons (Emulate3Buttons lets you simulate the middle button by pressing both buttons simultaneously). Then, enter the name of your mouse device. The default choice, /dev/mouse, should work since the link was configured during Slackware setup. If you're running GPM (the Linux mouse server) in repeater mode, you can set your mouse type to /dev/gpmdata to have X get information about the mouse through gpm. In some cases (with busmice especially) this can work better, but most users shouldn't do this.
xorgconfig will ask you about enabling special key bindings. If you need this say “y”. Most users can say “n” -- enter this if you're not sure.
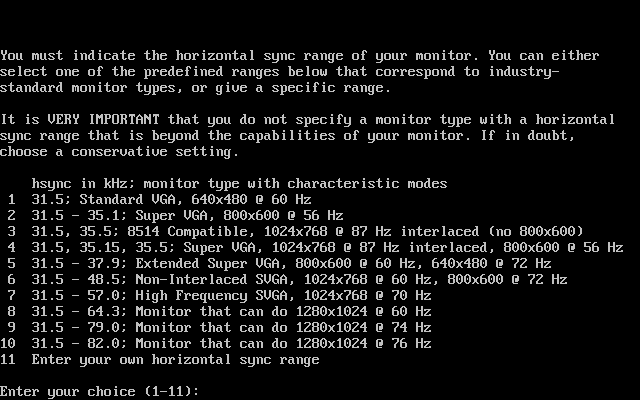
In the next section you enter the sync range for your monitor. To start configuring your monitor, press ENTER. You will see a list of monitor types -- choose one of them. Be careful not to exceed the specifications of your monitor. Doing so could damage your hardware.
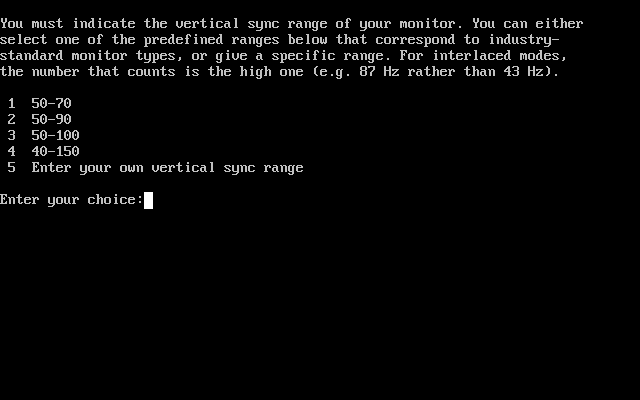
Specify the vertical sync range for your monitor (you should find this in the manual for the monitor). xorgconfig will ask you to enter strings to identify the monitor type in the xorg.conf file. Enter anything you like on these 3 lines (including nothing at all).
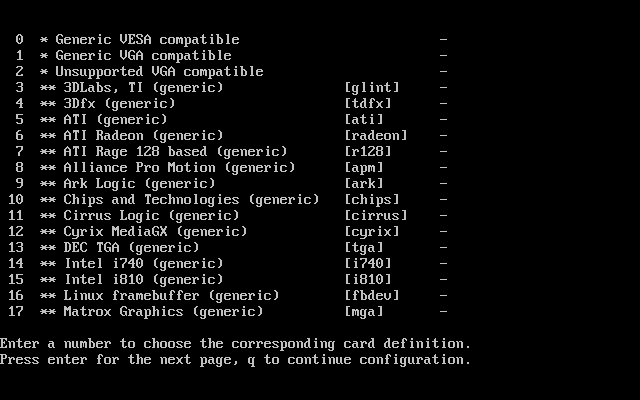
Now you have the opportunity to look at the database of video card types. You'll want to do this, so say “y”, and select a card from the list shown. If you don't see your exact card, try selecting one that uses the same chipset and it will probably work fine.
Next, tell xorgconfig how much RAM you have on your video card. xorgconfig will want you to enter some more descriptive text about your video card. If you like, you can enter descriptions on these three lines.
You'll then be asked which display resolutions you want to use. Again, going with the provided defaults should be fine to start with. Later on, you can edit the /etc/X11/xorg.conf file and rearrange the modes so 1024x768 (or whatever mode you like) is the default.
At this point, the xorgconfig program will ask if you'd like to save the current configuration file. Answer yes, and the X configuration file is saved, completing the setup process. You can start X now with the startx command.
6.2 xorgsetup
The second way to configure X is to use xorgsetup, an automagical configuration program that comes with Slackware.
To run xorgsetup, log in as root and type:
# xorgsetup |
If you've already got an /etc/X11/xorg.conf file (because you've already configured X), you'll be asked if you want to backup the existing config file before continuing. The original file will be renamed to /etc/X11/xorg.conf.backup.
6.3 xinitrc
xinit(1) is the program that actually starts X; it is called by startx(1), so you may not have noticed it (and probably don't really need to). Its configuration file, however, determines which programs (including and especially the window manager) are run when X starts up. xinit first checks your home directory for a .xinitrc file. If the file is found, it gets run; otherwise, /var/X11R6/lib/xinit/xinitrc (the systemwide default) is used. Here's a simple xinitrc file:
#!/bin/sh
# $XConsortium: xinitrc.cpp,v 1.4 91/08/22 11:41:34 rws Exp $

userresources=$HOME/.Xresources
usermodmap=$HOME/.Xmodmap
sysresources=/usr/X11R6/lib/X11/xinit/.Xresources
sysmodmap=/usr/X11R6/lib/X11/xinit/.Xmodmap

# merge in defaults and keymaps

if [ -f $sysresources ]; then
    xrdb -merge $sysresources
fi

if [ -f $sysmodmap ]; then
    xmodmap $sysmodmap
fi

if [ -f $userresources ]; then
    xrdb -merge $userresources
fi

if [ -f $usermodmap ]; then
    xmodmap $usermodmap
fi

# start some nice programs

twm &
xclock -geometry 50x50-1+1 &
xterm -geometry 80x50+494+51 &
xterm -geometry 80x20+494-0 &
exec xterm -geometry 80x66+0+0 -name login
|
All of those “if” blocks are there to merge in various configuration settings from other files. The interesting part of the file is toward the end, where various programs are run. This X session will begin with the twm(1) window manager, a clock, and three terminals. Note the exec before the last xterm. What that does is replace the currently running shell (the one that's executing this xinitrc script) with that xterm(1) command. When the user quits that xterm, the X session will end.
To customize your X startup, copy the default /var/X11R6/lib/xinit/xinitrc to ~/.xinitrc and edit it, replacing those program lines with whatever you like. The end of mine is simply:
# Start the window manager: exec startkde |
Note that there are several xinitrc.* files in /var/X11R6/lib/xinit that correspond to various window managers and GUIs. You can use any of those, if you like.
6.4 xwmconfig
For years, Unix was used almost exclusively as the operating system for servers, with the exception of high-powered professional workstations. Only the technically inclined were likely to use a Unix-like operating system, and the user interface reflected this fact. GUIs tended to be fairly bare-bones, designed to run a few necessarily graphical applications like CAD programs and image renderers. Most file and system management was conducted at the command line. Various vendors (Sun Microsystems, Silicon Graphics, etc) were selling workstations with an attempt to provide a cohesive “look and feel”, but the wide variety of GUI toolkits in use by developers led inevitably to the dissolution of the desktop's uniformity. A scrollbar might not look the same in two different applications. Menus might appear in different places. Programs would have different buttons and checkboxes. Colors ranged widely, and were generally hard-coded in each toolkit. As long as the users were primarily technical professionals, none of this mattered much.
With the advent of free Unix-like operating systems and the growing number and variety of graphical applications, X has recently gained a wide desktop user base. Most users, of course, are accustomed to the consistent look and feel provided by Microsoft's Windows or Apple's MacOS; the lack of such consistency in X-based applications became a barrier to its wider acceptance. In response, two open source projects have been undertaken: The K Desktop Environment, or KDE, and the GNU Network Object Model Environment, known as GNOME. Each has a wide variety of applications, from taskbars and file managers to games and office suites, written with the same GUI toolkit and tightly integrated to provide a uniform, consistent desktop.
The differences in KDE and GNOME are generally fairly subtle. They each look different from the other, because each uses a different GUI toolkit. KDE is based on the Qt library from Troll Tech AS, while GNOME uses GTK, a toolkit originally developed for The GNU Image Manipulation Program (or The GIMP, for short). As separate projects, KDE and GNOME each have their own designers and programmers, with different development styles and philosophies. The result in each case, however, has been fundamentally the same: a consistent, tightly integrated desktop environment and application collection. The functionality, usability, and sheer prettiness of both KDE and GNOME rival anything available on other operating systems.
The best part, though, is that these advanced desktops are free. This means you can have either or both (yes, at the same time). The choice is yours.
In addition to the GNOME and KDE desktops, Slackware includes a large collection of window managers. Some are designed to emulate other operating systems, some for customization, others for speed. There's quite a variety. Of course you can install as many as you want, play with them all, and decide which you like the most.
To make desktop selection easy, Slackware also includes a program called xwmconfig that can be used to select a desktop or window manager. It is run like so:
% xwmconfig |
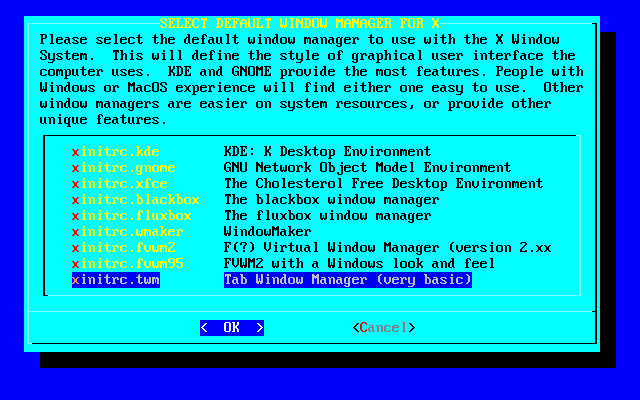
You'll be given a list of all the desktops and window managers installed. Just select the one you want from the list. Each user on your system will need to run this program, since different users can use different desktops, and not everyone will want the default one you selected at installation.
Then just start up X, and you're good to go.
6.5 xdm
As Linux becomes more and more useful as a desktop operating system, many users find it desirable for the machine to boot straight into a graphical environment. For this, you will need to tell Slackware to boot straight into X, and assign a graphical login manager. Slackware ships with three graphical login tools, xdm(1), kdm, and gdm(1).
xdm is the graphical login manager shipped with the X.org system. It's ubiquitous, but not as fully features as alternatives. kdm is the graphical login manager shipped with KDE, The K Desktop Environment. Finally, gdm is the login manager shipped with GNOME. Any of the choices will allow you to log in as any user, and choose what desktop you wish to use.
Unfortunately, Slackware doesn't include a nice program like xwmconfig for choosing what login manager to use, so if all three are installed you may have to do some editing to choose your preference. But first, we'll discuss how to boot into a graphical environment.
In order to start X at boot, you need to boot into run-level 4. Run-levels are just a way of telling init(8) to do something different when it starts the OS. We do this by editing the config file for init, /etc/inittab.
# These are the default runlevels in Slackware: # 0 = halt # 1 = single user mode # 2 = unused (but configured the same as runlevel 3) # 3 = multiuser mode (default Slackware runlevel) # 4 = X11 with KDM/GDM/XDM (session managers) # 5 = unused (but configured the same as runlevel 3) # 6 = reboot # Default runlevel. (Do not set to 0 or 6) id:3:initdefault: |
In order to make Slackware boot to a graphical environment, we just change the 3 to a 4.
# Default runlevel. (Do not set to 0 or 6) id:4:initdefault: |
Now Slackware will boot into runlevel 4 and execute /etc/rc.d/rc.4. This file starts up X and calls whatever login manager you've chosen. So, how do we choose login managers? There are a few ways to do this, and I'll explain them after we look at rc.4.
  # Try to use GNOME's gdm session manager:
  if [ -x /usr/bin/gdm ]; then
    exec /usr/bin/gdm -nodaemon
  fi

  # Not there?  OK, try to use KDE's kdm session manager:
  if [ -x /opt/kde/bin/kdm ]; then
    exec /opt/kde/bin/kdm -nodaemon
  fi

  # If all you have is XDM, I guess it will have to do:
  if [ -x /usr/X11R6/bin/xdm ]; then
    exec /usr/X11R6/bin/xdm -nodaemon
  fi
|
As you can see here, rc.4 first checks to see if gdm is executable, and if so runs it. Second on the list is kdm, and finally xdm. One way of choosing a login manager is to simply remove the ones you don't wish to use using removepkg. You can find out more about removepkg in Chapter 18.
Optionally, you can remove the executable permission from those files that you don't want to use. We discuss chmod in Chapter 9.
# chmod -x /usr/bin/gdm |
Finally, you can just comment out the lines for the login manager you don't want to use.
  # Try to use GNOME's gdm session manager:
  # if [ -x /usr/bin/gdm ]; then
  #   exec /usr/bin/gdm -nodaemon
  # fi

  # Not there?  OK, try to use KDE's kdm session manager:
  if [ -x /opt/kde/bin/kdm ]; then
    exec /opt/kde/bin/kdm -nodaemon
  fi

  # If all you have is XDM, I guess it will have to do:
  if [ -x /usr/X11R6/bin/xdm ]; then
    exec /usr/X11R6/bin/xdm -nodaemon
  fi
|
Any lines preceded by the hash mark (#) are considered comments and the shell silently passes them. Thus, even if gdm is installed and executable, the shell (in this case bash) won't bother checking for it.
Chapter 7 Booting
The process of booting your Linux system can sometimes be easy and sometimes be difficult. Many users install Slackware on their computer and that's it. They just turn it on and it's ready to use. Othertimes, simply booting the machine can be a chore. For most users, LILO works best. Slackware includes LILO and Loadlin for booting Slackware Linux. LILO will work from a hard drive partition, a hard drive's master boot record, or a floppy disk, making it a very versatile tool. Loadlin works from a DOS command line, killing DOS and invoking Linux.
Another popular utility for booting Linux is GRUB. GRUB is not included or officially supported by Slackware. Slackware holds to the “tried and true” standard for what gets included inside the distribution. While GRUB works well and includes some features that LILO does not, LILO handles all the essential tasks of a boot loader reliably with a proven track record. Being younger, GRUB hasn't quite lived up to that legacy yet. As it is not included with Slackware, we do not discuss it here. If you wish to use GRUB (perhaps it came with another Linux OS and you want to use it to dual-boot) consult GRUB's documentation.
This section covers using LILO and Loadlin, the two booters included with Slackware. It also explains some typical dual booting scenarios and how you could go about setting it up.
7.1 LILO
The Linux Loader, or LILO, is the most popular booter in use on Linux systems. It is quite configurable and can easily be used to boot other operating systems.
Slackware Linux comes with a menu-driven configuration utility called liloconfig. This program is first run during the setup process, but you can invoke it later by typing liloconfig at the prompt.
LILO reads its settings from the /etc/lilo.conf(5) file. It is not read each time you boot up, but instead is read each time you install LILO. LILO must be reinstalled to the boot sector each time you make a configuration change. Many LILO errors come from making changes to the lilo.conf file, but failing to re-run lilo to install these changes. liloconfig will help you build the configuration file so that you can install LILO for your system. If you prefer to edit /etc/lilo.conf by hand, then reinstalling LILO just involves typing /sbin/lilo (as root) at the prompt.
When you first invoke liloconfig, it will look like this:

If this is your first time setting up LILO, you should pick simple. Otherwise, you might find expert to be faster if you are familiar with LILO and Linux. Selecting simple will begin the LILO configuration.
If kernel frame buffer support is compiled into your kernel, liloconfig will ask which video resolution you would like to use. This is the resolution that is also used by the XFree86 frame buffer server. If you do not want the console to run in a special video mode, selecting normal will keep the standard 80x25 text mode in use.
The next part of the LILO configuration is selecting where you want it installed. This is probably the most important step. The list below explains the installation places:
- Root
-
This option installs LILO to the beginning of your Linux root partition. This is the safest option if you have other operating systems on your computer. It ensures that any other booters are not overwritten. The disadvantage is that LILO will only load from here if your Linux drive is the first drive on your system. This is why many people chose to create a very small /boot partition as the first drive on their system. This allows the kernel and LILO to be installed at the beginning of the drive where LILO can find them. Previous versions of LILO contained an infamous flaw known as the “1024 cylinder limit”. LILO was unable to boot kernels on partitions past the 1024th cylinder. Recent editions of LILO have eliminated this problem.
- Floppy
-
This method is even safer than the previous one. It creates a boot floppy that you can use to boot your Linux system. This keeps the booter off the hard disk entirely, so you only boot this floppy when you want to use Slackware. The flaws with this method are obvious. Floppies are notoriously fickle, prone to failures. Secondly, the boot loader is no longer self-contained within the computer. If you loose your floppy disk, you'll have to make another to boot your system.
- MBR
-
You will want to use this method if Slackware is the only operating system on your computer, or if you will be using LILO to choose between multiple operating systems on your computer. This is the most preferred method for installing LILO and will work with almost any computer system.
This option will overwrite any other booter you have in the MBR.
After selecting the installation location, liloconfig will write the configuration file and install LILO. That's it. If you select the expert mode you will receive a special menu. This menu allows you to tweak the /etc/lilo.conf file, add other operating systems to your boot menu, and set LILO to pass special kernel parameters at boot time. The expert menu looks like this:
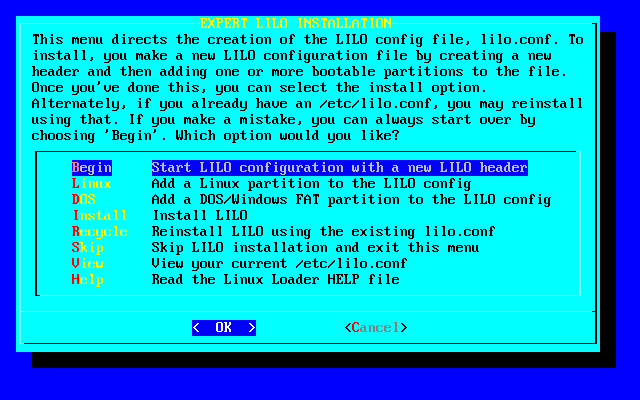
Whatever your system configuration is, setting up a working boot loader is easy. liloconfig makes setting it up a cinch.
7.2 LOADLIN
The other booting option that comes with Slackware Linux is LOADLIN. LOADLIN is a DOS executable that can be used to start Linux from a running DOS system. It requires the Linux kernel to be on the DOS partition so that LOADLIN can load it and properly boot the system.
During the installation process, LOADLIN will be copied to root's home directory as a .ZIP file. There is no automatic setup process for LOADLIN. You will need to copy the Linux kernel (typically /boot/vmlinuz) and the LOADLIN file from root's home directory to the DOS partition.
LOADLIN is useful if you would like to make a boot menu on your DOS partition. A menu could be added to your AUTOEXEC.BAT file that would allow you to pick between Linux or DOS. A choice of Linux would run LOADLIN, thus booting your Slackware system. This AUTOEXEC.BAT file under Windows 95 will provide a sufficient boot menu:
@ECHO OFF SET PROMPT=$P$G SET PATH=C:\WINDOWS;C:\WINDOWS\COMMAND;C:\ CLS ECHO Please Select Your Operating System: ECHO. ECHO [1] Slackware Linux ECHO [2] Windows 95 ECHO. CHOICE /C:12 "Selection? -> " IF ERRORLEVEL 2 GOTO WIN IF ERRORLEVEL 1 GOTO LINUX :WIN CLS ECHO Starting Windows 95... WIN GOTO END :LINUX ECHO Starting Slackware Linux... CD \LINUX LOADLIN C:\LINUX\VMLINUZ ROOT=<root partition device> RO GOTO END :END |
You will want to specify your root partition as a Linux device name, like /dev/hda2 or something else. You can always use LOADLIN at the command line. You simply use it in the same manner as it is in the example above. The LOADLIN documentation comes with many examples on how to use it.
7.3 Dual Booting
Many users set up their computers to boot Slackware Linux and another operating system. We've described several typical dual boot scenarios below, in case you are having difficulty setting up your system.
7.3.1 Windows
Setting up a computer with both MS Windows and Linux is probably the most common dual boot scenario. There are numerous ways you can setup the booting, but this section will cover two.
Often times when setting up a dual boot system, a person will devise a perfect plan for where everything should go but mess up the installation order. It is very important to understand that operating systems need to be installed in a certain order for a dual boot setup to work. Linux always offers control over what, if anything, gets written to the Master Boot Record. Therefore, it's always advisable to install Linux last. Windows should be installed first, since it will always write its booter to the Master Boot Record, overwriting any entry Linux may have put there.
7.3.1.1 Using LILO
Most people will want to use LILO to chose between Linux and Windows. As stated above, you should install Windows first, then Linux.
Let's say you have a 40GB IDE hard disk as the only drive in your system. Let's also say that you want to give half of that space to Windows and half of that space to Linux. This will present a problem when trying to boot Linux.
20GB Windows boot (C:) 1GB Linux root (/) 19GB Linux /usr (/usr) |
You would also want to set aside an adequate amount of space for a Linux swap partition. The unwritten rule is to use twice the amount of RAM you have in disk space. A 64MB system would have 128MB of swap, and so on. Adequate swap space is the discussion of many flames on IRC and Usenet. There's no truly “right” way to do it, but sticking with the rule above should be sufficient.
With your partitions laid out, you should proceed to install Windows. After that is set up and working, you should install Linux. The LILO installation needs special attention. You will want to select the expert mode for installing LILO.
Begin a new LILO configuration. You will want to install it to Master Boot Record so that it can be used to choose between the two operating systems. From the menu, add your Linux partition and add your Windows (or DOS) partition. Once that's complete, you can install LILO.
Reboot the computer. LILO should load and will display a menu letting you select between the operating systems you have installed. Select the name of the OS you wish to load (these names were selected when you setup LILO).
LILO is quite a configurable boot loader. It's not just limited to booting Linux or DOS. It can boot just about anything. The man pages for lilo(8) and lilo.conf(5) provide more detailed information.
What if LILO doesn't work? There are instances where LILO just won't work on a particular machine. Fortunately, there is another way to dual boot Linux and Windows.
7.3.1.2 Using LOADLIN
This method can be used if LILO doesn't work on your system, or if you just don't want to set up LILO. This method is also ideal for the user that reinstalls Windows often. Each time you reinstall Windows, it will overwrite the Master Boot Record, thus destroying any LILO installation. With LOADLIN, you are not subject to that problem. The biggest disadvantage is that you can only use LOADLIN to boot Linux.
With LOADLIN, you can install the operating systems in any order desired. Be careful about installing things to the Master Boot Record, you do not want to do that. LOADLIN relies on the Windows partition being bootable. So during the Slackware installation, make sure you skip the LILO setup.
After installing the operating systems, copy the loadlinX.zip (where X is a version number, such as 16a) file from root's home directory to your Windows partition. Also copy your kernel image to the Windows partition. You will need to be in Linux for this to work. This example shows how to do this:
# mkdir /win # mount -t vfat /dev/hda1 /win # mkdir /win/linux # cd /root # cp loadlin* /win/linux # cp /boot/vmlinuz /win/linux # cd /win/linuz # unzip loadlin16a.zip |
That will create a C:\LINUX directory on your Windows partition (assuming it's /dev/hda1) and copy over the necessary stuff for LOADLIN. After doing this, you will need to reboot into Windows to setup a boot menu.
Once in Windows, get to a DOS prompt. First, we need to make sure the system is set to not boot into the graphical interface.
C:\> cd \ C:\> attrib -r -a -s -h MSDOS.SYS C:\> edit MSDOS.SYS |
Add this line to the file:
BootGUI=0 |
Now save the file and exit the editor. Now edit C:\AUTOEXEC.BAT so we can add a boot menu. The following provides an example of what a boot menu block in AUTOEXEC.BAT would look like:
cls echo System Boot Menu echo. echo 1 - Linux echo 2 - Windows echo. choice /c:12 "Selection? -> " if errorlevel 2 goto WIN if errorlevel 1 goto LINUX :LINUX cls echo "Starting Linux..." cd \linux loadlin c:\linux\vmlinuz root=/dev/hda2 ro goto END :WIN cls echo "Starting Windows..." win goto END :END |
The key line is the one that runs LOADLIN. We tell it the kernel to load, the Linux root partition, and that we want it mounted read-only initially.
The tools for these two methods are provided with Slackware Linux. There are numerous other booters on the market, but these should work for most dual boot setups.
7.3.1.3 Deprecated Windows NT Hack
This is the least common dual booting situation. In the days of old, LILO was unable to boot Windows NT, requiring Linux users to hack NTLDR, which presented several more problems than dual booting between Windows 9x and Linux. Understand that the following instructions are deprecated. LILO has been able to boot Windows NT/2000/XP/2003 for many years now. If you are using a legacy machine though, you may need to use just such a hack.
-
Install Windows NT
-
Install Linux, making sure LILO is installed to the superblock of the Linux partition
-
Get the first 512 bytes of the Linux root partition and store it on the Windows NT partition
-
Edit C:\BOOT.INI under Windows NT to add a Linux option
Installing Windows NT should be fairly straightforward, as should installing Linux. From there, it gets a little more tricky. Grabbing the first 512 bytes of the Linux partition is easier than it sounds. You will need to be in Linux to accomplish this. Assuming your Linux partition is /dev/hda2, issue this command:
# dd if=/dev/hda2 of=/tmp/bootsect.lnx bs=1 count=512 |
That's it. Now you need to copy bootsect.lnx to the Windows NT partition. Here's where we run into another problem. Linux does not have stable write support for the NTFS filesystem. If you installed Windows NT and formatted your drive as NTFS, you will need to copy this file to a FAT floppy and then read from it under Windows NT. If you formatted the Windows NT drive as FAT, you can simply mount it under Linux and copy the file over. Either way, you will want to get /tmp/bootsect.lnx from the Linux drive to C:\BOOTSECT.LNX on the Windows NT drive.
The last step is adding a menu option to the Windows NT boot menu. Under Windows NT open a command prompt.
C:\WINNT> cd \ C:\> attrib -r -a -s -h boot.ini C:\> edit boot.ini |
Add this line to the end of the file:
C:\bootsect.lnx="Slackware Linux" |
Save the changes and exit the editor. When you reboot Windows NT, you will have a Linux option on the menu. Choosing it will boot into Linux.
7.3.2 Linux
Yes, people really do this. This is definitely the easiest dual boot scenario. You can simply use LILO and add more entries to the /etc/lilo.conf file. That's all there is to it.
Chapter 8 The Shell
In a graphical environment, the interface is provided by a program that creates windows, scrollbars, menus, etc. In a commandline environment, the user interface is provided by a shell, which interprets commands and generally makes things useable. Immediately after logging in (which is covered in this chapter), users are put into a shell and allowed to go about their business. This chapter serves as an introduction to the shell, and to the most common shell among Linux users-- the Bourne Again Shell (bash). For more detailed information on anything in this chapter, check out the bash(1) man page.
8.1 Users
8.1.1 Logging In
So you've booted, and you're looking at something that looks like this:
Welcome to Linux 2.4.18 Last login: Wed Jan 1 15:59:14 -0500 2005 on tty6. darkstar login: |
Hmm.. nobody said anything about a login. And what's a darkstar? Don't worry; you probably didn't accidentally fire up a hyperspace comm-link to the Empire's artificial moon. (I'm afraid the hyperspace comm-link protocol isn't currently supported by the Linux kernel. Maybe the 2.8 kernel branch will at last provide this oft looked-for support.) No, darkstar is just the name of one of our computers, and its name gets stamped on as the default. If you specified a name for your computer during setup, you should see it instead of darkstar.
As for the login... If this is your first time, you'll want to log in as root. You'll be prompted for a password; if you set one during the setup process, that's what it's looking for. If not, just hit enter. That's it-- you're in!
8.1.2 Root: The Superuser
Okay, who or what is root? And what's it doing with an account on your system?
Well, in the world of Unix and similar operating systems (like Linux), there are users and then there are users. We'll go into this in more detail later, but the important thing to know now is that root is the user above all users; root is all-powerful and all-knowing, and nobody disobeys root. It just isn't allowed. root is what we call a “superuser”, and rightly so. And best of all, root is you.
Cool, huh?
If you're not sure: yes, that's very cool. The catch is, though, that root is inherently allowed to break anything it so desires. You might want to skip ahead to Section 12.1.1 and see about adding a user; then login as that user and work from there. The traditional wisdom is that it's best to only become the superuser when absolutely necessary, so as to minimize the possibility of accidentally breaking something.
By the way, if you decide you want to be root while you're logged in as someone else, no problem. Just use the su(1) command. You'll be asked for root's password and then it will make you root until you exit or logout. You can also become any other user using su, provided you know that user's password: su logan, for instance, would make you me.
|
root is allowed to su to any user, without requiring their password. |
8.2 The Command Line
8.2.1 Running Programs
It's hard to get much accomplished without running a program; you might be able to prop something up with your computer or hold a door open, and some will make the most lovely humming noise when running, but that's really about it. And I think we can all agree that its use as a humming doorstop isn't what brought the personal computer the popularity it now enjoys.
So, remember how almost everything in Linux is a file? Well, that goes for programs, too. Every command you run (that isn't built into the shell) resides as a file somewhere. You run a program simply by specifying the full path to it.
For instance, remember that su command from the last section? Well, it's actually in the /bin directory: /bin/su would run it nicely.
So why, then, does just typing su work? After all, you didn't say it was in /bin. It could just as easily have been in /usr/local/share, right? How did it know? The answer to that lies in the PATH environment variable; most shells have either PATH or something very much like PATH. It basically contains a list of directories to look in for programs you try to run. So when you ran su, your shell ran through its list of directories, checking each one for an executable file called su that it could run; the first one it came to, it ran. This happens whenever you run a program without specifying a full path to it; if you get a ““Command not found”” error, that only means that the program you tried to run isn't in your PATH. (Of course, this would be true if the program doesn't exist at all...) We'll discuss environment variables in more depth in Section 8.3.1.
Remember also that “.” is shorthand for the current directory, so if you happened to be in /bin, ./su would have worked as an explicit full path.
8.2.2 Wildcard Matching
Nearly every shell recognizes some characters as being substitutes or abbreviations that mean anything goes here. Such characters are aptly named wildcards; the most common are * and ?. By convention, ? usually matches any single character. For instance, suppose you're in a directory with three files: ex1.txt, ex2.txt, and ex3.txt. You want to copy all of those files (using the cp command we cover in Section 10.5.1) to another directory, say /tmp. Well, typing cp ex1.txt ex2.txt ex3.txt /tmp is entirely too much work. It's much easier to type cp ex?.txt /tmp; the ? will match each of the characters “1”, “2”, and “3”, and each in turn will be substituted in.
What's that you say? That's still too much work? You're right. It's appalling; we have labor laws to protect us from that sort of thing. Fortunately, we also have *. As was already mentioned, * matches “any number of characters”, including 0. So if those three files were the only ones in the directory, we could have simply said cp * /tmp and gotten them all in one fell swoop. Suppose, though, that there is also a file called ex.txt and one called hejaz.txt. We want to copy ex.txt but not hejaz.txt; cp ex* /tmp will do that for us.
cp ex?.txt /tmp, would, of course, only get our original three files; there's no character in ex.txt to match that ?, so it would be left out.
Another common wildcard is the bracket pair [ ]. Any characters inside the brackets will be substituted in place of the [ ] to find matches. Sound confusing? It's not too bad. Suppose for instance, we have a directory containing the following 8 files: a1, a2, a3, a4, aA, aB, aC, and aD . We want to only find the files ending in numbers; [ ] will do this for us.
% ls a[1-4] a1 a2 a3 a4 |
But what we really want is just a1, a2, and a4? In the previous example we used - to mean all values between 1 and 4. We can also separate individual entries with commas.
% ls a[1,2,4] a1 a2 a4 |
I know what you're thinking now, “Well what about letters?” Linux is case-sensitive, meaning that a and A are different characters and are only related in your mind. Capitals always come before lowercase letters, so A and B come before a and b. Continuing with our earlier example, if we wanted files a1, and A1, we can find these quickly with [ ].
% ls [A,a]1 A1 a1 |
Note, that if we had included a hyphen instead of a comma, we would have gotten incorrect results.
% ls [A-a]1 A1 B1 C1 D1 a1 |
You can also combine hyphen and comma strings.
% ls [A,a-d] A1 a1 b1 c1 d1 |
8.2.3 Input/Output Redirection and Piping
(Here comes something cool.)
% ps > blargh |
Y'know what that is? That's me running ps to see which processes are running; ps is covered in Section 11.3. That's not the cool part. The cool part is > blargh, which means, roughly, take the output from ps and write it to a file called blargh. But wait, it gets cooler.
% ps | less |
That one takes the output from ps and pipes it through less, so I can scroll through it at my leisure.
% ps >> blargh |
This is the third most commonly used redirector; it does the same thing as “>”, except that “>>” will append output from ps to the file blargh, if said file exists. If not, just like “>”, it will be created. (“>” will obliterate the current contents of blargh.)
There is also a “<” operator, which means take your input from the following, but it's not used nearly so often.
% fromdos < dosfile.txt > unixfile.txt |
Redirection gets really fun when you start piling it up:
% ps | tac >> blargh |
That will run ps, reverse the lines of its output, and append those to the file blargh. You can stack as many of these up as you want; just be careful to remember that they get interpreted from left to right.
See the bash(1) man page for more detailed information on redirection.
8.3 The Bourne Again Shell (bash)
8.3.1 Environment Variables
A Linux system is a complex beast, and there's a lot to keep track of, a lot of little details that come into play in your normal interactions with various programs (some of which you might not even need to be aware of). Nobody wants to pass a bunch of options to every program that gets run, telling it what kind of terminal is being used, the hostname of the computer, how their prompt should look...
So as a coping mechanism, users have what's called an environment. The environment defines the conditions in which programs run, and some of this definition is variable; the user can alter and play with it, as is only right in a Linux system. Pretty much any shell will have environment variables (if not, it's probably not a very useable shell). Here we will give an overview of the commands bash provides for manipulating its environment variables.
set by itself will show you all of the environment variables that are currently defined, as well as their values. Like most bash built-ins, it can also do several other things (with parameters); we'll leave it to the bash(1) man page to cover that, though. Example 8-1 shows an excerpt from a set command run on one of the author's computers. Notice in this example the PATH variable that was discussed earlier. Programs in any of those directories can be run simply by typing the base filename.
Example 8-1. Listing Environment Variables with set
% set PATH=/usr/local/lib/qt/bin:/usr/local/bin:/usr/bin:/bin:/usr/X11R6/bin: /usr/openwin/bin:/usr/games:.:/usr/local/ssh2/bin:/usr/local/ssh1/bin: /usr/share/texmf/bin:/usr/local/sbin:/usr/sbin:/home/logan/bin PIPESTATUS=([0]="0") PPID=4978 PS1='\h:\w\$ ' PS2='> ' PS4='+ ' PWD=/home/logan QTDIR=/usr/local/lib/qt REMOTEHOST=ninja.tdn SHELL=/bin/bash |
% unset VARIABLE |
unset will remove any variables that you give it, wiping out both the variable and its value; bash will forget that variable ever existed. (Don't worry. Unless it's something you explicitly defined in that shell session, it'll probably get redefined in any other session.)
% export VARIABLE=some_value |
Now, export is truly handy. Using it, you give the environment variable VARIABLE the value “some_value”; if VARIABLE didn't exist, it does now. If VARIABLE already had a value, well, it's gone. That's not so good, if you're just trying to add a directory to your PATH. In that case, you probably want to do something like this:
% export PATH=$PATH:/some/new/directory |
Note the use of $PATH there: when you want bash to interpret a variable (replace it with its value), tack a $ onto the beginning of the variable's name. For instance, echo $PATH will echo the value of PATH, in my case:
% echo $PATH /usr/local/lib/qt/bin:/usr/local/bin:/usr/bin:/bin:/usr/X11R6/bin: /usr/openwin/bin:/usr/games:.:/usr/local/ssh2/bin:/usr/local/ssh1/bin: /usr/share/texmf/bin:/usr/local/sbin:/usr/sbin:/home/logan/bin |
8.3.2 Tab Completion
(Here comes something cool again.)
-
A commandline interface means lots of typing.
-
Typing is work.
-
Nobody likes work.
From 3 and 2, we can determine that (4) nobody likes typing. Fortunately, bash saves us from (5) (nobody likes a commandline interface).
How does bash accomplish this wonderful feat, you ask? In addition to the wildcard expansion we discussed before, bash features tab completion.
Tab completion works something like this: You're typing the name of a file. Maybe it's in your PATH, maybe you're typing it out explicitly. All you have to do is type enough of the filename to uniquely identify it. Then hit the tab key. bash will figure out what you want and finish typing it for you!
Example time. /usr/src contains two subdirectories: /usr/src/linux and /usr/src/sendmail. I want to see what's in /usr/src/linux. So I just type ls /usr/src/l, hit the TAB key, and bash gives me ls /usr/src/linux.
Now, suppose there are two directories /usr/src/linux and /usr/src/linux-old; If I type /usr/src/l and hit TAB, bash will fill in as much as it can, and I'll get /usr/src/linux. I can stop there, or I can hit TAB again, and bash will show a list of directories that match what I've typed so far.
Hence, less typing (and hence, people can like commandline interfaces). I told you it was cool.
8.4 Virtual Terminals
So you're in the middle of working on something and you decide you need to do something else. You could just drop what you're doing and switch tasks, but this is a multi-user system, right? And you can log in as many times simultaneously as you want, right? So why should you have to do one thing at a time?
You don't. We can't all have multiple keyboards, mice, and monitors for one machine; chances are most of us don't want them. Clearly, hardware isn't the solution. That leaves software, and Linux steps up on this one, providing “virtual terminals”, or “VTs”.
By pressing Alt and a function key, you can switch between virtual terminals; each function key corresponds to one. Slackware has logins on 6 VTs by default. Alt+F2 will take you to the second one, Alt+F3 to the third, etc.
The rest of the function keys are reserved for X sessions. Each X session uses its own VT, beginning with the seventh (Alt+F7) and going up. When in X, the Alt+Function key combination is replaced with Ctrl+Alt+Function; so if you are in X and want to get back to a text login (without exiting your X session), Ctrl+Alt+F3 will take you to the third. (Alt+F7 will take you back, assuming you're using the first X session.)
8.4.1 Screen
But what about situations where there are no virtual terminals? What then? Fortunately, slackware includes a beautiful screen manager aptly named screen. screen is a terminal emulator that has virtual terminal like capabilities. Executing screen flashes a brief introduction, then dumps to a terminal. Unlike the standard virtual terminals, screen has its own commands. All screen commands are prefixed with a Crtl+A keystroke. For example, Ctrl+A+C will create a new terminal session. Ctrl+A+N will switch to the next terminal. Ctrl+A+P switches to the previous terminal.
screen also supports detaching and re-attaching to screen sessions which is particularly useful for remote sessions via ssh and telnet, (more on those later). Ctrl+A+D will detach from the currently running screen. Executing screen -r will list all currently running screen sessions you may reattach to.
% screen -r
There are several suitable screens on:
     1212.pts-1.redtail      (Detached)
     1195.pts-1.redtail      (Detached)
     1225.pts-1.redtail      (Detached)
     17146.pts-1.sanctuary   (Dead ???)
Remove dead screens with 'screen -wipe'.
Type "screen [-d] -r [pid.]tty.host" to resume one of them.
|
Running screen -r 1212 would reattach to the first screen listed. I mentioned earlier how useful this was for remote sessions. If I were to login to a remote slackware server via ssh, and my connection was severed by some chance occurrence such as a local power failure, whatever I was doing at that moment would instantly perish, which can be a horrible thing for your server. Using screen prevents this by detaching my session if my connection is dropped. Once my connection is restored, I can reattach to my screen session and resume right where I left off.
Chapter 9 Filesystem Structure
We have already discussed the directory structure in Slackware Linux. By this point, you should be able to find files and directories that you need. But there is more to the filesystem than just the directory structure.
Linux is a multiuser operating system. Every aspect of the system is multiuser, even the filesystem. The system stores information like who owns a file and who can read it. There are other unique parts about the filesystems, such as links and NFS mounts. This section explains these, as well as the multiuser aspects of the filesystem.
9.1 Ownership
The filesystem stores ownership information for each file and directory on the system. This includes what user and group own a particular file. The easiest way to see this information is with the ls command:
% ls -l /usr/bin/wc -rwxr-xr-x 1 root bin 7368 Jul 30 1999 /usr/bin/wc |
We are interested in the third and fourth columns. These contain the username and group name that owns this file. We see that the user “root” and the group “bin” own this file.
We can easily change the file owners with the chown(1) (which means “change owner”) and chgrp(1) (which means “change group”) commands. To change the file owner to daemon, we would use chown:
# chown daemon /usr/bin/wc |
To change the group owner to “root”, we would use chgrp:
# chgrp root /usr/bin/wc |
We can also use chown to specify the user and group owners for a file:
# chown daemon:root /usr/bin/wc |
In the above example, the user could have used a period instead of a colon. The result would have been the same; however, the colon is considered better form. Use of the period is deprecated and may be removed from future versions of chown to allow usernames with periods in them. These usernames tend to be very popular with Windows Exchange Servers and are encountered most commonly in email addresses such as: mr.jones@example.com. In slackware, administrators are advised to stay away from such usernames because some scripts still use the period to indicate the user and group of a file or directory. In our example, chmod would interpret mr.jones as user “mr” and group “jones”.
File ownership is a very important part of using a Linux system, even if you are the only user. You sometimes need to fix ownerships on files and device nodes.
9.2 Permissions
Permissions are the other important part of the multiuser aspects of the filesystem. With these, you can change who can read, write, and execute files.
The permission information is stored as four octal digits, each specifying a different set of permissions. There are owner permissions, group permissions, and world permissions. The fourth octal digit is used to store special information such as set user ID, set group ID, and the sticky bit. The octal values assigned to the permission modes are (they also have letters associated with them that are displayed by programs such as ls and can be used by chmod):
Table 9-1. Octal Permission Values
| Permission Type | Octal Value | Letter Value |
|---|---|---|
| “sticky” bit | 1 | t |
| set user ID | 4 | s |
| set group ID | 2 | s |
| read | 4 | r |
| write | 2 | w |
| execute | 1 | x |
You add the octal values for each permission group. For example, if you want the group permissions to be “read” and “write”, you would use “6” in the group portion of the permission information.
bash's default permissions are:
% ls -l /bin/bash -rwxr-xr-x 1 root bin 477692 Mar 21 19:57 /bin/bash |
The first dash would be replaced with a “d” if this was a directory. The three permission groups (owner, group, and world) are displayed next. We see that the owner has read, write, and execute permissions (rwx). The group has only read and execute (r-x). And everyone else has only read and execute (r-x).
How would we set permissions on another file to resemble bash's? First, let's make an example file:
% touch /tmp/example % ls -l /tmp/example -rw-rw-r--- 1 david users 0 Apr 19 11:21 /tmp/example |
We will use chmod(1) (which means “change mode”) to set the permissions on the example file. Add the octal numbers for the permissions you want. For the owner to have read, write, and execute, we would have a value of 7. Read and execute would have 5. Run those together and pass them to chmod like this:
% chmod 755 /tmp/example % ls -l /tmp/example -rwxr-xr-x 1 david users 0 Apr 19 11:21 /tmp/example |
Now you may be thinking, “Why didn't it just create a file with those permissions in the first place?” Well the answer is simple. bash includes a nice little built-in called umask. This is included with most Unix shells as well, and controls what file permissions are assigned to newly created files. We discussed bash built-ins to some degree in Section 8.3.1. umask takes a little getting used to. It works very similar to chmod, only in reverse. You specify the octal values you do not wish to have present in newly created files. The default umask value is 0022.
% umask 0022 % umask 0077 % touch tempfile % ls -l tempfile -rw-------- 1 david users 0 Apr 19 11:21 tempfile |
See the man page for bash for more information.
To set special permissions with chmod, add the numbers together and place them in the first column. For example, to make it set user ID and set group ID, we use 6 as the first column:
% chmod 6755 /tmp/example % ls -l /tmp/example -rwsr-sr-x 1 david users 0 Apr 19 11:21 /tmp/example |
If the octal values confuse you, you can use letters with chmod. The permission groups are represented as:
To do the above, we would have to use several command lines:
% chmod a+rx /tmp/example % chmod u+w /tmp/example % chmod ug+s /tmp/example |
Some people prefer the letters over the numbers. Either way will result in the same set of permissions.
The octal format is often faster, and the one you see most often used in shell scripts. Sometimes the letters are more powerful however. For example, there's no easy way to change one group of permissions while preserving the other groups on files and directories when using the octal format. This is trivial with the letters.
% ls -l /tmp/ -rwxr-xr-x 1 alan users 0 Apr 19 11:21 /tmp/example0 -rwxr-x--- 1 alan users 0 Apr 19 11:21 /tmp/example1 ----r-xr-x 1 alan users 0 Apr 19 11:21 /tmp/example2 % chmod g-rwx /tmp/example? -rwx---r-x 1 alan users 0 Apr 19 11:21 /tmp/example0 -rwx------ 1 alan users 0 Apr 19 11:21 /tmp/example1 -------r-x 1 alan users 0 Apr 19 11:21 /tmp/example2 |
We mentioned set user ID and set group ID permissions in several places above. You may be wondering what this is. Normally when you run a program, it is operating under your user account. That is, it has all the permissions that you as a user have. The same is true for the group. When you run a program, it executes under your current group. With set user ID permissions, you can force the program to always run as the program owner (such as “root”). Set group ID is the same, but for the group.
Be careful with this, set user ID and set group ID programs can open major security holes on your system. If you frequently set user ID programs that are owned by root, you are allowing anyone to run that program and run it as root. Since root has no restrictions on the system, you can see how this would pose a major security problem. In short, it's not bad to use set user ID and set group ID permissions, just use common sense.
9.3 Links
Links are pointers between files. With links, you can have files exist in many locations and be accessible by many names. There are two types of links: hard and soft.
Hard links are names for a particular file. They can only exist within a single filesystem and are only removed when the real name is removed from the system. These are useful in some cases, but many users find the soft link to be more versatile.
The soft link, also called a symbolic link, can point to a file outside of its filesystem. It is actually a small file containing the information it needs. You can add and remove soft links without affecting the actual file. And since a symbolic link is actually a small file containing its own information, they can even point at a directory. It's rather common to have /var/tmp actually be a symbolic link to /tmp for example.
Links do not have their own set of permissions or ownerships, but instead reflect those of the file they point to. Slackware uses mostly soft links. Here is a common example:
% ls -l /bin/sh lrwxrwxrwx 1 root root 4 Apr 6 12:34 /bin/sh -> bash |
The sh shell under Slackware is actually bash. Removing links is done using rm. The ln command is used to create links. These commands will be discussed in more depth in Chapter 10.
It's very important to be careful about symlinks in particular. Once, I was working on a machine that was consistently failing to back-up to tape each night. Two symlinks had been made to directories beneath each other. The back-up software kept appending those same directories to the tape until it was out of space. Normally, a set of checks will prevent creating a symlink in this situation, but ours was a special case.
9.4 Mounting Devices
As was previously discussed in Section 4.1.1, all the drives and devices in your computer are one big filesystem. Various hard drive partitions, CD-ROMs, and floppies are all placed in the same tree. In order to attach these drives to the filesystem so that you can access them, you have to use the mount(1) and umount(1) commands.
Some devices are automatically mounted when you boot up your computer. These are listed in the /etc/fstab file. Anything that you want to be mounted automatically gets an entry in that file. For other devices, you'll have to issue a command every time you want to use the device.
9.4.1 fstab
Let's look at an example of the /etc/fstab file:
% cat /etc/fstab /dev/sda1 / ext2 defaults 1 1 /dev/sda2 /usr/local ext2 defaults 1 1 /dev/sda4 /home ext2 defaults 1 1 /dev/sdb1 swap swap defaults 0 0 /dev/sdb3 /export ext2 defaults 1 1 none /dev/pts devpts gid=5,mode=620 0 0 none /proc proc defaults 0 0 /dev/fd0 /mnt ext2 defaults 0 0 /dev/cdrom /mnt/cdrom iso9660 ro 0 0 |
The first column is the device name. In this case, the devices are five partitions spread out across two SCSI hard drives, two special filesystems that don't need a device, a floppy, and a CD-ROM drive. The second column is where the device will be mounted. This needs to be a directory name, except in the case of a swap partition. The third column is the filesystem type of the device. For normal Linux filesystems, this will be ext2 (second extended filesystem). CD-ROM drives are iso9660, and Windows-based devices will either be msdos or vfat.
The fourth column is a listing of options that apply to the mounted filesystem. defaults is fine for just about everything. However, read-only devices should be given the ro flag. There are a lot of options that can be used. Check the fstab(5) man page for more information. The last two columns are used by fsck and other commands that need to manipulate the devices. Check the man page for that information as well.
When you install Slackware Linux, the setup program will build much of the fstab file.
9.4.2 mount and umount
Attaching another device to your filesystem is easy. All you have to do is use the mount command, along with a few options. Using mount can simplified if the device has an entry in the /etc/fstab file. For example, let's say that I wanted to mount my CD-ROM drive and that my fstab file looked like the example from the previous section. I would call mount like so:
% mount /cdrom |
Since there is an entry in fstab for that mount point, mount knows what options to use. If there wasn't an entry for that device, I would have to use several options for mount:
% mount -t iso9660 -o ro /dev/cdrom /cdrom |
That command line includes the same information as the example fstab did, but we'll go over all the parts anyways. The -t iso9660 is the filesystem type of the device to mount. In this case, it would be the iso9660 filesystem which is what CD-ROM drives most commonly use. The -o ro tells mount to mount the device read-only. The /dev/cdrom is the name of the device to mount, and /cdrom is the location on the filesystem to mount the drive.
Before you can remove a floppy, CD-ROM, or other removable device that is currently mounted, you'll have to unmount it. That is done using the umount command. Don't ask where the “n” went because we couldn't tell you. You can use either the mounted device or the mount point as the argument to umount. For example, if you wanted to unmount the CD-ROM from the previous example, either of these commands would work:
# umount /dev/cdrom # umount /cdrom |
9.5 NFS Mounts
NFS stands for the Network Filesystem. It is not really part of the real filesystem, but can be used to add parts to the mounted filesystem.
Large Unix environments often times share the same programs, sets of home directories, and mail spool. The problem of getting the same copy to each machine is solved with NFS. We can use NFS to share one set of home directories between all of the workstations. The workstations then mount that NFS share as if it were on their own machines.
See Section 5.6.2 and the man pages for exports(5), nfsd(8), and mountd(8) for more information.
Chapter 10 Handling Files and Directories
Linux aims to the most Unix-like it can be. Traditionally, Unix operating systems have been command-line oriented. We do have a graphical user interface in Slackware, but the command-line is still the main level of control for the system. Therefore, it is important to understand some of the basic file management commands.
The following sections explain the common file management commands and provide examples of how they are used. There are many other commands, but these will help you get started. Also, the commands are only briefly discussed here. You will find more detail in the accompanying man pages for each command.
10.1 Navigation : ls, cd, and pwd
10.1.1 ls
This command lists files in a directory. Windows and DOS users will notice its similarity to the dir command. By itself, ls(1) will list the files in the current directory. To see what's in your root directory, you could issue these commands:
% cd / % ls bin cdr dev home lost+found proc sbin tmp var boot cdrom etc lib mnt root suncd usr vmlinuz |
The problem a lot of people have with that output is that you cannot easily tell what is a directory and what is a file. Some users prefer that ls add a type identifier to each listing, like this:
% ls -FC bin/ cdr/ dev/ home/ lost+found/ proc/ sbin/ tmp/ var/ boot/ cdrom/ etc/ lib/ mnt/ root/ suncd/ usr/ vmlinuz |
Directories get a slash at the end of the name, executable files get an asterisk at the end of the name, and so on.
ls can also be used to get other statistics on files. For example, to see the creation dates, owners, and permissions, you would look at a long listing:
% ls -l drwxr-xr-x 2 root bin 4096 May 7 09:11 bin/ drwxr-xr-x 2 root root 4096 Feb 24 03:55 boot/ drwxr-xr-x 2 root root 4096 Feb 18 01:10 cdr/ drwxr-xr-x 14 root root 6144 Oct 23 18:37 cdrom/ drwxr-xr-x 4 root root 28672 Mar 5 18:01 dev/ drwxr-xr-x 10 root root 4096 Mar 8 03:32 etc/ drwxr-xr-x 8 root root 4096 Mar 8 03:31 home/ drwxr-xr-x 3 root root 4096 Jan 23 21:29 lib/ drwxr-xr-x 2 root root 16384 Nov 1 08:53 lost+found/ drwxr-xr-x 2 root root 4096 Oct 6 12:47 mnt/ dr-xr-xr-x 62 root root 0 Mar 4 15:32 proc/ drwxr-x--x 12 root root 4096 Feb 26 02:06 root/ drwxr-xr-x 2 root bin 4096 Feb 17 02:02 sbin/ drwxr-xr-x 5 root root 2048 Oct 25 10:51 suncd/ drwxrwxrwt 4 root root 487424 Mar 7 20:42 tmp/ drwxr-xr-x 21 root root 4096 Aug 24 03:04 usr/ drwxr-xr-x 18 root root 4096 Mar 8 03:32 var/ |
Suppose you want to get a listing of the hidden files in the current directory. This command will do just that:
% ls -a . bin cdrom home mnt sbin usr .. boot dev lib proc suncd var .pwrchute_tmp cdr etc lost+found root tmp vmlinuz |
Files beginning with a period (called dot files) are hidden when you run ls. You will only see them if you pass the -a option.
There are many more options that can be found in the online manual page. Don't forget that you can combine options that you pass to ls.
10.1.2 cd
The cd command is used to change working directories. You simply type cd followed by the path name to change to. Here are some examples:
darkstar:~$ cd /bin darkstar:/bin$ cd usr bash: cd: usr: No such file or directory darkstar:/bin$ cd /usr darkstar:/usr$ ls bin darkstar:/usr$ cd bin darkstar:/usr/bin$ |
Notice that without the preceding slash, it tries to change to a directory in the current directory. Also executing cd with no options will move you to your home directory.
The cd command is not like the other commands. It is a builtin shell command. Shell builtins are discussed in Section 8.3.1. This may not make any sense to you right now. Basically it means there is no man page for this command. Instead, you have to use the shell help. Like this:
% help cd |
It will display the options for cd and how to use them.
10.1.3 pwd
The pwd command is used to show your current location. To use the pwd command just type pwd. For example:
% cd /bin % pwd /bin % cd /usr % cd bin % pwd /usr/bin |
10.2 Pagers: more, less, and most
10.2.1 more
more(1) is what we call a pager utility. Oftentimes the output of a particular command is too big to fit on one screen. The individual commands do not know how to fit their output to separate screens. They leave this job to the pager utility.
The more command breaks the output into individual screens and waits for you to press the space bar before continuing on to the next screen. Pressing the enter key will advance the output one line. Here is a good example:
% cd /usr/bin % ls -l |
That should scroll for a while. To break up the output screen by screen, just pipe it through more:
% ls -l | more |
That is the pipe character (shift backslash). The pipe is short for saying take the output of ls and feed it into more. You can pipe just about anything through the more command, not just ls. Piping is also covered in Section 8.2.3.
10.2.2 less
The more command is quite handy, but often you will find that you have advanced past the screen you wanted. more does not provide a way to go back. The less(1) command provides this functionality. It is used in the same way as the more command, so the previous examples apply here too. So, less is more than more. Joost Kremers puts it this way:
less is more, but more more than more is, so more is less less, so use more less if you want less more.
10.2.3 most
Where more and less leave off, most(1) picks back up. If less is more than more, most is more than less. Whereas the other pagers can only display one file at a time, most is capable of viewing any number of files, as long as each file's window is at least 2 lines long. most has a lot of options, check the man page for full details.
10.3 Simple Output: cat and echo
10.3.1 cat
cat(1) is short for “concatenate”. It was originally designed to merge text files into one, but can be used for many other purposes.
To merge two or more files into one, you simply list the files after the cat command and then redirect the new output to a file. cat works with standard input and standard output, so you have to use the shell redirection characters. For example:
% cat file1 file2 file3 > bigfile |
This command takes the contents of file1, file2, and file3 and merges it all together. The new output is sent to standard out.
One can also use cat to display files. Many people cat text files through the more or less commands, like this:
% cat file1 | more |
That will display the file1 file and pipe it through the more command so that you only get one screen at a time.
Another common use for cat is copying files. You can copy any file around with cat, like this:
% cat /bin/bash > ~/mybash |
The /bin/bash program is copied to your home directory and named mybash.
cat has many uses and the ones discussed here are just a few. Since cat makes extensive use of standard input and standard output, it is ideal for use in shell scripts or part of other complex commands.
10.3.2 echo
The echo(1) command displays the specified text on the screen. You specify the string to display after the echo command. By default echo will display the string and print a newline character after it. You can pass the -n option to suppress the printing of the newline. The -e option will cause echo to search for escape characters in the string and execute them.
10.4 Creation: touch and mkdir
10.4.1 touch
touch(1) is used to change the timestamp on a file. You can change access timestamps and modification timestamps with this command. If the file specified does not exist, touch will create a zero length file with the name specified. To mark a file with the current system time, you would issue this command:
% ls -al file1 -rw-r--r-- 1 root root 9779 Feb 7 21:41 file1 % touch file1 % ls -al file1 -rw-r--r-- 1 root root 9779 Feb 8 09:17 file1 |
There are several options for touch, including options to specify which timestamp to modify, the time to use, and many more. The online manual page discusses these in detail.
10.4.2 mkdir
mkdir(1) will create a new directory. You simply specify the directory to create when you run mkdir. This example creates the hejaz directory in the current directory:
% mkdir hejaz |
You can also specify a path, like this:
% mkdir /usr/local/hejaz |
The -p option will tell mkdir to make any parent directories. The above example will fail if /usr/local does not exist. The -p option will create /usr/local and /usr/local/hejaz:
% mkdir -p /usr/local/hejaz |
10.5 Copy and Move
10.5.1 cp
cp(1) copies files. DOS users will notice its similarity to the copy command. There are many options for cp , so you should have a look at the man page before using it.
A common use is to use cp to copy a file from one location to another. For example:
% cp hejaz /tmp |
This copies the hejaz file from the current directory to the /tmp directory.
Many users prefer to keep the timestamps preserved, as in this example:
% cp -a hejaz /tmp |
This ensures that the timestamps are not modified in the copy.
To recursively copy the contents of a directory to another directory, you would issue this command:
% cp -R mydir /tmp |
That will copy the mydir directory to the /tmp directory.
Also if you wish to copy a directory or a file and keep all it's old permissions and time stamps and keep it exactly the same use cp -p.
% ls -l file -rw-r--r-- 1 root vlad 4 Jan 1 15:27 file % cp -p file /tmp % ls -l /tmp/file -rw-r--r-- 1 root vlad 4 Jan 1 15:27 file |
cp has many more options that are discussed in detail in the online manual page.
10.5.2 mv
mv(1) moves files from one place to another. Sounds simple enough doesn't it?
% mv oldfile /tmp/newfile |
mv has a few useful command line options that are detailed in the man page. In practice, mv is almost never used with commandline options.
10.6 Deletion: rm and rmdir
10.6.1 rm
rm(1) removes files and directory trees. DOS users will notice the similarity to both the del and deltree commands. rm can be very dangerous if you do not watch yourself. While it is sometimes possible to retrieve a recently deleted file, it can be complicated (and potentially costly) and is beyond the scope of this book.
To remove a single file, specify its name when you run rm:
% rm file1 |
If the file has write permissions removed, you may get a permission denied error message. To force removal of the file no matter what, pass the -f option, like this:
% rm -f file1 |
To remove an entire directory, you use the -r and -f options together. This is a good example of how to delete the entire contents of your hard drive. You really don't want to do this. But here's the command anyway:
# rm -rf / |
Be very careful with rm; you can shoot yourself in the foot. There are several command line options, which are discussed in detail in the online manual page.
10.6.2 rmdir
rmdir(1) removes directories from the filesystem. The directory must be empty before it can be removed. The syntax is simply:
% rmdir <directory> |
This example will remove the hejaz subdirectory in the current working directory:
% rmdir hejaz |
If that directory does not exist, rmdir will tell you. You can also specify a full path to a directory to remove, as this example shows:
% rmdir /tmp/hejaz |
That example will try to remove the hejaz directory inside the /tmp directory.
You can also remove a directory and all of its parent directories by passing the -p option.
% rmdir -p /tmp/hejaz |
This will first try to remove the hejaz directory inside /tmp. If that is successful, it will try to remove /tmp. rmdir will continue this until an error is encountered or the entire tree specified is removed.
10.7 Aliasing files with ln
ln(1) is used to create links between files. These links can be either hard links or soft (symbolic) links. The differences between the two kinds of links were discussed in Section 9.3. If you wanted to make a symbolic link to the directory /var/media/mp3 and place the link in your home directory, you would do this:
% ln -s /var/media/mp3 ~/mp3 |
The -s option tells ln to make a symbolic link. The next option is the target of the link, and the final option is what to call the link. In this case, it will just make a file called mp3 in your home directory that points to /var/media/mp3. You can call the link itself whatever you want by just changing the last option.
Making a hard link is just as simple. All you have to do is leave off the -s option. Hard links may not normally refer to directories or span file systems, however. To create a hard link /usr/bin/email to /usr/bin/mutt, simply type the following:
# ln /usr/bin/mutt /usr/bin/email |
Chapter 11 Process Control
Every program that is running is called a process. These processes range from things like the X Window System to system programs (daemons) that are started when the computer boots. Every process runs as a particular user. Processes that are started at boot time usually run as root or nobody. Processes that you start will run as you. Processes started as other users will run as those users.
You have control over all the processes that you start. Additionally, root has control over all processes on the system, including those started by other users. Processes can be controlled and monitored through several programs, as well as some shell commands.
11.1 Backgrounding
Programs started from the command line start up in the foreground. This allows you to see all the output of the program and interact with it. However, there are several occasions when you'd like the program to run without taking up your terminal. This is called running the program in the background, and there are a few ways to do it.
The first way to background a process is by adding an ampersand to the command line when you start the program. For example, assume you wanted to use the command line mp3 player amp to play a directory full of mp3s, but you needed to do something else on the same terminal. The following command line would start up amp in the background:
% amp *.mp3 & |
The program will run as normal, and you are returned to a prompt.
The other way to background a process is to do so while it is running. First, start up a program. While it is running, hit Control+z. This suspends the process. A suspended process is basically paused. It momentarily stops running, but can be started up again at any time. Once you have suspended a process, you are returned to a prompt. You can background the process by typing:
% bg |
Now the suspended process is running in the background.
11.2 Foregrounding
If you need to interact with a backgrounded process, you can bring it back into the foreground. If you've only got one backgrounded process, you can bring it back by typing:
% fg |
If the program is not done running, the program will take control over you terminal and you will not be returned to a prompt. Sometimes, the program will finish running while backgrounded. In this instance, you'll get a message like this:
[1]+ Done /bin/ls $LS_OPTIONS |
That tells you that the backgrounded process (in this case ls - not terribly interesting) has completed.
It is possible to have several processes backgrounded at once. When this happens, you'll need to know which process you want to bring back to the foreground. Just typing fg will foreground the process that was last backgrounded. What if you had a whole list of processes in the background? Luckily, bash includes a command to list all the processes. It's called jobs and gives output like so:
% jobs [1] Stopped vim [2]- Stopped amp [3]+ Stopped man ps |
This shows you a list of all the processes that are backgrounded. As you can see, they are all stopped. This means that the processes are suspended. The number is a sort of ID for all the backgrounded processes. The ID with a plus sign beside it (man ps) is the process that will be foregrounded if you just type fg.
If you wanted to foreground vim, you would type:
% fg 1 |
and vim would spring back up to the console. Backgrounding processes can be very useful if you only have one terminal open over a dialup connection. You can have several programs running on that one terminal, periodically switching back and forth between them.
11.3 ps
So now you know how to switch back and forth between several processes that you've started from the command line. And you also know that there are lots of processes running all the time. So how do you list all of these programs? Well, you make use of the ps(1) command. This command has a lot of options, so we'll only cover the most important ones here. For a complete listing, see the man page for ps. Man pages are covered in-depth in Section 2.1.1.
Simply typing ps will get you a listing of the programs running on your terminal. This incudes the foreground processes (which include whatever shell you are using, and of course, ps itself). Also listed are backgrounded processes you may have running. Many times, that will be a very short listing:
Even though this is not a lot of processes, the information is very typical. You'll get the same columns using regular ps no matter how many processes are running. So what does it all mean?
Well, the PID is the process ID. All running processes are given a unique identifier which ranges between 1 and 32767. Each process is assigned the next free PID. When a process quits (or is killed, as you will see in the next section), it gives up its PID. When the max PID is reached, the next free one will wrap back around to the lowest free one.
The TTY column indicates which terminal the process is running on. Doing a plain ps will only list all the programs running on the current terminal, so all the processes give the same information in the TTY column. As you can see, both processes listed are running on ttyp0. This indicates that they are either running remotely or from an X terminal of some variety.
The TIME column indicated how much CPU time the process has been running. This is different from the actual amount of time that a process runs. Remember that Linux is a multitasking operating system. There are many processes running all the time, and these processes each get a small portion of the processor's time. So, the TIME column should show much less time for each process than it actually takes to run. If you see more than several minutes in the TIME column, it could mean that something is wrong.
Finally, the CMD column shows what the program actually is. It only lists the base name of the program, not any command line options or similar information. To get that information, you'll need to use one of the many options to ps. We'll discuss that shortly.
You can get a complete listing of the processes running on your system using the right combination of options. This will probably result in a long listing of processes (fifty-five on my laptop as I write this sentence), so I'll abbreviate the output:
% ps -ax PID TTY STAT TIME COMMAND 1 ? S 0:03 init [3] 2 ? SW 0:13 [kflushd] 3 ? SW 0:14 [kupdate] 4 ? SW 0:00 [kpiod] 5 ? SW 0:17 [kswapd] 11 ? S 0:00 /sbin/kerneld 30 ? SW 0:01 [cardmgr] 50 ? S 0:00 /sbin/rpc.portmap 54 ? S 0:00 /usr/sbin/syslogd 57 ? S 0:00 /usr/sbin/klogd -c 3 59 ? S 0:00 /usr/sbin/inetd 61 ? S 0:04 /usr/local/sbin/sshd 63 ? S 0:00 /usr/sbin/rpc.mountd 65 ? S 0:00 /usr/sbin/rpc.nfsd 67 ? S 0:00 /usr/sbin/crond -l10 69 ? S 0:00 /usr/sbin/atd -b 15 -l 1 77 ? S 0:00 /usr/sbin/apmd 79 ? S 0:01 gpm -m /dev/mouse -t ps2 94 ? S 0:00 /usr/sbin/automount /auto file /etc/auto.misc 106 tty1 S 0:08 -bash 108 tty3 SW 0:00 [agetty] 109 tty4 SW 0:00 [agetty] 110 tty5 SW 0:00 [agetty] 111 tty6 SW 0:00 [agetty] [output cut] |
Most of these processes are started at boot time on most systems. I've made a few modifications to my system, so your mileage will most likely vary. However, you will see most of these processes on your system too. As you can see, these options display command line options to the running processes. Recently, a kernel vulnerability in ptrace facilitated a fix which no longer shows command line options for many running processes. These are now listed in brackets like PIDs 108 through 110. It also brings up a few more columns and some other interesting output.
First, you'll notice that most of these processes are listed as running on tty “?”. Those are not attached to any particular terminal. This is most common with daemons, which are processes which run without attaching to any particular terminal. Common daemons are sendmail, BIND, apache, and NFS. They typically listen for some request from a client, and return information to it upon request.
Second, there is a new column: STAT. It shows the status of the process. S stands for sleeping: the process is waiting for something to happen. Z stands for a zombied process. A zombied processes is one whose parent has died, leaving the child processes behind. This is not a good thing. D stands for a process that has entered an uninterruptible sleep. Often, these processes refuse to die even when passed a SIGKILL. You can read more about SIGKILL later in the next section on kill . W stands for paging. A dead process is marked with an X. A process marked T is traced, or stopped. R means that the process is runable.
If you want to see even more information about the running processes, try this out:
% ps -aux USER PID %CPU %MEM VSZ RSS TTY STAT START TIME COMMAND root 1 0.0 0.0 344 80 ? S Mar02 0:03 init [3] root 2 0.0 0.0 0 0 ? SW Mar02 0:13 [kflushd] root 3 0.0 0.0 0 0 ? SW Mar02 0:14 [kupdate] root 4 0.0 0.0 0 0 ? SW Mar02 0:00 [kpiod] root 5 0.0 0.0 0 0 ? SW Mar02 0:17 [kswapd] root 11 0.0 0.0 1044 44 ? S Mar02 0:00 /sbin/kerneld root 30 0.0 0.0 1160 0 ? SW Mar02 0:01 [cardmgr] bin 50 0.0 0.0 1076 120 ? S Mar02 0:00 /sbin/rpc.port root 54 0.0 0.1 1360 192 ? S Mar02 0:00 /usr/sbin/sysl root 57 0.0 0.1 1276 152 ? S Mar02 0:00 /usr/sbin/klog root 59 0.0 0.0 1332 60 ? S Mar02 0:00 /usr/sbin/inet root 61 0.0 0.2 1540 312 ? S Mar02 0:04 /usr/local/sbi root 63 0.0 0.0 1796 72 ? S Mar02 0:00 /usr/sbin/rpc. root 65 0.0 0.0 1812 68 ? S Mar02 0:00 /usr/sbin/rpc. root 67 0.0 0.2 1172 260 ? S Mar02 0:00 /usr/sbin/cron root 77 0.0 0.2 1048 316 ? S Mar02 0:00 /usr/sbin/apmd root 79 0.0 0.1 1100 152 ? S Mar02 0:01 gpm root 94 0.0 0.2 1396 280 ? S Mar02 0:00 /usr/sbin/auto chris 106 0.0 0.5 1820 680 tty1 S Mar02 0:08 -bash root 108 0.0 0.0 1048 0 tty3 SW Mar02 0:00 [agetty] root 109 0.0 0.0 1048 0 tty4 SW Mar02 0:00 [agetty] root 110 0.0 0.0 1048 0 tty5 SW Mar02 0:00 [agetty] root 111 0.0 0.0 1048 0 tty6 SW Mar02 0:00 [agetty] [output cut] |
That's a whole lot of information. Basically, it adds information including what user started the process, how much of the system resources the process is using (the %CPU, %MEM, VSZ, and RSS columns), and on what date the process was started. Obviously, that's a lot of information that could come in handy for a system administrator. It also brings up another point: the information now goes off the edge of the screen so that you cannot see it all. The -w option will force ps to wrap long lines.
It's not terribly pretty, but it does the job. You've now got the complete listings for each process. There's even more information that you can display about each process. Check out the very in-depth man page for ps. However, the options shown above are the most popular ones and will be the ones you need to use the most often.
11.4 kill
On occasion, programs misbehave and you'll need to put them back in line. The program for this kind of administration is called kill(1), and it can be used for manipulating processes in several ways. The most obvious use of kill is to kill off a process. You'll need to do this if a program has run away and is using up lots of system resources, or if you're just sick of it running.
In order to kill off a process, you'll need to know its PID or its name. To get the PID, use the ps command as was discussed in the last section. For example, to kill off process 4747, you'd issue the following:
% kill 4747 |
Note that you'll have to be the owner of the process in order to kill it. This is a security feature. If you were allowed to kill off processes started by other users, it would be possible to do all sorts of malicious things. Of course, root can kill off any process on the system.
There's another variety of the kill command called killall(1). This program does exactly what it says: it kills all the running processes that have a certain name. If you wanted to kill off all the running vim processes, you could type the following command:
% killall vim |
Any and all vim processes you have running will die off. Doing this as root would kill off all the vim processes running for all users. This brings up an interesting way to kick everyone (including yourself) off the system:
# killall bash |
Sometimes a regular kill doesn't get the job done. Certain processes will not die with a kill. You'll need to use a more potent form. If that pesky PID 4747 wasn't responding to your kill request, you could do the following:
% kill -9 4747 |
That will almost certainly cause process 4747 to die. You can do the same thing with killall. What this is doing is sending a different signal to the process. A regular kill sends a SIGTERM (terminate) signal to the process, which tells it to finish what it's doing, clean up, and exit. kill -9 sends a SIGKILL (kill) signal to the process, which essentially drops it. The process is not allowed to clean-up, and sometimes bad things like data corruption could occur by killing something with a SIGKILL. There's a whole list of signals at your disposal. You can get a listing of signals by typing the following:
% kill -l 1) SIGHUP 2) SIGINT 3) SIGQUIT 4) SIGILL 5) SIGTRAP 6) SIGABRT 7) SIGBUS 8) SIGFPE 9) SIGKILL 10) SIGUSR1 11) SIGSEGV 12) SIGUSR2 13) SIGPIPE 14) SIGALRM 15) SIGTERM 17) SIGCHLD 18) SIGCONT 19) SIGSTOP 20) SIGTSTP 21) SIGTTIN 22) SIGTTOU 23) SIGURG 24) SIGXCPU 25) SIGXFSZ 26) SIGVTALRM 27) SIGPROF 28) SIGWINCH 29) SIGIO 30) SIGPWR |
The number must be used for kill, while the name minus the leading “SIG” can be used with killall. Here's another example:
% killall -KILL vim |
A final use of kill is to restart a process. Sending a SIGHUP will cause most processes to re-read their configuration files. This is especially helpful for telling system processes to re-read their config files after editing.
11.5 top
Finally, there's a command you can use to display updating information about the processes running on the system. This command is called top(1), and is started like so:
% top |
This will display a full screen of information about the processes running on the system, as well as some overall information about the system. This includes load average, number of processes, the CPU status, free memory information, and details about processes including PID, user, priority, CPU and memory usage information, running time, and program name.
 6:47pm  up 1 day,  18:01,  1 user,  load average: 0.02, 0.07, 0.02
61 processes: 59 sleeping, 2 running, 0 zombie, 0 stopped
CPU states:  2.8% user,  3.1% system,  0.0% nice, 93.9% idle
Mem:   257992K av,  249672K used,    8320K free,   51628K shrd,  78248K buff
Swap:   32764K av,     136K used,   32628K free,                 82600K cached

PID USER    PRI  NI  SIZE  RSS  SHARE  STAT  LIB %CPU %MEM  TIME COMMAND
 112 root     12   0 19376  18M   2468  R       0  3.7  7.5 55:53 X
4947 david    15   0  2136 2136   1748  S       0  2.3  0.8  0:00 screenshot
3398 david     7   0 20544  20M   3000  S       0  1.5  7.9  0:14 gimp
4946 root     12   0  1040 1040    836  R       0  1.5  0.4  0:00 top
 121 david     4   0   796  796    644  S       0  1.1  0.3 25:37 wmSMPmon
 115 david     3   0  2180 2180   1452  S       0  0.3  0.8  1:35 wmaker
4948 david    16   0   776  776    648  S       0  0.3  0.3  0:00 xwd
   1 root      1   0   176  176    148  S       0  0.1  0.0  0:13 init
 189 david     1   0  6256 6156   4352  S       0  0.1  2.4  3:16 licq
4734 david     0   0  1164 1164    916  S       0  0.1  0.4  0:00 rxvt
   2 root      0   0     0    0      0  SW      0  0.0  0.0  0:08 kflushd
   3 root      0   0     0    0      0  SW      0  0.0  0.0  0:06 kupdate
   4 root      0   0     0    0      0  SW      0  0.0  0.0  0:00 kpiod
   5 root      0   0     0    0      0  SW      0  0.0  0.0  0:04 kswapd
  31 root      0   0   340  340    248  S       0  0.0  0.1  0:00 kerneld
  51 root      0   0    48   48     32  S       0  0.0  0.0  0:00 dhcpcd
  53 bin       0   0   316  316    236  S       0  0.0  0.1  0:00 rpc.portmap
  57 root      0   0   588  588    488  S       0  0.0  0.2  0:01 syslogd
|
It's called top because the most CPU intensive programs will be listed at the top. An interesting note is that top will be listed first on most inactive (and some active) systems because of its CPU utilization. However, top is quite useful for determining what program is misbehaving and needs to be killed off.
But suppose you only want a list of your own processes, or the processes of some other user. The processes you want to see might not be among the most CPU intensive programs currently running. The -u option allows you to specify a username or UID and monitor only those processes owned by that UID.
% top -u alan PID USER PR NI VIRT RES SHR S %CPU %MEM TIME+ COMMAND 3622 alan 13 0 11012 10m 6956 S 1.0 2.1 0:03.66 gnome-terminal 3739 alan 13 0 1012 1012 804 R 0.3 0.2 0:00.06 top 3518 alan 9 0 1312 1312 1032 S 0.0 0.3 0:00.09 bash 3529 alan 9 0 984 984 848 S 0.0 0.2 0:00.00 startx 3544 alan 9 0 640 640 568 S 0.0 0.1 0:00.00 xinit 3548 alan 9 0 8324 8320 6044 S 0.0 1.6 0:00.30 gnome-session 3551 alan 9 0 7084 7084 1968 S 0.0 1.4 0:00.50 gconfd-2 3553 alan 9 0 2232 2232 380 S 0.0 0.4 0:00.05 esd 3555 alan 9 0 2552 2552 1948 S 0.0 0.5 0:00.10 bonobo-activati 3557 alan 9 0 2740 2740 2224 S 0.0 0.5 0:00.05 gnome-smproxy 3559 alan 9 0 6496 6492 5004 S 0.0 1.3 0:00.31 gnome-settings- 3565 alan 9 0 1740 1740 1440 S 0.0 0.3 0:00.28 xscreensaver 3568 alan 9 0 7052 7052 4960 S 0.0 1.4 0:02.28 metacity 3572 alan 9 0 11412 11m 7992 S 0.0 2.2 0:01.58 gnome-panel 3574 alan 9 0 12148 11m 8780 S 0.0 2.4 0:00.64 nautilus 3575 alan 9 0 12148 11m 8780 S 0.0 2.4 0:00.00 nautilus 3576 alan 9 0 12148 11m 8780 S 0.0 2.4 0:00.00 nautilus |
As you can see, I'm currently running X, top, a gnome-terminal (in which I'm writing this) and many other X-related processes which take up the most CPU time for me. This is a good way to monitor how hard your users are working your system.
top also supports monitoring processes by their PID, ignoring idle and zombied processes, and many other options. The best place to get a handle on these options is the man page for top.
Chapter 12 Essential System Administration
Whoa whoa whoa whoa whoa.... I know what you're thinking. “I'm not a system administrator! I don't even want to be a system administrator!”
Fact is, you are the administrator of any computers for which you have the root password. This might be your desktop box with one or two users, or it might be a big server with several hundred. Regardless, you'll need to know how to manage users, and how to shut down the system safely. These tasks seem simple, but they have some quirks to keep in mind.
12.1 Users and Groups
As mentioned in Chapter 8, you shouldn't normally use your system logged in as root. Instead, you should create a normal user account for everyday use, and use the root account only for system administration tasks. To create a user, you can either use the tools supplied with Slackware, or you can edit the password files by hand.
12.1.1 Supplied Scripts
The easiest way to manage users and groups is with the supplied scripts and programs. Slackware includes the programs adduser, userdel(8), chfn(1), chsh(1), and passwd(1) for dealing with users. The commands groupadd(8), groupdel(8), and groupmod(8) are for dealing with groups. With the exception of chfn, chsh, and passwd, these programs are generally only run as root, and are therefore located in /usr/sbin. chfn, chsh, and passwd can be run by anyone, and are located in /usr/bin.
Users can be added with the adduser program. We'll start out by going through the whole procedure, showing all the questions that are asked and a brief description of what everything means. The default answer is in the brackets, and can be chosen for almost all the questions, unless you really want to change something.
# adduser Login name for new user []: jellyd |
This is the name that the user will use to login. Traditionally, login names are eight characters or fewer, and all lowercase characters. (You may use more than eight characters, or use digits, but avoid doing so unless you have a fairly important reason.)
You can also provide the login name as an argument on the command line:
# adduser jellyd |
In either case, after providing the login name, adduser will prompt for the user ID:
User ID ('UID') [ defaults to next available ]:
|
The user ID (UID) is how ownerships are really determined in Linux. Each user has a unique number, starting at 1000 in Slackware. You can pick a UID for the new user, or you can just let adduser assign the user the next free one.
Initial group [users]: |
All users are placed into the users group by default. You might want to place the new user into a different group, but it is not recommended unless you know what you're doing.
Additional groups (comma separated) []: |
This question allows you to place the new user into additional groups. It is possible for a user to be in several groups at the same time. This is useful if you have established groups for things like modifying web site files, playing games, and so on. For example, some sites define group wheel as the only group that can use the su command. Or, a default Slackware installation uses the sys group for users authorized to play sounds through the internal sound card.
Home directory [/home/jellyd] |
Home directories default to being placed under /home. If you run a very large system, it's possible that you have moved the home directories to a different location (or to many locations). This step allows you to specify where the user's home directory will be.
Shell [ /bin/bash ] |
bash is the default shell for Slackware Linux, and will be fine for most people. If your new user comes from a Unix background, they may be familiar with a different shell. You can change their shell now, or they can change it themselves later using the chsh command.
Expiry date (YYYY-MM-DD) []: |
Accounts can be set up to expire on a specified date. By default, there is no expiration date. You can change that, if you'd like. This option might be useful for people running an ISP who might want to make an account expire upon a certain date, unless they receive the next year's payment.
New account will be created as follows: --------------------------------------- Login name: jellyd UID: [ Next available ] Initial group: users Additional groups: [ None ] Home directory: /home/jellyd Shell: /bin/bash Expiry date: [ Never ] |
This is it... if you want to bail out, hit Control+C. Otherwise, press ENTER to go ahead and make the account.
You now see all the information that you've entered about the new account and are given the opportunity to abort the account creation. If you entered something incorrectly, you should hit Control+C and start over. Otherwise, you can hit enter and the account will be made.
Creating new account...

Changing the user information for jellyd
Enter the new value, or press return for the default
        Full Name []: Jeremy
        Room Number []: Smith 130
        Work Phone []:
        Home Phone []:
        Other []:
|
All of this information is optional. You don't have to enter any of this if you don't want to, and the user can change it at any time using chfn. However, you might find it helpful to enter at least the full name and a phone number, in case you need to get in touch with the person later.
Changing password for jellyd Enter the new password (minimum of 5, maximum of 127 characters) Please use a combination of upper and lower case letters and numbers. New password: Re-enter new password: Password changed. Account setup complete. |
You'll have to enter a password for the new user. Generally, if the new user is not physically present at this point, you'll just pick some default password and tell the user to change it to something more secure.
|
Choosing a Password: Having a secure password is the first line of defense against getting cracked. You do not want to have an easily guessed password, because that makes it easier for someone to break into your system. Ideally, a secure password would be a random string of characters, including upper and lowercase letters, numbers, and random characters. (A tab character might not be a wise choice, depending on what kinds of computers you'll be logging in from.) There are many software packages that can generate random passwords for you; search the Internet for these utilities. In general, just use common sense: don't pick a password that is someone's birthday, a common phrase, something found on your desk, or anything that is easily associated with you. A password like “secure1” or any other password you see in print or online is also bad. |
Removing users is not difficult at all. Just run userdel with the name of the account to remove. You should verify that the user is not logged in, and that no processes are running as that user. Also, remember that once you've deleted the user, all of that user's password information is gone permanently.
# userdel jellyd |
This command removes that annoying jellyd user from your system. Good riddance! :) The user is removed from the /etc/passwd, /etc/shadow, and /etc/group files, but doesn't remove the user's home directory.
If you'd wanted to remove the home directory as well, you would instead use this command:
# userdel -r jellyd |
Temporarily disabling an account will be covered in the next section on passwords, since a temporary change involves changing the user's password. Changing other account information is covered in Section 12.1.3.
The programs to add and remove groups are very simple. groupadd will just add another entry to the /etc/group file with a unique group ID, while groupdel will remove the specified group. It is up to you to edit /etc/group to add users to a specific group. For example, to add a group called cvs:
# groupadd cvs |
And to remove it:
# groupdel cvs |
12.1.2 Changing Passwords
The passwd program changes passwords by modifying the /etc/shadow file. This file holds all the passwords for the system in an encrypted format. In order to change your own password, you would type:
% passwd Changing password for chris Old password: Enter the new password (minumum of 5, maximum of 127 characters) Please use a combination of upper and lower case letters and numbers. New password: |
As you can see, you are prompted to enter your old password. It won't appear on the screen as you type it, just like when you log in. Then, you are prompted to enter the new password. passwd performs a lot of checks on your new password, and it will complain if your new password doesn't pass its checks. You can ignore its warnings if you want. You will be prompted to enter your new password a second time for confirmation.
If you are root, you can also change another user's password:
# passwd ted |
You will then have to go through the same procedure as above, except that you won't have to enter the user's old password. (One of the many benefits of being root...)
If needed, you can also temporarily disable an account, and reenable it at a later time if needed. Both disabling an account and reenabling an account can be done with passwd. To disable an account, do the following as root:
# passwd -l david |
This will change david's password to something that can never match any encrypted value. You would reenable the account by using:
# passwd -u david |
Now, david's account is back to normal. Disabling an account might be useful if the user doesn't play by the rules you've set up on your system, or if they've exported a very large copy of xeyes(1) to your X desktop.
12.1.3 Changing User Information
There are two pieces of information that users can change at any time: their shell and their finger information. Slackware Linux uses chsh (change shell) and chfn (change finger) to modify these values.
A user can pick any shell that is listed in the /etc/shells file. For most people, /bin/bash will do just fine. Others might be familiar with a shell found on their system at work or school and want to use what they already know. To change your shell, use chsh:
% chsh
Password:
Changing the login shell for chris
Enter the new value, or press return for the default
        Login Shell [/bin/bash]:
|
After entering your password, enter the full path to the new shell. Make sure that it's listed in the /etc/shells(5) file first. The root user can also change any user's shell by running chsh with a username as the argument.
The finger information is the optional information such as your full name, phone numbers, and room number. This can be changed using chfn, and follows the same procedure as it did during account creation. As usual, root can change anyone's finger information.
12.2 Users and Groups, the Hard Way
Of course, it is possible to add, modify, and remove users and groups without using the scripts and programs that come with Slackware. It's not really difficult, although after reading this process, you'll probably find it much easier to use the scripts. However, it's important to know how your password information is actually stored, in case you ever need to recover this information and don't have the Slackware tools available.
First, we'll add a new user to the /etc/passwd(5), /etc/shadow(5), and /etc/group(5) files. The passwd file holds some information about the users on your system, but (strangely enough) not their passwords. This was once the case, but was halted long ago for security reasons. The passwd file must be readable by all users, but you don't want encrypted passwords world-readable, as would-be intruders can use the encrypted passwords as a starting point for decrypting a user's password. Instead, the encrypted passwords are kept in the shadow file, which is only readable by root, and everyone's password is entered into the passwd file simply as “x”. The group file lists all the groups and who is in each.
You can use the vipw command to edit the /etc/passwd file safely, and the vigr command to edit the /etc/group file safely. Use vipw -s to edit the /etc/shadow file safely. (“Safely” in this context means someone else won't be able to modify the file you're editing at the moment. If you're the only administrator of your system, you're probably safe, but it's best to get into good habits from the start.)
Let's examine the /etc/passwd file and look at how to add a new user. A typical entry in passwd looks like this:
chris:x:1000:100:Chris Lumens,Room 2,,:/home/chris:/bin/bash |
Each line is an entry for one user, and fields on each line are separated by a colon. The fields are the login name, encrypted password (“x” for everyone on a Slackware system, since Slackware uses shadow passwords), user ID, group ID, the optional finger information (separated by commas), home directory, and shell. To add a new user by hand, add a new line at the end of the file, filling in the appropriate information.
The information you add needs to meet some requirements, or your new user may have problems logging in. First, make sure that the password field is an x, and that both the user name and user ID is unique. Assign the user a group, either 100 (the “users” group in Slackware) or your default group (use its number, not its name). Give the user a valid home directory (which you'll create later) and shell (remember, valid shells are listed in /etc/shells).
Next, we'll need to add an entry in the /etc/shadow file, which holds the encrypted passwords. A typical entry looks like this:
chris:$1$w9bsw/N9$uwLr2bRER6YyBS.CAEp7R.:11055:0:99999:7::: |
Again, each line is an entry for one person, with each field delimited by a colon. The fields are (in order) login name, encrypted password, days since the Epoch (January 1, 1970) that the password was last changed, days before the password may be changed, days after which the password must be changed, days before password expiration that the user is notified, days after expiration that the account is disabled, days since the Epoch that the account is disabled, and a reserved field.
As you can see, most of that is for account expiration information. If you aren't using expiration information, you only need to fill in a few fields with some special values. Otherwise, you'll need to do some calculations and decision making before you can fill those fields in. For a new user, just put some random garbage in the password field. Don't worry about what the password is right now, because you're going to change it in a minute. The only character you cannot include in the password field is a colon. Leave the “days since password was changed” field blank as well. Fill in 0, 99999, and 7 just as you see in the example entry, and leave the other fields blank.
(For those of you who think you see my encrypted password above and believe you've got a leg up on breaking into my system, go right ahead. If you can crack that password, you'll know the password to a firewalled test system. Now that's useful :) )
All normal users are members of the “users” group on a typical Slackware system. However, if you want to create a new group, or add the new user to additional groups, you'll need to modify the /etc/group file. Here is a typical entry:
cvs::102:chris,logan,david,root |
The fields are group name, group password, group ID, and group members, separated by commas. Creating a new group is a simple matter of adding a new line with a unique group ID, and listing all the users you want to be in the group. Any users that are in this new group and are logged in will have to log out and log back in for those changes to take effect.
At this point, it might be a good idea to use the pwck and grpck commands to verify that the changes you've made are consistent. First, use pwck -r and grpck -r: the -r switch makes no changes, but lists the changes you would be asked to make if you ran the command without the switch. You can use this output to decide whether you need to further modify any files, to run pwck or grpck without the -r switch, or to simply leave your changes as they are.
At this point, you should use the passwd command to create a proper password for the user. Then, use mkdir to create the new user's home directory in the location you entered into the /etc/passwd file, and use chown to change the owner of the new directory to the new user.
Removing a user is a simple matter of deleting all of the entries that exist for that user. Remove the user's entry from /etc/passwd and /etc/shadow, and remove the login name from any groups in the /etc/group file. If you wish, delete the user's home directory, the mail spool file, and his crontab entry (if they exist).
Removing groups is similar: remove the group's entry from /etc/group.
12.3 Shutting Down Properly
It is very important that you shut down your system properly. Simply turning the power off with the power switch can cause serious filesystem damage. While the system is on, files are in use even if you aren't doing anything. Remember that there are many processes running in the background all the time. These processes are managing the system and keep a lot of files open. When the system's power is switched off, these files are not closed properly and may become corrupted. Depending on what files become damaged, the system might be rendered completely unusable! In any case, you'll have to go through a long filesystem check procedure on the next reboot.
|
If you configured your system with a journalling filesystem, like ext3 or reiserfs, you'll be partially protected from filesystem damage, and your filesystem check on reboot will be shorter than if you had used a filesystem without journalling, like ext2. However, this safety net is no excuse for improperly shutting down your system! A journalling FS is meant to protect your files from events beyond your control, not from your own laziness. |
In any case, when you want to reboot or power down your computer, it is important to do so properly. There are several ways of doing so; you can pick whichever one you think is the most fun (or least amount of work). Since a shutdown and a reboot are similar procedures, most of the ways for powering off the system can also be applied to rebooting.
The first method is through the shutdown(8) program, and it is probably the most popular. shutdown can be used to reboot or turn off the system at a given time, and can display a message to all the logged-in users of the system telling them that the system is going down.
The most basic use of shutdown to power down the computer is:
# shutdown -h now |
In this case, we are not going to send a custom message to the users; they will see shutdown's default message. “now” is the time that we want to shutdown, and the “-h” means to halt the system. This is not a very friendly way to run a multi-user system, but it works just fine on your home computer. A better method on a multiuser system would be to give everyone a little advance warning:
# shutdown -h +60 |
This would shutdown the system in one hour (60 minutes), which would be just fine on a normal multiuser system. Vital systems should have their downtime scheduled far in advance, and you should post warnings about the downtime in any appropriate locations used for system notifications (email, bulletin board, /etc/motd, whatever).
Rebooting the system uses the same command, but substitutes “-r” for “-h”:
# shutdown -r now |
You can use same time notation with shutdown -r that you could with shutdown -h. There are a lot of other things that you can do with shutdown to control when to halt or reboot the machine; see the man page for more details.
The second way of shutting down or powering off the computer is to use the halt(8) and reboot(8) commands. As the names indicate, halt will immediately halt the operating system, and reboot will reboot the system. (reboot is actually just a symbolic link to halt.) They are invoked like so:
# halt # reboot |
A lower-level way to reboot or shutdown the system is to talk directly to init. All the other methods are simply convenient ways to talk to init, but you can directly tell it what to do using telinit(8) (note that it only has one “l”). Using telinit will tell init what runlevel to drop into, which will cause a special script to be run. This script will kill or spawn processes as needed for that runlevel. This works for rebooting and shutting down because both of those are special runlevels.
# telinit 0 |
Runlevel 0 is halt mode. Telling init to enter runlevel 0 will cause all processes to be killed off, the filesystems unmounted, and the machine to be halted. This is a perfectly acceptable way to bring down the system. On many laptops and modern desktop computers, this will also cause the machine to be turned off.
# telinit 6 |
Runlevel 6 is reboot mode. All processes will be killed off, the filesystems will be unmounted, and the machine will be rebooted. This is a perfectly acceptable method of rebooting the system.
For the curious, when switching to runlevel 0 or 6, whether by using shutdown, halt, or reboot, the script /etc/rc.d/rc.6 is run. (The script /etc/rc.d/rc.0 is another symbolic link, to /etc/rc.d/rc.6.) You can customize this file to your tastes--but be sure to test your changes carefully!
There is one last method of rebooting the system. All the other methods require you to be logged in as root. However, it is possible to reboot the machine even if you aren't root, provided that you have physical access to the keyboard. Using Control+Alt+Delete (the "three-fingered salute") will cause the machine to immediately reboot. (Behind the scenes, the shutdown command is called for you when you use Control+Alt+Delete.) The salute doesn't always work when using X Windows--you may need to use Control+Alt+F1 (or another Function key) to switch to a non-X Windows terminal before using it.
Finally, the file that ultimately controls every aspect of startup and shutdown is the /etc/inittab(5) file. In general, you should not need to modify this file, but it may give you insight into why some things work the way they do. As always, see the man pages for further details.
Chapter 13 Basic Network Commands
A network consists of several computers connected together. The network can be as simple as a few computers connected in your home or office, or as complicated as a large university network or even the entire Internet. When your computer is part of a network, you have access to those systems either directly or through services like mail and the web.
There are a variety of networking programs that you can use. Some are handy for performing diagnostics to see if everything is working properly. Others (like mail readers and web browsers) are useful for getting your work done and staying in contact with other people.
13.1 ping
ping(8) sends an ICMP ECHO_REQUEST packet to the specified host. If the host responds, you get an ICMP packet back. Sound strange? Well, you can “ping” an IP address to see if a machine is alive. If there is no response, you know something is wrong. Here is an example conversation between two Linux users:
User A: Loki's down again.
User B: Are you sure?
User A: Yeah, I tried pinging it, but there's no response.
It's instances like these that make ping a very useful day-to-day command. It provides a very quick way to see if a machine is up and connected to the network. The basic syntax is:
% ping www.slackware.com |
There are, of course, several options that can be specified. Check the ping(1) man page for more information.
13.2 traceroute
Slackware's traceroute(8) command is a very useful network diagnostic tool. traceroute displays each host that a packet travels through as it tries to reach its destination. You can see how many “hops” from the Slackware web site you are with this command:
% traceroute www.slackware.com |
Each host will be displayed, along with the response times at each host. Here is an example output:
% traceroute www.slackware.com traceroute to www.slackware.com (204.216.27.13), 30 hops max, 40 byte packets 1 zuul.tdn (192.168.1.1) 0.409 ms 1.032 ms 0.303 ms 2 207.171.227.254 (207.171.227.254) 18.218 ms 32.873 ms 32.433 ms 3 border-sf-2-0-4.sirius.com (205.134.230.254) 15.662 ms 15.731 ms 16.142 ms 4 pb-nap.crl.net (198.32.128.20) 20.741 ms 23.672 ms 21.378 ms 5 E0-CRL-SFO-03-E0X0.US.CRL.NET (165.113.55.3) 22.293 ms 21.532 ms 21.29 ms 6 T1-CDROM-00-EX.US.CRL.NET (165.113.118.2) 24.544 ms 42.955 ms 58.443 ms 7 www.slackware.com (204.216.27.13) 38.115 ms 53.033 ms 48.328 ms |
traceroute is similar to ping in that it uses ICMP packets. There are several options that you can specify with traceroute. These options are explained in detail in the man page.
13.3 DNS Tools
Domain Name Service (DNS for short) is that magical protocol that allows your computer to turn meaningless domain names like www.slackware.com into meaningful IP address like 64.57.102.34. Computers can't route packets to www.slackware.com, but they can route packets to that domain name's IP address. This gives us a convenient way to remember machines. Without DNS we'd have to keep a mental database of just what IP address belongs to what computer, and that's assuming the IP address doesn't change. Clearly using names for computers is better, but how do we map names to IP addresses?
13.3.1 host
host(1) can do this for us. host is used to map names to IP addresses. It is a very quick and simple utility without a lot of functions.
% host www.slackware.com www.slackware.com is an alias for slackware.com. slackware.com has address 64.57.102.34 |
But let's say for some reason we want to map an IP address to a domain name; what then?
13.3.2 nslookup
nslookup is a tried and true program that has weathered the ages. nslookup has been deprecated and may be removed from future releases. There is not even a man page for this program.
% nslookup 64.57.102.34 Note: nslookup is deprecated and may be removed from future releases. Consider using the `dig' or `host' programs instead. Run nslookup with the `-sil[ent]' option to prevent this message from appearing. Server: 192.168.1.254 Address: 192.168.1.254#53 Non-authoritative answer: www.slackware.com canonical name = slackware.com. Name: slackware.com Address: 64.57.102.34 |
13.3.3 dig
The meanest dog in the pound, the domain information groper, dig(1) for short, is the go-to program for finding DNS information. dig can grab just about anything from a DNS server including reverse lookups, A, CNAME, MX, SP, and TXT records. dig has many command line options and if you're not familiar with it you should read through it's extensive man page.
% dig @192.168.1.254 www.slackware.com mx ; <<>> DiG 9.2.2 <<>> @192.168.1.254 www.slackware.com mx ;; global options: printcmd ;; Got answer: ;; ->>HEADER<<- opcode: QUERY, status: NOERROR, id: 26362 ;; flags: qr rd ra; QUERY: 1, ANSWER: 2, AUTHORITY: 2, ADDITIONAL: 2 ;; QUESTION SECTION: ;www.slackware.com. IN MX ;; ANSWER SECTION: www.slackware.com. 76634 IN CNAME slackware.com. slackware.com. 86400 IN MX 1 mail.slackware.com. ;; AUTHORITY SECTION: slackware.com. 86400 IN NS ns1.cwo.com. slackware.com. 86400 IN NS ns2.cwo.com. ;; ADDITIONAL SECTION: ns1.cwo.com. 163033 IN A 64.57.100.2 ns2.cwo.com. 163033 IN A 64.57.100.3 ;; Query time: 149 msec ;; SERVER: 192.168.1.254#53(192.168.1.254) ;; WHEN: Sat Nov 6 16:59:31 2004 ;; MSG SIZE rcvd: 159 |
This should give you an idea how dig works. “@192.168.1.254” specifies the dns server to use. “www.slackware.com” is the domain name I am performing a lookup on, and “mx” is the type of lookup I am performing. The above query tells me that e-mail to www.slackware.com will instead be sent to mail.slackware.com for delivery.
13.4 finger
finger(1) will retrieve information about the specified user. You give finger a username or an email address and it will try to contact the necessary server and retrieve the username, office, telephone number, and other pieces of information. Here is an example:
% finger johnc@idsoftware.com |
finger can return the username, mail status, phone numbers, and files referred to as “dot plan” and “dot project”. Of course, the information returned varies with each finger server. The one included with Slackware returns the following information by default:
-
Username
-
Room number
-
Home phone number
-
Work phone number
-
Login status
-
Email status
-
Contents of the .plan file in the user's home directory
-
Contents of the .project file in the user's home directory
The first four items can be set with the chfn command. It stores those values in the /etc/passwd file. To change the information in your .plan or .project file, just edit them with your favorite text editor. They must reside in your home directory and must be called .plan and .project.
Many users finger their own account from a remote machine to quickly see if they have new email. Or, you can see a user's plan or current project.
Like many commands, finger has options. Check the man page for more information on what special options you can use.
13.5 telnet
Someone once stated that telnet(1) was the coolest thing he had ever seen on computers. The ability to remotely log in and do stuff on another computer is what separates Unix and Unix-like operating systems from other operating systems.
telnet allows you to log in to a computer, just as if you were sitting at the terminal. Once your username and password are verified, you are given a shell prompt. From here, you can do anything requiring a text console. Compose email, read newsgroups, move files around, and so on. If you are running X and you telnet to another machine, you can run X programs on the remote computer and display them on yours.
To login to a remote machine, use this syntax:
% telnet <hostname> |
If the host responds, you will receive a login prompt. Give it your username and password. That's it. You are now at a shell. To quit your telnet session, use either the exit command or the logout command.
|
telnet does not encrypt the information it sends. Everything is sent in plain text, even passwords. It is not advisable to use telnet over the Internet. Instead, consider the Secure Shell. It encrypts all traffic and is available for free. |
13.5.1 The other use of telnet
Now that we have convinced you not to use the telnet protocol anymore to log into a remote machine, we'll show you a couple of useful ways to use telnet.
You can also use the telnet command to connect to a host on a certain port.
% telnet <hostname> [port] |
This can be quite handy when you quickly need to test a certain service, and you need full control over the commands, and you need to see what exactly is going on. You can interactively test or use an SMTP server, a POP3 server, an HTTP server, etc. this way.
In the next figure you'll see how you can telnet to a HTTP server on port 80, and get some basic information from it.
Figure 13-1. Telnetting to a webserver
% telnet store.slackware.com 80 Trying 69.50.233.153... Connected to store.slackware.com. Escape character is '^]'. HEAD / HTTP/1.0 HTTP/1.1 200 OK Date: Mon, 25 Apr 2005 20:47:01 GMT Server: Apache/1.3.33 (Unix) mod_ssl/2.8.22 OpenSSL/0.9.7d Last-Modified: Fri, 18 Apr 2003 10:58:54 GMT ETag: "193424-c0-3e9fda6e" Accept-Ranges: bytes Content-Length: 192 Connection: close Content-Type: text/html Connection closed by foreign host. % |
You can do the same for other plain-text protocols, as long as you know what port to connect to, and what the commands are.
13.6 The Secure shell
Today, secure shell basks in the adoration that telnet once enjoyed. ssh(1) allows one to make a connection to a remote machine and execute programs as if one were physically present; however, ssh encrypts all the data travelling between the two computers so even if others intercept the conversation, they are unable to understand it. A typical secure shell connection follows.
% ssh carrier.lizella.net -l alan The authenticity of host 'carrier.lizella.net (192.168.1.253)' can't be established. RSA key fingerprint is 0b:e2:5d:43:4c:39:4f:8c:b9:85:db:b2:fa:25:e9:9d. Are you sure you want to continue connecting (yes/no)? yes Warning: Permanently added 'carrier.lizella.net' (RSA) to the list of known hosts. Password: password Last login: Sat Nov 6 16:32:19 2004 from 192.168.1.102 Linux 2.4.26-smp. alan@carrier:~$ ls -l MANIFEST -rw-r--r-- 1 alan users 23545276 2004-10-28 20:04 MANIFEST alan@carrier:~$ exit logout Connection to carrier.lizella.net closed. |
There you see me making an ssh connection to carrier.lizella.net, and checking the permissions on the MANIFEST file.
13.7 email
Electronic mail is one of the most popular things one can do on the Internet. In 1998, it was reported that more electronic mail was sent than regular mail. It is indeed common and useful.
Under Slackware, we provide a standard mail server, and several mail clients. All of the clients discussed below are text-based. A lot of Windows users may be against this, but you will find that a text based client is very convenient, especially when checking mail remotely. Fear not, there are many graphical e-mail clients such as KDE's Kmail. If you wish to use one of those check its help menu.
13.7.1 pine
pine(1) is not elm. Or so the saying goes. The University of Washington created their program for Internet news and email out of a need for an easy mail reader for their students. pine is one of the most popular email clients in use today and is available for nearly every flavor of Unix and even Windows.
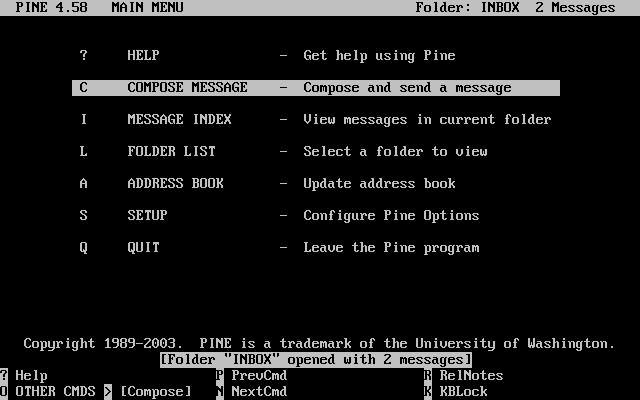
You will see a menu of commands and a row of command keys at the bottom. pine is indeed a complex program, so we will not discuss every feature about it here.
To see what's in your inbox, type i. Your messages are listed with their date, author, and subject. Highlight the message you want and press enter to view it. Pressing r will start a reply to the message. Once you have written the response, type Ctrl+X to send it. You can press i to get back to the message listing.
If you want to delete a message, press d. It will mark the highlighted message for deletion. pine deletes the mail when you exit the program. pine also lets you store your mail in folders. You can get a listing of folders by pressing l. At the message listing, press s to save it to another folder. It will ask for the folder name to write the message to.
pine offers many, many features; you should definitely have a look at the man page for more information. It will contain the latest information about the program.
13.7.2 elm
elm(1) is another popular text-based email client. Though not quite as user friendly as pine, it's definitely been around a lot longer.
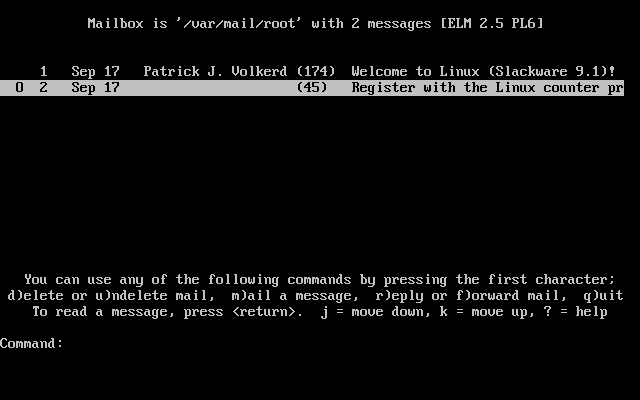
By default, you are placed in your inbox. The messages are listed with the message number, date, sender, and subject. Use the arrow keys to highlight the message you want. Press Enter to read the message.
To compose a new message, type m at the main screen. The d key will flag a message for deletion. And the r key will reply to the current message you are reading. All of these keys are displayed at the bottom of the screen with a prompt.
The man page discusses elm in more detail, so you will probably want to consult that before using elm.
13.7.3 mutt
“All mail clients suck. This one just sucks less.” mutt's original interface was based on elm with added features found in other popular mailclients, resulting in a hybrid mutt.
Some of mutt's features include:
-
color support
-
message threading
-
MIME and PGP/MIME support
-
pop3 and imap support
-
support for multiple mailbox formats (mbox, MMDF, MH, maildir)
-
highly customizable
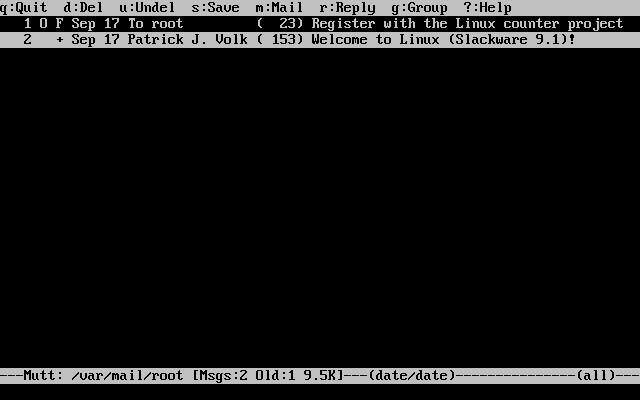
if you're looking for a mail client that will let you be in total control over everything, then you will like mutt. all the default settings can be customized, keybindings can be changed. if you like to add a macro, you can.
you probably want to take a look at the muttrc manpage, which will tell you how to configure everything. or take a look at the included example muttrc file.
13.7.4 nail
nail(1) is a command line driven mail client. It is very primitive and offers pretty much nothing in the way of user interfaces. However, mailx is handy for times when you need to quickly mail something, scripting a bulk mailer, testing your MTA installation or something similar. Note that Slackware creates symbolic links to nail at /usr/bin/mail and /usr/bin/mailx. Any of these three commands executes the same program. In fact, you will most likely see nail referred to as mail.
The basic command line is:
% mailx <subject> <to-addr> |
mailx reads the message body from standard input. So you can cat a file into this command to mail it, or you can just type text and hit Ctrl+D when finished with the message.
Here is an example of mailing a program source file to another person.
% cat randomfunc.c | mail -s "Here's that function" asdf@example.net |
The man page explains more of what nail can do, so you will probably want to have a look at that before using it.
13.8 Browsers
The first thing that people think about when they hear the word Internet is “surfing the net”. Or looking at websites using a web browser. This is probably by far the most popular use of the Internet for the average user.
Slackware provides popular graphical web browsers in the “XAP” series, as well as text mode browsers in the “N” series. We'll take a quick look at some of the most common options below.
13.8.1 lynx
lynx(1) is a text-based web browser. It is a very quick way of looking up something on the Internet. Sometimes graphics just get in the way if you know exactly what you're after.
To start lynx, just type lynx at the prompt:
% lynx |
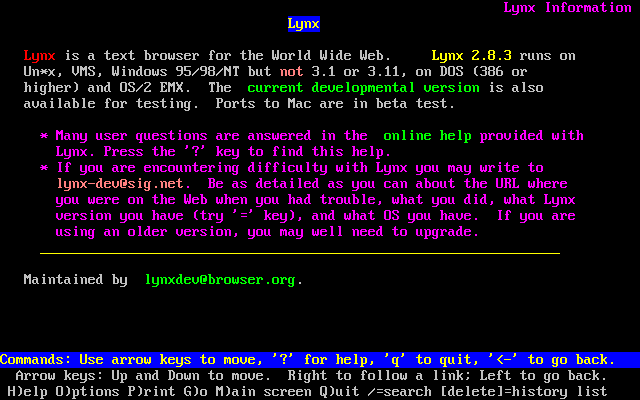
You may want to specify a site for lynx to open to:
% lynx http://www.slackware.com |
lynx prints the command keys and what they do at the bottom of the screen. The up and down arrow keys move around the document, Enter selects the highlighted link, and the left arrow goes back to the previous page. Typing d will download the currently selected file. The g command brings up the Go prompt, where you can give lynx a URL to open.
There are many other commands in lynx. You can either consult the man page, or type h to get the help screen for more information.
13.8.2 links
Just like lynx, links is a textmode web browser, where you do all the navigation using the keyboard. However, when you press the Esc key, it will activate a very convenient pulldown menu on the top of the screen. This makes it very easy to use, without having to learn all the keyboard shortcuts. People who do not use a text browser every day will appreciate this feature.
links seems to have better support for both frames and tables, when compared to lynx.
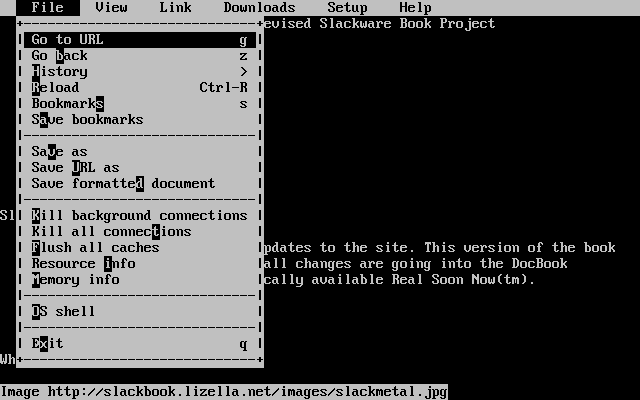
13.8.3 wget
wget(1) is a command line utility that will download files from a specified URL. While not an actual web-browser, wget is used primarily to grab whole or partial web sites for offline viewing, or for fast download of single files from HTTP or FTP servers instead. The basic syntax is:
% wget <url> |
You can also pass options. For example, this will download the Slackware web site:
% wget --recursive http://www.slackware.com |
wget will create a www.slackware.com directory and store the files in there, just as the site does.
wget can also download files from FTP sites; just specify an FTP URL instead of an HTTP one.
% wget ftp://ftp.gnu.org/gnu/wget/wget-1.8.2.tar.gz
--12:18:16--  ftp://ftp.gnu.org/gnu/wget/wget-1.8.2.tar.gz
           => `wget-1.8.2.tar.gz'
Resolving ftp.gnu.org... done.
Connecting to ftp.gnu.org[199.232.41.7]:21... connected.
Logging in as anonymous ... Logged in!
==> SYST ... done.   ==> PWD ... done.
==> TYPE I ... done. ==> CWD /gnu/wget ... done.
==> PORT ... done.   ==> RETR wget-1.8.2.tar.gz ... done.
Length: 1,154,648 (unauthoritative)

100%[==================================>] 1,154,648     209.55K/s    ETA 00:00

12:18:23 (209.55KB/s) - `wget-1.8.2.tar.gz' saved [1154648]
|
wget has many more options, which make it nice for site specific scripts (web site mirroring and so forth). The man page should be consulted for more information.
13.9 FTP Clients
FTP stands for the File Transfer Protocol. It allows you to send and receive files between two computers. There is the FTP server and the FTP client. We discuss the client in this section.
For the curious, the “client” is you. The “server” is the computer that answers your FTP request and lets you login. You will download files from and upload files to the server. The client cannot accept FTP connections, it can only connect to servers.
13.9.1 ftp
To connect to an FTP server, simply run the ftp(1) command and specify the host:
% ftp <hostname> [port] |
If the host is running an FTP server, it will ask for a username and password. You can log in as yourself or as “anonymous”. Anonymous FTP sites are very popular for software archives. For example, to get Slackware Linux via FTP, you must use anonymous FTP.
Once connected, you will be at the ftp> prompt. There are special commands for FTP, but they are similar to other standard commands. The following shows some of the basic commands and what they do:
Table 13-1. ftp commands
| Command | Purpose |
|---|---|
| ls | List files |
| cd <dirname> | Change directory |
| bin | Set binary transfer mode |
| ascii | Set ASCII transfer mode |
| get <filename> | Download a file |
| put <filename> | Upload a file |
| hash | Toggle hash mark stats indicator |
| tick | Toggle byte counter indicator |
| prom | Toggle interactive mode for downloads |
| mget <mask> | Download a file or group of files; wildcards are allowed |
| mput <mask> | Upload a file or group of files; wildcards are allowed |
| quit | Log off the FTP server |
You can also use some of the following commands which are quite self-explanatory: chmod, delete, rename, rmdir. For a complete list of all commands and their meaning, just type help or ? and you'll see a complete listing on screen.
FTP is a fairly simple program to use, but lacks the user interface that many of us are used to nowadays. The man page discusses some of the command line options for ftp(1).
ftp> ls *.TXT 200 PORT command successful. 150 Opening ASCII mode data connection for /bin/ls. -rw-r--r-- 1 root 100 18606 Apr 6 2002 BOOTING.TXT -rw-r--r-- 1 root 100 10518 Jun 13 2002 COPYRIGHT.TXT -rw-r--r-- 1 root 100 602 Apr 6 2002 CRYPTO_NOTICE.TXT -rw-r--r-- 1 root 100 32431 Sep 29 02:56 FAQ.TXT -rw-r--r-- 1 root 100 499784 Mar 3 19:29 FILELIST.TXT -rw-r--r-- 1 root 100 241099 Mar 3 19:12 PACKAGES.TXT -rw-r--r-- 1 root 100 12339 Jun 19 2002 README81.TXT -rw-r--r-- 1 root 100 14826 Jun 17 2002 SPEAKUP_DOCS.TXT -rw-r--r-- 1 root 100 15434 Jun 17 2002 SPEAK_INSTALL.TXT -rw-r--r-- 1 root 100 2876 Jun 17 2002 UPGRADE.TXT 226 Transfer complete. ftp> tick Tick counter printing on (10240 bytes/tick increment). ftp> get README81.TXT local: README81.TXT remote: README81.TXT 200 PORT command successful. 150 Opening BINARY mode data connection for README81.TXT (12339 bytes). Bytes transferred: 12339 226 Transfer complete. 12339 bytes received in 0.208 secs (58 Kbytes/sec) |
13.9.2 ncftp
ncftp(1) (pronounced "Nik-F-T-P") is an alternative to the traditional ftp client that comes with Slackware. It is still a text-based program, but offers many advantages over ftp, including:
-
Tab completion
-
Bookmarks file
-
More liberal wildcard uses
-
Command history
By default, ncftp will try to log in anonymously to the server you specify. You can force ncftp to present a login prompt with the “-u” option. Once logged in, you can use the same commands as in ftp, only you'll notice a nicer interface, one that works more like bash.
ncftp /pub/linux/slackware > cd slackware-current/ Please read the file README81.TXT it was last modified on Wed Jun 19 16:24:21 2002 - 258 days ago CWD command successful. ncftp ...ware/slackware-current > ls BOOTING.TXT FAQ.TXT bootdisks/ CHECKSUMS FILELIST.TXT extra/ CHECKSUMS.asc GPG-KEY isolinux/ CHECKSUMS.md5 PACKAGES.TXT kernels/ CHECKSUMS.md5.asc PRERELEASE_NOTES pasture/ COPYING README81.TXT rootdisks/ COPYRIGHT.TXT SPEEKUP_DOCS.TXT slackware/ CRYPTO_NOTICE.TXT SPEEK_INSTALL.TXT source/ CURRENT.WARNING Slackware-HOWTO ChangeLog.txt UPGRADE.TXT ncftp ...ware/slackware-current > get README81.TXT README81.TXT: 12.29 kB 307.07 kB/s |
13.10 Talking to Other People
13.10.1 wall
wall(1) is a quick way to write a message to the users on a system. The basic syntax is:
% wall [file] |
This will result in the contents of [file] being displayed on the terminals of all currently logged in users. If you don't specify a file, wall will read from standard input, so you can just type your message, and end with Ctrl+d.
wall doesn't have many features, and apart from letting your users know that you're about to do some serious maintenance to the system, or even reboot it, so they have time to save their work and log off :)
13.10.2 talk
talk(1) allows two users to chat. It splits the screen in half, horizontally. To request a chat with another user, use this command:
% talk <person> [ttyname] |

If you specify just a username, the chat request is assumed to be local, so only local users are queried. The ttyname is required if you want to ring a user on a specific terminal (if the user is logged in more than once). The required information for talk can be obtained from the w(1) command.
talk can also ring users on remote hosts. For the username you simply specify an email address. talk will try to contact that remote user on that host.
talk is somewhat limited. It only supports two users and is half-duplex.
13.10.3 ytalk
ytalk(1) is a backwards compatible replacement for talk. It comes with Slackware as the ytalk command. The syntax is similar, but has a few differences:
% ytalk <username>[#ttyname] |
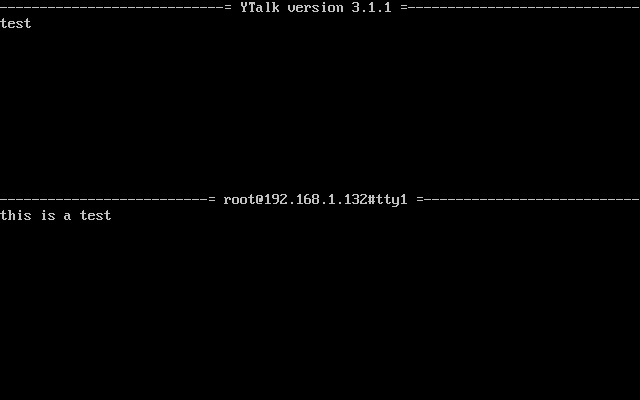
The username and terminal are specified the same as under talk, except you must put them together with the hash mark (#).
ytalk offers several advantages:
-
It supports more than two users.
-
A menu of options that can be brought up anytime with Esc.
-
You can shell out while still in the talk session.
-
Plus more...
If you're a server administrator, you'll want to make sure that the ntalk port is enabled in /etc/inetd.conf. ytalk needs that to work properly.
Chapter 14 Security
Security on any system is important; it can prevent people launching attacks from your machine, as well as protect sensitive data. This chapter is all about how to start securing your Slackware box against script kiddies, crackers and rogue hamsters alike. Bear in mind that this is only the start of securing a system; security is a process, not a state.
14.1 Disabling Services
The first step after installing Slackware should be to disable any services you don't need. Any services could potentially pose a security risk, so it is important to run as few services as possible (i.e. only those that are needed). Services are started from two main places - inetd and init scripts.
14.1.1 Services started from inetd
A lot of the daemons that come with Slackware are run from inetd(8). inetd is a daemon that listens on all of the ports used by services configured to be started by it and spawns an instance of the relevant daemon when a connection attempt is made. Daemons started from inetd can be disabled by commenting out the relevant lines in /etc/inetd.conf. To do this, open this file in your favorite editor (e.g. vi) and you should see lines similar to this:
telnet stream tcp nowait root /usr/sbin/tcpd in.telnetd |
You can disable this service, and any others you don't need, by commenting them out (i.e. adding a # (hash) symbol to the beginning of the line). The above line would then become:
#telnet stream tcp nowait root /usr/sbin/tcpd in.telnetd |
After inetd has been restarted, this service will be disabled. You can restart inetd with the command:
# kill -HUP $(cat /var/run/inetd.pid) |
14.1.2 Services started from init scripts
The rest of the services started when the machine starts are started from the init scripts in /etc/rc.d/. These can be disabled in two different ways, the first being to remove the execute permissions on the relevant init script and the second being to comment out the relevant lines in the init scripts.
For example, SSH is started by its own init script at /etc/rc.d/rc.sshd. You can disable this using:
# chmod -x /etc/rc.d/rc.sshd |
For services that don't have their own init script, you will need to comment out the relevant lines in the init scripts to disable them. For example, the portmap daemon is started by the following lines in /etc/rc.d/rc.inet2:
# This must be running in order to mount NFS volumes. # Start the RPC portmapper: if [ -x /sbin/rpc.portmap ]; then echo "Starting RPC portmapper: /sbin/rpc.portmap" /sbin/rpc.portmap fi # Done starting the RPC portmapper. |
This can be disabled by adding # symbols to the beginnings of the lines that don't already start with them, like so:
# This must be running in order to mount NFS volumes. # Start the RPC portmapper: #if [ -x /sbin/rpc.portmap ]; then # echo "Starting RPC portmapper: /sbin/rpc.portmap" # /sbin/rpc.portmap #fi # Done starting the RPC portmapper. |
These changes will only take effect after either a reboot or changing from and back to runlevel 3 or 4. You can do this by typing the following on the console (you will need to log in again after changing to runlevel 1):
# telinit 1 # telinit 3 |
14.2 Host Access Control
14.2.1 iptables
iptables is the packet filtering configuration program for Linux 2.4 and above. The 2.4 kernel (2.4.5, to be exact) was first introduced into Slackware (as an option) in version 8.0 and was made the default in Slackware 8.1. This section only covers the basics of its usage and you should check http://www.netfilter.org/ for more details. These commands can be entered into /etc/rc.d/rc.firewall, which has to be set as executable for these rules to take effect at startup. Note that incorrect iptables commands can essentially lock you out of your own machine. Unless you are 100% confident in your skills, always ensure you have local access to the machine.
The first thing most people should do is set the default policy for each inbound chain to DROP:
# iptables -P INPUT DROP # iptables -P FORWARD DROP |
When everything is denied, you can start allowing things. The first thing to allow is any traffic for sessions which are already established:
# iptables -A INPUT -m state --state ESTABLISHED,RELATED -j ACCEPT |
So as not to break any applications that communicate using the loopback address, it is usually wise to add a rule like this:
# iptables -A INPUT -s 127.0.0.0/8 -d 127.0.0.0/8 -i lo -j ACCEPT |
This rules allows any traffic to and from 127.0.0.0/8 (127.0.0.0 - 127.255.255.255) on the loopback (lo) interface. When creating rules, it is a good idea to be as specific as possible, to make sure that your rules do not inadvertently allow anything evil. That said, rules that allow too little mean more rules and more typing.
The next thing to do would be to allow access to specific services running on your machine. If, for example, you wanted to run a web server on your machine, you would use a rule similar to this:
# iptables -A INPUT -p tcp --dport 80 -i ppp0 -j ACCEPT |
This will allow access from any machine to port 80 on your machine via the ppp0 interface. You may want to restrict access to this service so that only certain machines can access it. This rule allows access to your web service from 64.57.102.34:
# iptables -A INPUT -p tcp -s 64.57.102.34 --dport 80 -i ppp0 -j ACCEPT |
Allowing ICMP traffic can be useful for diagnostic purposes. To do this, you would use a rule like this:
# iptables -A INPUT -p icmp -j ACCEPT |
Most people will also want to set up Network Address Translation (NAT) on their gateway machine, so that other machines on their network can access the Internet through it. You would use the following rule to do this:
# iptables -t nat -A POSTROUTING -o ppp0 -j MASQUERADE |
You will also need to enable IP forwarding. You can do this temporarily, using the following command:
# echo 1 > /proc/sys/net/ipv4/ip_forward |
To enable IP forwarding on a more permanent basis (i.e. so that the change is kept after a reboot), you will need to open the file /etc/rc.d/rc.inet2 in your favorite editor and change the following line:
IPV4_FORWARD=0 |
...to this:
IPV4_FORWARD=1 |
For more information on NAT, see the NAT HOWTO.
14.2.2 tcpwrappers
tcpwrappers controls access to daemons at the application level, rather than at the IP level. This can provide an extra layer of security at times when IP-level access controls (e.g. Netfilter) are not functioning correctly. For example, if you recompile the kernel but forget to include iptables support, your IP level protection will fail but tcpwrappers will still help protect your system.
Access to services protected by tcpwrappers can be controlled using /etc/hosts.allow and /etc/hosts.deny.
The majority of people would have a single line in their /etc/hosts.deny file to deny access to all daemons by default. This line would be:
ALL : ALL |
When this is done, you can concentrate on allowing access to services for specified hosts, domains, or IP ranges. This can be done in the /etc/hosts.allow file, which follows the same format.
A lot of people would start by accepting all connections from localhost. This can be achieved using:
ALL : 127.0.0.1 |
To allow access to SSHd from 192.168.0.0/24, you could use either of the following rules:
sshd : 192.168.0.0/24 sshd : 192.168.0. |
It is also possible to restrict access to hosts in certain domains. This can be done using the following rule (note that this relies on the reverse DNS entry for the connecting host being trustworthy, so I would recommand against its use on Internet-connected hosts):
sshd : .slackware.com |
14.3 Keeping Current
14.3.1 slackware-security mailing list
Whenever a security problem affects Slackware, an email is sent to all subscribers to the slackware-security@slackware.com mailing list. Reports are sent out for vulnerabilities of any part of Slackware, apart from the software in /extra or /pasture. These security announcement emails include details on obtaining updated versions of Slackware packages or work-arounds, if any.
Subscribing to Slackware mailing lists is covered in Section 2.2.2.
14.3.2 The /patches directory
Whenever updated packages are released for a version of Slackware (usually only to fix a security problem, in the case of already released Slackware versions), they are placed in the /patches directory. The full path to these patches will depend on the mirror you are using, but will take the form /path/to/slackware-x.x/patches/.
Before installing these packages, it is a good idea to verify the md5sum of the package. md5sum(1) is a commandline utility that creates a “unique” mathematical hash of the file. If a single bit of the file has been changed, it will generate a different md5sum value.
% md5sum package-<ver>-<arch>-<rev>.tgz 6341417aa1c025448b53073a1f1d287d package-<ver>-<arch>-<rev>.tgz |
You should then check this against the line for the new package in the CHECKSUMS.md5 file in the root of the slackware-$VERSION directory (also in the /patches directory for patches) or in the email to the slackware-security mailing list.
If you have a file with the md5sum values in it, you can source it instead with the -c option to md5sum.
# md5sum -c CHECKSUMS.md5 ./ANNOUNCE.10_0: OK ./BOOTING.TXT: OK ./COPYING: OK ./COPYRIGHT.TXT: OK ./CRYPTO_NOTICE.TXT: OK ./ChangeLog.txt: OK ./FAQ.TXT: FAILED |
As you can see, any files that md5sum evaluates as correct are listed “OK” while files that fail are labelled “FAILED”. (Yes, this was an insult to your intelligence. Why do you put up with me?)
Chapter 15 Archive Files
15.1 gzip
gzip(1) is the GNU compression program. It takes a single file and compresses it. The basic usage is as follows:
% gzip filename |
The resulting file will be named filename.gz and will usually be smaller than the input file. Note that filename.gz will replace filename. This means that filename will no longer exist, even though a gzipped copy will. Regular text files will compress nicely, while jpeg images, mp3s, and other such files will not compress too well as they are already compressed. This basic usage is a balance of final file size and compression time. The maximum compression can be achieved like so:
% gzip -9 filename |
This will take a longer time to compress the file, but the result will be as small as gzip can make it. Using lower values for the command line option will cause it to compress faster, but the file will not be as compressed.
Decompressing gzipped files can be done using two commands, which are really just the same program. gzip will decompress any file with a recognized file extension. A recognized extension can be any of the following: .gz, -gz, .z, -z, .Z, or -Z. The first method is to call gunzip(1) on a file, like so:
% gunzip filename.gz |
This will leave a decompressed version of infile in the current directory, and the .gz extension will be stripped from the filename. gunzip is really part of gzip and is identical to gzip -d. As such, gzip is often pronounced gunzip, as that name just sounds cooler. :^)
15.2 bzip2
bzip2(1) is an alternative compression program installed on Slackware Linux. It uses a different compression algorithm from gzip, which results in some advantages and some disadvantages. The main advantage for bzip2 is the compressed file size. bzip2 will almost always compress better than gzip. In some instances, this can result in dramatically smaller files. This can be a great advantage for people on slower modem connections. Also remember, when downloading software from a public ftp server, it's generally good netiquette to download the .bz2 files instead of the .gz files, as this results in less overhead for the generous people hosting the server.
The disadvantage to bzip2 is that it is more CPU intensive than gzip. This means that bzipping a file will generally take longer and will use more of the CPU than gzipping the file would. When considering which compression program to use, you must weigh this speed vs. compressed size and determine which is more important.
The usage of bzip2 is nearly identical to gzip, so not much time will be spent discussing it. Like gunzip, bunzip2 is identical to bzip2 -d. The primary difference in practical usage is that bzip2 uses the .bz2 extension.
% bzip2 filename % bunzip2 filename.bz2 % bzip2 -9 filename |
15.3 tar
tar(1) is the GNU tape archiver. It takes several files or directories and creates one large file. This allows you to compress an entire directory tree, which is impossible by just using gzip or bzip2. tar has many command line options, which are explained in its man page. This section will just cover the most common uses of tar.
The most common use for tar is to decompress and unarchive a package that you've downloaded from a web site or ftp site. Most files will come with a .tar.gz extension. This is commonly known as a “tarball”. It means that several files were archived using tar and then compressed using gzip. You might also see this listed as a .tar.Z file. It means the same thing, but this is usually encountered on older Unix systems.
Alternatively, you might find a .tar.bz2 file somewhere. Kernel source is distributed as such because it is a smaller download. As you might have guessed, this is several files archived with tar and then bzipped.
You can get to all the files in this archive by making use of tar and some command line arguments. Unarchiving a tarball makes use of the -z flag, which means to first run the file through gunzip and decompress it. The most common way to decompress a tarball is like so:
% tar -xvzf filename.tar.gz |
That's quite a few options. So what do they all mean? The -x means to extract. This is important, as it tells tar exactly what to do with the input file. In this case, we'll be splitting it back up into all the files that it came from. -v means to be verbose. This will list all the files that are being unarchived. It is perfectly acceptable to leave this option off, if somewhat boring. Alternatively, you could use -vv to be very verbose and list even more information about each file being unarchived. The -z option tells tar to run filename.tar.gz through gunzip first. And finally, the -f option tells tar that the next string on the command line is the file to operate on.
There are a few other ways to write this same command. On older systems lacking a decent copy of GNU tar, you might see it written like so:
% gunzip filename.tar.gz | tar -xvf - |
This command line will uncompress the file and send the output to tar. Since gzip will write its output to standard out if told to do so, this command will write the decompressed file to standard out. The pipe then sends it to tar for unarchiving. The “-” means to operate on standard input. It will unarchive the stream of data that it gets from gzip and write that to the disk.
Another way to write the first command line is to leave off the dash before the options, like so:
% tar xvzf filename.tar.gz |
You might also encounter a bzipped archive. The version of tar that comes with Slackware Linux can handle these the same as gzipped archives. Instead of the -z command line option, you'd use -j:
% tar -xvjf filename.tar.bz2 |
It is important to note that tar will place the unarchived files in the current directory. So, if you had an archive in /tmp that you wanted to decompress into your home directory, there are a few options. First, the archive could be moved into your home directory and then run through tar. Second, you could specify the path to the archive file on the command line. Third, you can use the -C option to “explode” the tarball in a specified directory.
% cd $HOME % cp /tmp/filename.tar.gz . % tar -xvzf filename.tar.gz % cd $HOME % tar -xvzf /tmp/filename.tar.gz % cd / % tar -xvzf /tmp/filename.tar.gz -C $HOME |
All the above statements are equivalent. In each case, the archive is unpacked inside your home directory and the original uncompressed archive is left in place.
So what good is being able to uncompress these archives if you can't make them? Well, tar handles that too. In most cases it's as easy as removing the “-x” option and replacing it with the “-c” option.
% tar -cvzf filename.tar.gz . |
In this command line, the -c option tells tar to create an archive, while the -z option runs the resulting archive file through gzip to compress it. filename.tar.gz is the file that you want to create.
Specifying the “-f” option isn't always necessary, but is typically good practice anyway. Without it, tar writes to standard output, which is usually desired for piping tar's output to another program, like so.
% tar -cv filename.tar . | gpg --encrypt |
That command creates an non-compressed tar archive of the current directory, pipes the tarball through gpg which encrypts and compresses the tarball, making it realistically impossible to read by anyone other than the person knowing the secret key.
15.4 zip
Finally, there are two utilities that can be used on zip files. These are very common in the Windows world, so Linux has programs to deal with them. The compression program is called zip(1), and the decompression program is called unzip(1).
% zip foo * |
This will create the file foo.zip, which will contain all the files in the current directory. zip will add the .zip extension automatically, so there's no need to include that in the file name. You can also recurse through the current directory, zipping up any directories that are also laying around:
% zip -r foo * |
Decompressing files is easy, as well.
% unzip foo.zip |
This will extract all the files in the file foo.zip, including any directories in the archive.
The zip utilities have several advanced options for creating self-extracting archives, leaving out files, controlling compressed file size, printing out what will happen, and much more. See the man pages for zip and unzip to find out how to use these options.
Chapter 16 Vi
vi(1) is the standard Unix text editing program, and while mastering it is not as essential as it once was, is still a very rewarding goal. There are several versions (or clones) of vi available, including vi, elvis, vile, and vim. One of these is available on just about any version of Unix, as well as on Linux. All of these versions include the same basic feature set and commands, so learning one clone should make it easy to learn another. With the variety of text editors included with Linux distributions and Unix variants these days, many people no longer use vi. Still, it remains the most universal text editor across Unix and Unix work-alikes. Mastering vi means you should never be sitting at a Unix machine and not be comfortable with at least one powerful text editor.
vi includes a number of powerful features including syntax highlighting, code formatting, a powerful search-and-replace mechanism, macros, and more. These features make it especially attractive to programmers, web developers, and the like. System administrators will appreciate the automation and integration with the shell that is possible.
On Slackware Linux, the default version of vi available is elvis. Other versions - including vim and gvim - are available if you've installed the proper packages. gvim is an X Window version of vim that includes toolbars, detachable menus, and dialog boxes.
16.1 Starting vi
vi can be started from the command line in a variety of ways. The simplest form is just:
% vi |
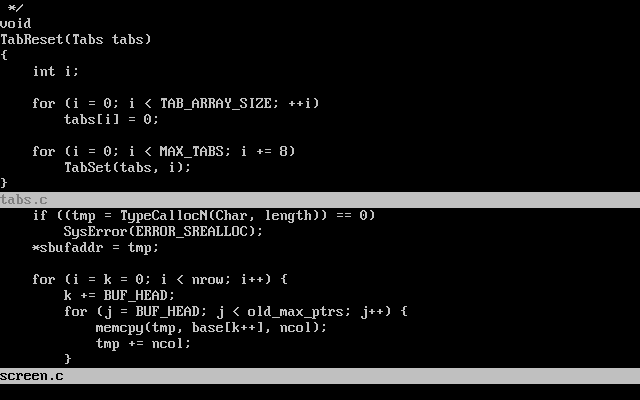
This will start up vi with an empty buffer. At this point, you'll see a mostly blank screen. It is now in “command mode”, waiting for you to do something. For a discussion of the various vi modes, see the Section 16.2. In order to quit out of vi, type the following:
:q |
Assuming that there have been no changes to the file, this will cause vi to quit. If there have been changes made, it will warn you that there have been changes and tell you how to disregard them. Disregarding changes usually means appending an exclamation point after the “q” like so:
:q! |
The exclamation point usually means to force some action. We'll discuss it and other key combinations in further details later.
You can also start vi with a pre-existing file. For example, the file /etc/resolv.conf would be opened like so:
% vi /etc/resolv.conf |
Finally, vi can be started on a particular line of a file. This is especially useful for programmers when an error message includes the line their program bombed on. For example, you could start up vi on line 47 of /usr/src/linux/init/main.c like so:
% vi +47 /usr/src/linux/init/main.c |
vi will display the given file and will place the cursor at the specified line. In the case where you specify a line that is after the end of the file, vi will place the cursor on the last line. This is especially helpful for programmers, as they can jump straight to the location in the file that an error occurred, without having to search for it.
16.2 Modes
vi operates in various modes, which are used to accomplish various tasks. When you first start vi, you are placed into command mode. From this point, you can issue various commands to manipulate text, move around in the file, save, quit, and change modes. Editing the text is done in insert mode. You can quickly move between modes with a variety of keystrokes, which are explained below.
16.2.1 Command Mode
You are first placed into command mode. From this mode, you cannot directly enter text or edit what is already there. However, you can manipulate the text, search, quit, save, load new files, and more. This is intended only to be an introduction to the command mode. For a description of the various commands, see Section 16.7.
Probably the most often used command in command mode is changing to insert mode. This is accomplished by hitting the i key. The cursor changes shapes, and -- INSERT -- is displayed at the bottom of the screen (note that this does not happen in all clones of vi). From there, all your keystrokes are entered into the current buffer and are displayed to the screen. To get back into command mode, hit the ESCAPE key.
Command mode is also where you move around in the file. On some systems, you can use the arrow keys to move around. On other systems, you may need to use the more traditional keys of “hjkl”. Here is a simple listing of how these keys are used to move around:
| h | move left one character |
| j | move down one character |
| k | move up one character |
| l | move right one character |
Simply press a key to move. As you will see later, these keys can be combined with a number to move much more efficiently.
Many of the commands that you will use in command mode begin with a colon. For example, quitting is :q, as discussed earlier. The colon simply indicates that it is a command, while the “q” tells vi to quit. Other commands are an optional number, followed by a letter. These commands do not have a colon before them, and are generally used to manipulate the text.
For example, deleting one line from a file is accomplished by hitting dd. This will remove the line that the cursor is on. Issuing the command 4dd would tell vi to remove the line that the cursor is on and the three after that. In general, the number tells vi how many times to perform the command.
You can combine a number with the movement keys to move around several characters at a time. For example, 10k would move up ten lines on the screen.
Command mode can also be used to cut and paste, insert text, and read other files into the current buffer. Copying text is accomplished with the y key (y stands for yank). Copying the current line is done by typing yy, and this can be prefixed with a number to yank more lines. Then, move to the location for the copy and hit p. The text is pasted on the line after the current one.
Cutting text is done by typing dd, and p can be used to paste the cut text back into the file. Reading in text from another file is a simple procedure. Just type :r, followed by a space and the file name that contains the text to be inserted. The file's contents will be pasted into the current buffer on the line after the cursor. More sophisticated vi clones even contain filename completion similar to the shell's.
The final use that will be covered is searching. Command mode allows for simple searching, as well as complicated search-and-replace commands that make use of a powerful version of regular expressions. A complete discussion of regular expressions is beyond the scope of this chapter, so this section will only cover simple means of searching.
A simple search is accomplished by hitting the / key, followed by the text that you are searching for. vi will search forward from the cursor to the end of the file for a match, stopping when it finds one. Note that inexact matches will cause vi to stop as well. For example, a search for “the” will cause vi to stop on “then”, “therefore”, and so on. This is because all of those words do match “the”.
After vi has found the first match, you can continue on to the next match simply by hitting the / key followed by enter. You can also search backwards through the file by replacing the slash with the ? key. For example, searching backwards through the file for “the” would be accomplished by typing ?the.
16.2.2 Insert Mode
Inserting and replacing text is accomplished in insert mode. As previously discussed, you can get into insert mode by hitting i from command mode. Then, all text that you type is entered into the current buffer. Hitting the ESCAPE key takes you back into command mode.
Replacing text is accomplished in several ways. From command mode, hitting r will allow you to replace the one character underneath the cursor. Just type the new character and it will replace the one under the cursor. You will then be immediately placed back into command mode. Hitting R allows you to replace as many characters as you'd like. To get out of this replacement mode, just hit ESCAPE to go back into command mode.
There is yet another way to toggle between insertion and replacement. Hitting the INSERT key from command mode will take you into insert mode. Once you are in insert mode, the keyboard's INSERT key serves as a toggle between insert and replace. Hitting it once will allow you to replace. Hitting it once more will once again allow you to insert text.
16.3 Opening Files
vi allows you to open files from command mode as well as specifying a file on the command line to open. To open the file /etc/lilo.conf:
:e /etc/lilo.conf |
If you have made changes to the current buffer without saving, vi will complain. You can still open the file without saving the current buffer by typing :e!, followed by a space and the filename. In general, vi's warnings can be suppressed by following the command with an exclamation mark.
If you want to reopen the current file, you can do so simply by typing e!. This is particularly useful if you have somehow messed up the file and want to reopen it.
Some vi clones (for example, vim) allow for multiple buffers to be open at the same time. For example, to open up the file 09-vi.sgml in my home directory while another file was open, I would type:
:split ~/09-vi.sgml |
The new file is displayed on the top half of the screen, and the old file is displayed in the bottom half of the screen. There are a lot of commands that manipulate the split screen, and many of these commands start to resemble something out of Emacs The best place to look up these commands would be the man page for your vi clone. Note that many clones do not support the split-screen idea, so you might not be able to use it at all.
16.4 Saving Files
There are several ways to save files in vi. If you want to save the current buffer to the file randomness, you would type:
:w randomness |
Once you've saved the file once, saving it again is as simple as typing :w. Any changes will be written out to the file. After you've saved the file, you are dumped back into command mode. If you want to save the file and quit vi (a very common operation), you would type :wq. That tells vi to save the current file and quit back to the shell.
On occasion, you want to save a file that is marked as read-only. You can do this by adding an exclamation point after the write command, like so:
:w! |
However, there will still be instances where you cannot write the file (for example, you are attempting to edit a file that is owned by another user). When this happens, vi will tell you that it cannot save the file. If you really want to edit the file, you'll have to come back and edit it as root or (preferably) the owner of that file.
16.5 Quitting vi
One way to quit vi is through :wq, which will save the current buffer before quitting. You can also quit without saving with :q or (more commonly) :q!. The latter is used when you've modified the file but do not wish to save any changes to it.
On occasion, your machine might crash or vi might crash. However, both elvis and vim will take steps to minimize the damage to any open buffers. Both editors save the open buffers to a temporary file on occasion. This file is usually named similarly to the open file, but with a dot at the beginning. This makes the file hidden.
This temporary file gets removed once the editor quits under normal conditions. This means that the temporary copy will still be around if something crashes. When you go back to edit the file again, you will be prompted for what action to take. In most cases, a large amount of your unsaved work can be recovered. elvis will also send you a mail (from Graceland, oddly enough :) telling you that a backup copy exists.
16.6 vi Configuration
Your vi clone of choice can be configured in several ways.
A variety of commands can be entered while in command mode to set up vi just how you like it. Depending on your editor, you can enable features to make programming easier (like syntax hilighting, auto-indenting, and more), set up macros to automake tasks, enable textual substitutions, and more.
Almost all of these commands can be put into a configuration file in your home directory. elvis expects a .exrc file, while vim expects a .vimrc file. Most of the setup commands that can be entered in command mode can be placed in the configuration file. This includes setup information, textual substitutions, macros, and more.
Discussing all these options and the differences between the editors is quite an involved subject. For more information, check out the man page or web site for your preferred vi editor. Some editors (like vim) have extensive help within the editor that can be accessed with the :help command, or something similar. You can also check out the O'Reilly book Learning the vi Editor by Lamb and Robbins.
Many common programs in Linux will load up a text file in vi by default. For example, editing your crontabs will start up vi by default. If you do not like vi and would like another editor to be started instead, all you need to do is set the VISUAL environment variable to the editor you prefer. For information on setting environment variables, see the section called Environment Variables in Chapter 8. If you want to make sure that your editor will be the default every time you login, add the VISUAL setting to your .bash_profile or .bashrc files.
16.7 Vi Keys
This section is a quick reference of many common vi commands. Some of these were discussed earlier in the chapter, while many will be new.
Table 16-1. Movement
| Operation | Key |
|---|---|
| left, down, up, right | h, j, k, l |
| To the end of the line | $ |
| To the beginning of the line | ^ |
| To the end of the file | G |
| To the beginning of the file | :1 |
| To line 47 | :47 |
Table 16-2. Editing
| Operation | Key |
|---|---|
| Removing a line | dd |
| Removing five lines | 5dd |
| Replacing a character | r |
| Removing a character | x |
| Removing ten characters | 10x |
| Undo last action | u |
| Join current and next lines | J |
| Replace old with new, globally | %s'old'new'g |
Chapter 17 Emacs
While vi (with its clones) is without a doubt the most ubiquitous editor on Unix-like systems, Emacs comes in a good second. Instead of using different “modes”, like vi does, it uses Control and Alt key combinations to enter commands, in much the same way that you can use Control and Alt key combinations in a word processor and indeed in many other applications to execute certain functions. (Though it should be noted that the commands rarely correspond; so while many modern applications use Ctrl-C/ X/ V for copying, cutting and pasting, Emacs uses different keys and actually a somewhat different mechanism for this.)
Also unlike vi, which is an (excellent) editor and nothing more, Emacs is a program with near endless capabilities. Emacs is (for the most part) written in Lisp, which is a very powerful programming language that has the peculiar property that every program written in it is automatically a Lisp compiler of its own. This means that the user can extend Emacs, and in fact write completely new programs “in Emacs”.
As a result, Emacs is not just an editor anymore. There are many add-on packages for Emacs available (many come with the program's source) that provide all sorts of functionality. Many of these are related to text editing, which is after all Emacs' basic task, but it doesn't stop there. There are for example several spreadsheet programs for Emacs, there are databases, games, mail and news clients (the top one being Gnus), etc.
There are two main versions of Emacs: GNU Emacs (which is the version that comes with Slackware) and XEmacs. The latter is not a version for Emacs running under X. In fact, both Emacs and XEmacs run on the console as well as under X. XEmacs was once started as a project to tidy up the Emacs code. Currently, both versions are being actively developed, and there is in fact much interaction between the two development teams. For the present chapter, it is immaterial whether you use Emacs or XEmacs, the differences between them are not relevant to the normal user.
17.1 Starting emacs
Emacs can be started from the shell by simply typing emacs. When you are running X, Emacs will (normally) come up with its own X window, usually with a menu bar at the top, where you can find the most important functions. On startup, Emacs will first show a welcome message, and then after a few seconds will drop you in the *scratch* buffer. (See Section 17.2.)
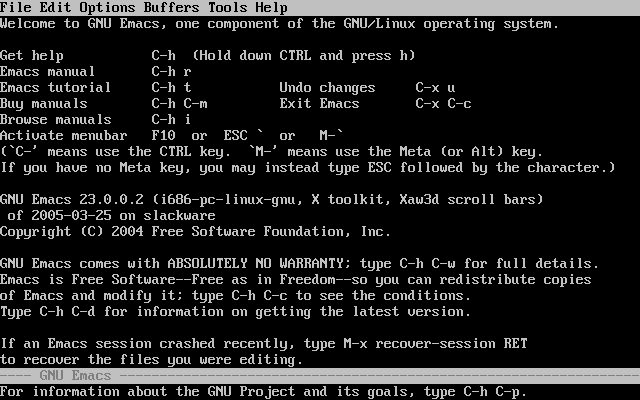
You can also start Emacs on an existing file by typing
% emacs /etc/resolv.conf |
This will cause Emacs to load the specified file when it starts up, skipping the welcome message.
17.1.1 Command Keys
As mentioned above, Emacs uses Control and Alt combinations for commands. The usual convention is to write these with C-letter and M-letter, respectively. So C-x means Control+x, and M-x means Alt+x. (The letter M is used instead of A because originally the key was not the Alt key but the Meta key. The Meta key has all but disappeared from computer keyboards, and in Emacs the Alt key has taken over its function.)
Many Emacs commands consist of sequences of keys and key combinations. For example, C-x C-c (that is Control-x followed by Control-c ) quits Emacs, C-x C-s saves the current file. Keep in mind that C-x C-b is not the same as C-x b. The former means Control-x followed by Control-b, while the latter means Control-x followed by just 'b'.
17.2 Buffers
In Emacs, the concept of “buffers” is essential. Every file that you open is loaded into its own buffer. Furthermore, Emacs has several special buffers, which do not contain a file but are used for other things. Such special buffers usually have a name that starts and ends with an asterisk. For example, the buffer that Emacs shows when it is first started, is the so-called *scratch* buffer. In the *scratch* buffer, you can type text in the normal way, but text that is typed there is not saved when Emacs is closed.
There is one other special buffer you need to know about, and that is the minibuffer. This buffer consists of only one line, and is always on the screen: it is the very last line of the Emacs window, below the status bar for the current buffer. The minibuffer is where Emacs shows messages for the user, and it is also the place where commands that require some user input are executed. For example, when you open a file, Emacs will ask for its name in the minibuffer.
Switching from one buffer to another can be done with the command C-x b. This will prompt you for the name of a buffer (a buffer's name is usually the name of the file you are editing in it), and it gives a default choice, which is normally the buffer that you were in before you switched to or created the current buffer. Just hitting Enter will switch to that default buffer.
If you want to switch to another buffer than the default offered by Emacs, just type its name. Note that you can use so-called Tab-completion here: type the first few letters of the buffer's name and hit Tab; Emacs will then complete the name of the buffer. Tab completion works everywhere in Emacs where it makes sense.
You can get a list of open buffers by hitting C-x C-b. This command will usually split the screen in two, displaying the buffer you were working in in the top half, and a new buffer called *Buffer List* in the bottom half. This buffer contains a list of all the buffers, their sizes and modes, and the files, if any, that those buffers are visiting (as it is called in Emacs). You can get rid of this split screen by typing C-x 1.
|
Under X, the list of buffers is also available in the Buffer menu in the menu bar. |
17.3 Modes
Every buffer in Emacs has an associated mode. This mode is very different from the idea of modes in vi: a mode tells you what kind of buffer you are in. For example, there is text-mode for normal text files, but there are also modes such as c-mode for editing C programs, sh-mode for editing shell scripts, latex-mode for editing LaTeX files, mail-mode for editing email and news messages, etc. A mode provides special customizations and functionality that is useful for the kind of file you are editing. It is even possible for a mode to redefine keys and key commands. For example, in Text mode, the Tab key simply jumps to the next tab stop, but in many programming language modes, the Tab key indents the current line according to the depth of the block that line is in.
The modes mentioned above are called major modes. Each buffer has exactly one major mode. Additionally, a buffer can have one or more minor modes. A minor mode provides additional features that may be useful for certain editing tasks. For example, if you hit the INSERT key, you invoke overwrite-mode, which does what you'd expect. There is also an auto-fill-mode, which is handy in combination with text-mode or latex-mode: it causes each line that you type to be automatically wrapped once the line reaches a certain number of characters. Without auto-fill-mode, you have to type M-q to fill out a paragraph. (Which you can also use to reformat a paragraph after you've edited some text in it and it is no longer nicely filled out.)
17.3.1 Opening files
To open a file in Emacs, type
C-x C-f |
Emacs will ask you for the name of the file, filling in some default path for you (which is usually ~/ ). After you type the filename (you can use Tab completion) and hit ENTER , Emacs will open the file in a new buffer and display that buffer on the screen.
|
Emacs will automatically create a new buffer, it will not load the file into the current buffer. |
In order to create a new file in emacs, you cannot just go typing right away. You first have to create a buffer for it, and come up with a filename. You do this by typing C-x C-f and typing a filename, just as if you were opening an existing file. Emacs will notice that the file you typed doesn't exist, and will create a new buffer and report “(New file)” in the minibuffer.
When you type C-x C-f and then enter a directory name instead of a filename, Emacs will create a new buffer in which you will find a list of all the files in that directory. You can move the cursor to the file that you are looking for and type , and Emacs will open it. (There are in fact a lot more actions you can perform here, such as deleting, renaming and moving files, etc. Emacs is now in dired-mode, which is basically a simple file manager.)
When you have typed C-x C-f and suddenly change your mind, you can type C-g to cancel the action. C-g works almost everywhere where you want to cancel an action or command that you've started but don't want to finish.
17.4 Basic Editing
When you have opened a file, you can of course move around in it with the cursor. The cursor keys and PgUp, PgDn do what you'd expect. Home and End jump to the beginning and end of the line. (In older versions, they would actually jump to the beginning and end of the buffer.) However, there are also Control and Meta (Alt) key combos that move the cursor around. Because you do not need to move your hands to another part of the keyboard for these, they are much quicker once you get used to them. The most important such commands are listed in Table 17-1.
Table 17-1. Basic Emacs Editing Commands
| Command | Result |
|---|---|
| C-b | go one character back |
| C-f | go one character forward |
| C-n | go one line down |
| C-p | go one line up |
| C-a | go to the beginning of the line |
| C-e | go to the end of the line |
| M-b | go one word back |
| M-f | go one word forward |
| M-} | go one paragraph forward |
| M-{ | go one paragraph backward |
| M-a | go one sentence backward |
| M-e | go one sentence forward |
| C-d | delete the character under the cursor |
| M-d | delete until the end of the current word |
| C-v | go down one screen (i.e., PgDn) |
| M-v | go up one screen (i.e., PgUp) |
| M-< | go to the beginning of the buffer |
| M-> | go to the end of the buffer |
| C-_ | undo the last change (can be repeated); note that you actually have to type Shift+Control+hyphen for this. |
| C-k | delete to end of line |
| C-s | forward search |
| C-r | backward search |
Note that many Meta commands are parallel to the Control commands except that they operate on larger units: while C-f goes forward one character, M-f goes forward an entire word, etc.
Also note that M-< and M-> require you to type Shift+Alt+comma and Shift+Alt+dot respectively, since < and > are on Shift+comma and Shift+dot. (Unless of course you have a different keyboard layout from the standard US layout.)
Note that C-k deletes (kills, as it is commonly called) all the text after the cursor to the end of the line, but doesn't delete the line itself (i.e., it doesn't delete the final newline). It only deletes the line if there was no text after the cursor. In other words, in order to delete a complete line, you have to put the cursor at the beginning of the line, and then hit C-k twice: once to delete the text on the line, once to delete the line itself.
17.5 Saving Files
In order to save a file, you type
C-x C-s |
Emacs will not ask you for a filename, the buffer will just be saved to the file it was loaded from. If you want to save your text to another file, type
C-x C-w |
When you save the file for the first time in this session, Emacs will normally save the old version of your file to a backup file, which has the same name appended with a tilde: so if you're editing a file “cars.txt”, Emacs will create a backup “cars.txt~”.
This backup file is a copy of the file that you opened. While you are working, Emacs will also regularly create an auto-save copy of the work you are doing, to a file named with hash signs: #cars.txt#. This backup is deleted when you save the file with C-x C-s.
When you are done editing a file, you can kill the buffer that holds it by typing
C-x k |
Emacs will then ask you which buffer you want to kill, with the current buffer as default, which you can select by hitting ENTER. If you haven't saved your file yet, Emacs will ask you if you really want to kill the buffer.
17.5.1 Quitting Emacs
When you are done with Emacs altogether, you can type
C-x C-c |
This quits Emacs. If you have any unsaved files, Emacs will tell you so, and ask if you want to save them each in turn. If you answer no to any of these, Emacs will ask for one final confirmation and then quit.
Chapter 18 Slackware Package Management
A software package is a bundle of related programs that are ready for you to install. When you download a source code archive, you have to configure, compile, and install it by hand. With a software package, this has already been done for you. All that you have to do is install the package. Another handy feature of using software packages is that it is very easy to remove and upgrade them, if you so desire. Slackware comes with programs for all your package management needs. You can install, remove, upgrade, make, and examine packages very easily.
There's a myth that's been going around ever since RedHat debuted RedHat Package Manager, that Slackware has no package management tool. This simply couldn't be further from the truth. Slackware has always included a package manager, even before RedHat existed. While not as full-featured or as ubiquitous as rpm (or for that matter deb), pkgtool and its associated programs are every bit as good at installing packages as rpm. The truth about pkgtool is not that it doesn't exist, but that it doesn't do any dependency checking.
Apparently many people in the Linux community think that a packager manager must by definition include dependency checking. Well, that simply isn't the case, as Slackware most certainly does not. This is not to say that Slackware packages don't have dependencies, but rather that its package manager doesn't check for them. Dependency management is left up to the sysadmin, and that's the way we like it.
18.1 Overview of Package Format
Before learning the utilities, you should become familiar with the format of a Slackware package. In Slackware, a package is simply a tar archive file that has been compressed with gzip. Packages are built to be extracted in the root directory.
Here is a fictitious program and its example package:
./ usr/ usr/bin/ usr/bin/makehejaz usr/doc/ usr/doc/makehejaz-1.0/ usr/doc/makehejaz-1.0/COPYING usr/doc/makehejaz-1.0/README usr/man/ usr/man/man1 usr/man/man1/makehejaz.1.gz install/ install/doinst.sh |
The package system will extract this file in the root directory to install it. An entry in the package database will be created that contains the contents of this package so that it can be upgraded or removed later.
Notice the install/ subdirectory. This is a special directory that can contain a postinstallation script called doinst.sh. If the package system finds this file, it will execute it after installing the package.
Other scripts can be embedded in the package, but those are discussed more in detail in Section 18.3.2 below.
18.2 Package Utilities
There are four main utilities for package management. They perform installation, removal, and upgrades of packages.
18.2.1 pkgtool
pkgtool(8) is a menu-driven program that allows installation and removal of packages. The main menu is shown in Figure 18-1.
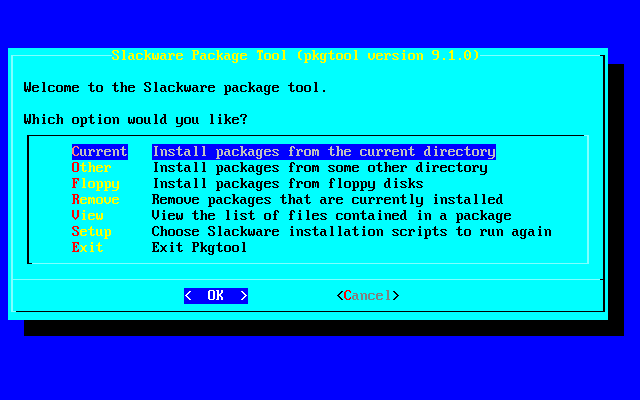
Installation is offered from the current directory, another directory, or from floppy disks. Simply select the installation method you want and pkgtool will search that location for valid packages to install.
You may also view a list of installed packages, as shown in Figure 18-2.
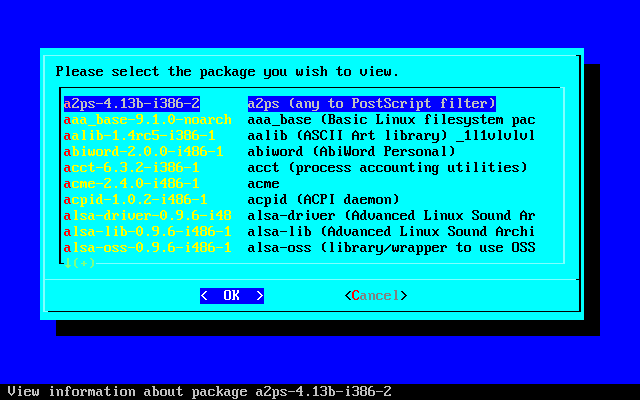
If you want to remove packages, select the remove option and you will be presented with a checklist of all the installed packages. Flag the ones you want to remove and select OK. pkgtool will remove them.
Some users prefer this utility to the command line utilities. However, it should be noted that the command line utilities offer many more options. Also, the ability to upgrade packages is only offered through the command line utilities.
18.2.2 installpkg
installpkg(8) handles installation of new packages on the system. The syntax is as follows:
# installpkg option package_name |
Three options are provided for installpkg. Only one option can be used at a time.
Table 18-1. installpkg Options
| Option | Effects |
|---|---|
| -m | Performs a makepkg operation on the current directory. |
| -warn | Shows what would happen if you installed the specified package. This is useful for production systems so you can see exactly what would happen before installing something. |
| -r | Recursively install all packages in the current directory and down. The package name can use wildcards, which would be used as the search mask when recursively installing. |
If you pass the ROOT environment variable before installpkg, that path will be used for the root directory. This is useful for setting up new drives for your root directory. They will typically be mounted to /mnt or something other than /.
The installed package database entry is stored in /var/log/packages. The entry is really just a plain text file, one for each package. If the package has a postinstallation script, it is written to /var/log/scripts/.
You may specify several packages or use wildcards for the package name. Be advised that installpkg will not tell you if you are overwriting an installed package. It will simply install right on top of the old one. If you want to ensure that old files from the previous package are safely removed, use upgradepkg.
18.2.3 removepkg
removepkg(8) handles removing installed packages from the system. The syntax is as follows:
# removepkg option package_name |
Four options are provided for removepkg. Only one option may be used at a time.
Table 18-2. removepkg Options
| Option | Effects |
|---|---|
| -copy | The package is copied to the preserved packages directory. This creates a tree of the original package without removing it. |
| -keep | Saves temporary files created during the removal. Really only useful for debugging purposes. |
| -preserve | The package is removed, but copied to the preserved packages directory at the same time. |
| -warn | Shows what would happen if you removed the package. |
If you pass the ROOT environment variable before removepkg, that path will be used for the root directory. This is useful for setting up new drives for your root directory. They will typically be mounted to /mnt or something other than /.
removepkg looks at the other installed packages and only removes files unique to the package you specify. It will also scan the postinstallation script for the specified package and remove any symbolic links that were created by it.
During the removal process, a status report is displayed. After the removal, the package database entry is moved to /var/log/removed_packages and the postinstallation script is moved to /var/log/removed_scripts.
Just as with installpkg, you can specify several packages or use wildcards for the package name.
18.2.4 upgradepkg
upgradepkg(8) will upgrade an installed Slackware package. The syntax is as follows:
# upgradepkg package_name |
or
# upgradepkg old_package_name%new_package_name |
upgradepkg works by first installing the new package and then removing the old package so that old files are no longer around on the system. If the upgraded package name has changed, use the percent sign syntax to specify the old package (the one that is installed) and the new package (the one you are upgrading it to).
If you pass the ROOT environment variable before upgradepkg, that path will be used for the root directory. This is useful for setting up new drives for your root directory. They will typically be mounted to /mnt or something other than /.
upgradepkg is not flawless. You should always back up your configuration files. If they get removed or overwritten, you'll want a copy of the originals for any needed repair work.
Just as with installpkg and removepkg, you can specify several packages or use wildcards for the package name.
18.2.5 rpm2tgz/rpm2targz
The Red Hat Package Manager is a popular packaging system available today. Many software distributors are offering their products in RPM format. Since this is not our native format, we do not recommend people rely on them. However, some things are only available as an RPM (even the source).
We provide a program that will convert RPM packages to our native .tgz format. This will allow you to extract the package (perhaps with explodepkg) to a temporary directory and examine its contents.
The rpm2tgz program will create a Slackware package with a .tgz extension, while rpm2targz creates an archive with a .tar.gz extension.
18.3 Making Packages
Making Slackware packages can be either easy or difficult. There is no specific method for building a package. The only requirement is that the package be a tar gzipped file and if there is a postinstallation script, it must be /install/doinst.sh.
If you are interested in making packages for your system or for a network that you manage, you should have a look at the various build scripts in the Slackware source tree. There are several methods we use for making packages.
18.3.1 explodepkg
explodepkg(8) will do the same thing that installpkg does to extract the package, but it doesn't actually install it and it doesn't record it in the packages database. It simply extracts it to the current directory.
If you look at the Slackware source tree, you will see how we use this command for “framework” packages. These packages contain a skeleton of what the final package will look like. They hold all the necessary filenames (zero-length), permissions, and ownerships. The build script will cat the package contents from the source directory to the package build directory.
18.3.2 makepkg
makepkg(8) will package up the current directory into a valid Slackware package. It will search the tree for any symbolic links and add a creation block to the postinstallation script for creating them during the package install. It also warns of any zero-length files in the package tree.
This command is typically run after you have created your package tree.
18.3.3 SlackBuild Scripts
Slackware packages are built in many different ways by necessity. Not all software packages are written by their programmers to compile the same way. Many have compile time options that are not all included in the packages Slackware uses. Perhaps you need some of this functionality; you'll need to compile your own package then. Fortunately for many Slackware packages, you can find SlackBuild scripts in the package's source code.
So what is a SlackBuild script? SlackBuild scripts are executable shell scripts that you run as root to configure, compile, and create Slackware packages. You can freely modify these scripts in the source directory and run them to create your own versions of the default Slackware packages.
18.4 Making Tags and Tagfiles (for setup)
The Slackware setup program handles installation of the software packages on your system. There are files that tell the setup program which packages must be installed, which ones are optional, and which ones are selected by default by the setup program.
A tagfile is in the first software series directory and is called tagfile. It lists the packages in that particular disk set and their status. The status can be:
Table 18-3. Tagfile Status Options
| Option | Meaning |
|---|---|
| ADD | The package is required for proper system operation |
| SKP | The package will be automatically skipped |
| REC | The package is not required, but recommended |
| OPT | The package is optional |
The format is simply:
package_name: status |
One package per line. The original tagfiles for each software series are stored as tagfile.org. So if you mess up yours, you can restore the original one.
Many administrators prefer writing their own tagfiles and starting the installer and selecting “full”. The setup program will read the tagfiles and perform the installation according to their contents. If you use REC or OPT, a dialog box will be presented to the user asking whether or not they want a particular package. Therefore, it is recommended that you stick with ADD and SKP when writing tagfiles for automated installs.
Just make sure your tagfiles are written to the same location as the originals. Or you can specify a custom tagfile path if you have custom tagfiles.
Chapter 19 ZipSlack
19.1 What is ZipSlack?
ZipSlack is a special version of Slackware Linux. It's an already installed copy of Slackware that's ready to run from your DOS or Windows partition. It's a basic installation, you do not get everything that comes with Slackware.
ZipSlack gets its name from the form it's distributed in, a big .ZIP file. Users of DOS and Windows will probably be familiar with these files. They are compressed archives. The ZipSlack archive contains everything you need to get up and running with Slackware.
It is important to note that ZipSlack is significantly different from a regular installation. Even though they function the same and contain the same programs, their intended audiences and functions differ. Several advantages and disadvantages of ZipSlack are discussed below.
One last thing, you should always review the documentation included in the actual ZipSlack directory. It contains the latest information regarding installation, booting, and general use of the product.
19.1.1 Advantages
-
Does not require repartitioning of your hard disk.
-
Great way to learn Slackware Linux without stumbling through the installation process.
19.1.2 Disadvantages
-
Uses the DOS filesystem, which is slower than a native Linux filesystem.
-
Will not work with Windows NT.
19.2 Getting ZipSlack
Obtaining ZipSlack is easy. If you have purchased the official Slackware Linux CD set, then you already have ZipSlack. Just find the CD that contains the zipslack directory and place it in your CD-ROM drive. It's usually the third or fourth disc, but always trust the labels over this documentation as the disk it resides on is prone to change.
If you want to download ZipSlack, you should first visit our “Get Slack” web page for the latest download information:
http://www.slackware.com/getslack/
ZipSlack is part of each Slackware release. Locate the release you want, and go to that directory on the FTP site. The latest release directory can be found at this location:
ftp://ftp.slackware.com/pub/slackware/slackware/
You'll find ZipSlack in the /zipslack subdirectory. ZipSlack is offered as one big .ZIP file or floppy-sized chunks. The chunks are in the /zipslack/split directory.
Don't stop at just the .ZIP files. You should also download the documentation files and any boot images that appear in the directory.
19.2.1 Installation
Once you've downloaded the necessary components, you'll need to extract the .ZIP file. Be sure to use a 32-bit unzipper. The size and filenames in the archive are too much for a 16-bit unzipper. Examples of 32-bit unzippers include WinZip and PKZIP for Windows.
ZipSlack is designed to be extracted directly to the root directory of a drive (such as C: or D:). A \LINUX directory will be created that contains the actual Slackware installation. You'll also find the files necessary to booting the system in that directory as well.
After you've extracted the files, you should have a \LINUX directory on the drive of your choosing (we'll use C: from here on).
19.3 Booting ZipSlack
There are several ways to boot ZipSlack. The most common is to use the included LINUX.BAT to boot the system from DOS (or from DOS mode under Windows 9x). This file must be edited to match your system before it will work.
Start by opening the C:\LINUX\LINUX.BAT file in your favorite text editor. At the top of the file you will notice a large comment. It explains what you need to edit in this file (and also what to do if you are booting from an external Zip drive). Don't worry if you don't understand the root= setting. There are several examples, so feel free to pick one and try it. If it doesn't work, you can edit the file again, comment out the line you uncommented, and pick another one.
After you uncomment the line you want by removing the “rem” at the beginning of the line, save the file and exit the editor. Bring your machine into DOS mode.
A DOS prompt window in Windows 9x will NOT work.
Type C:\LINUX\LINUX.BAT to boot the system. If all goes well, you should be presented with a login prompt.
Log in as root, with no password. You'll probably want to set a password for root, as well as adding an account for yourself. At this point you can refer to the other sections in this book for general system usage.
If using the LINUX.BAT file to boot the system didn't work for you, you should refer to the included C:\LINUX\README.1ST file for other ways to boot.
Glossary
- Account
-
All of the information about a user, including username, password, finger information, UID and GID, and home directory. To create an account is to add and define a user.
- Background
-
Any process that is running without accepting or controlling the input of a terminal is said to be running in the background.
- Boot disk
-
A floppy disk containing an operating system (in our case, the Linux kernel) from which a computer can be started.
- Compile
-
To convert source code to machine-readable “binary” code.
- Daemon
-
A program designed to run in the background and, without user intervention, perform a specific task (usually providing a service).
- Darkstar
-
The default hostname in Slackware; your computer will be called darkstar if you do not specify some other name.
One of Patrick Volkerding's development machines, named after “Dark Star”, a song by the Grateful Dead.
- Desktop Environment
-
A graphical user interface (GUI) that runs atop the X Window System and provides such features as integrated applications, cohesive look-and-feel between programs and components, file and window management capabilities, etc. A step beyond the simple window manager.
- Device driver
-
A chunk of code in the kernel that directly controls a piece of hardware.
- Device node
-
A special type of file in the /dev filesystem that represents a hardware component to the operating system.
- DNS
-
Domain Name Service. A system in which networked computers are given names which translate to numerical addresses.
- Domain name
-
A computer's DNS name, excluding its host name.
- Dot file
-
In Linux, files which are to be hidden have filenames beginning with a dot ('.').
- Dotted quad
-
The format of IP addresses, so called because it consists of four numbers (range 0-255 decimal) separated by periods.
- Dynamic loader
-
When programs are compiled under Linux, they usually use pieces of code (functions) from external libraries. When such programs are run, those libraries must be found and the required functions loaded into memory. This is the job of the dynamic loader.
- Environment variable
-
A variable set in the user's shell which can be referenced by that user or programs run by that user within that shell. Environment variables are generally used to store preferences and default parameters.
- Epoch
-
A period of history; in Unix, “The Epoch” begins at 00:00:00 UTC January 1, 1970. This is considered the “dawn of time” by Unix and Unix-like operating systems, and all other time is calculated relative to this date.
- Filesystem
-
A representation of stored data in which “files” of data are kept organized in “directories”. The filesystem is the nearly universal form of representation for data stored to disks (both fixed and removable).
- Foreground
-
A program that is accepting or controlling a terminal's input is said to be running in the foreground.
- Framebuffer
-
A type of graphics device; in Linux, this most often refers to the software framebuffer, which provides a standard framebuffer interface to programs while keeping specific hardware drivers hidden from them. This layer of abstraction frees programs of the need to speak to various hardware drivers.
- FTP
-
The File Transfer Protocol. FTP is a very popular method of transferring data between computers.
- Gateway
-
A computer through which data on a network is transferred to another network.
- GID
-
Group Identifier. The GID is a unique number attributed to a group of users.
- Group
-
Users in Unix belong to “groups”, which can contain many other users and are used for more general access control than the existence of users alone can easily allow.
- GUI
-
Graphical User Interface. A software interface that uses rendered graphical elements such as buttons, scrollbars, windows, etc. rather than solely text-based input and output
- Home directory
-
A user's “home directory” is the directory the user is placed in immediately upon logging in. Users have full permissions and more or less free reign within their home directories.
- HOWTO
-
A document describing “how to” do something, such as configure a firewall or manage users and groups. There is a large collection of these documents available from the Linux Documentation Project.
- HTTP
-
The Hypertext Transfer Protocol. HTTP is the primary protocol on which the World Wide Web operates.
- ICMP
-
Internet Control Message Protocol. A very basic networking protocol, used mostly for pings.
- Kernel
-
The heart of an operating system. The kernel is the part that provides basic process control and interfaces with the computer's hardware.
- Kernel module
-
A piece of kernel code, usually a driver of some sort, that can be loaded and unloaded from memory separately from the main body of the kernel. Modules are handy when upgrading drivers or testing kernel settings, because they can be loaded and unloaded without rebooting.
- Library
-
A collection of functions which can be shared between programs.
- LILO
-
The LInux LOader. LILO is the most widely-used Linux boot manager.
- LOADLIN
-
LOADLIN is a program that runs under MS DOS or Windows and boots a Linux system. It is most commonly used on computers with multiple operating systems (including Linux and DOS/Windows, of course).
- Man section
-
Pages in the standard Unix online manual ("man") are grouped into sections for easy reference. All C programming pages are in section 3, system administration pages in section 5, etc.
- MBR
-
The Master Boot Record. A reserved space on a hard drive where information on what to do when booting is stored. LILO or other boot managers can be written here.
- Motif
-
A popular programming toolkit used in many older X programs.
- MOTD
-
Message of the Day. The motd (stored in Linux in /etc/motd is a text file that is displayed to all users upon logging in. Traditionally, it is used by the system administrator as a sort of “bulletin board” for communicating with users.
- Mount point
-
An empty directory in a filesystem where another filesystem is to be “mounted”, or grafted on.
- Nameserver
-
A DNS information server. Nameservers translate DNS names to numerical IP addresses.
- Network interface
-
A virtual representation of a network device provided by the kernel. Network interfaces allow users and programs to talk to network devices.
- NFS
-
The Network Filesystem. NFS allows the mounting of remote filesystems as if they were local to your computer and thus provides a transparent method of file sharing.
- Octal
-
Base-8 number system, with digits 0-7.
- Pager
-
An X program that allows the user to see and switch between multiple “desktops”.
- Partition
-
A division of a hard drive. Filesystems exist on top of partitions.
- PPP
-
Point-to-Point Protocol. PPP is used mainly for connecting via modem to an Internet Service Provider.
- Process
-
A running program.
- Root directory
-
Represented as “/”, the root directory exists at the top of the filesystem, with all other directories branching out beneath it in a “file tree”.
- Root disk
-
The disk (usually fixed) on which the root directory is stored.
- Routing table
-
The set of information the kernel uses in “routing” network data around. It contains such tidbits as where your default gateway is, which network interface is connected to which network, etc.
- Runlevel
-
The overall system state as defined by init. Runlevel 6 is rebooting, runlevel 1 is “single user mode”, runlevel 4 is an X login, etc. There are 6 available runlevels on a Slackware system.
- Secure shell
-
An encrypted (thus secure) method of logging in remotely to a computer. Many secure shell programs are available; both a client and server are needed.
- Service
-
The sharing of information and/or data between programs and computers from a single “server” to multiple “clients”. HTTP, FTP, NFS, etc. are services.
- Shadow password suite
-
The shadow password suite allows encrypted passwords to be hidden from users, while the rest of the information in the /etc/passwd file remains visible to all. This helps prevent brute-force attempts at cracking passwords.
- Shell
-
Shells provide a commandline interface to the user. When you're looking at a text prompt, you're in a shell.
- Shell builtin
-
A command built into the shell, as opposed to being provided by an external program. For instance, bash has a cd builtin.
- Signal
-
Unix programs can communicate between each other using simple “signals”, which are enumerated and usually have specific meanings. kill -l will list the available signals.
- SLIP
-
Serial Line Interface Protocol. SLIP is a similar protocol to PPP, in that it's used for connecting two machines via a serial interface.
- Software package
-
A program and its associated files, archived and compressed into a single file along with any necessary scripts or information to aid in managing the installation, upgrade, and removal of those files.
- Software series
-
A collection of related software packages in Slackware. All KDE packages are in the “kde” series, networking packages in the “n” series, etc.
- Source code
-
The (more or less) human-readable code in which most programs are written. Source code is compiled into “binary” code.
- Standard Error (stderr)
-
The Unix-standard output stream for errors. Programs write any error messages on stderr, so that they can be separated from normal output.
- Standard Input (stdin)
-
The Unix-standard input stream. Data can be redirected or piped into a program's stdin from any source.
- Standard Output (stdout)
-
The Unix-standard output stream. Normal text output from a program is written to stdout, which is separate from the error messages reported on stderr and can be piped or redirected into other programs' stdin or to a file.
- Subnet
-
An IP address range that is part of a larger range. For instance, 192.168.1.0 is a subnet of 192.168.0.0 (where 0 is a mask meaning “undefined”); it is, in fact, the “.1” subnet.
- Superblock
-
In Linux, partitions are discussed in terms of blocks. A block is 512 bytes. The superblock is the first 512 bytes of a partition.
- Supplemental disk
-
In Slackware, a floppy disk used during installation that contains neither the kernel (which is on the boot disk) nor the root filesystem (which is on the root disk), but additional needed files such as network modules or PCMCIA support.
- Suspended process
-
A process which has been frozen until killed or resumed.
- Swap space
-
Disk space used by the kernel as “virtual” RAM. It is slower than RAM, but because disk space is cheaper, swap is usually more plentiful. Swap space is useful to the kernel for holding lesser-used data and as a fallback when physical RAM is exhausted.
- Symbolic link
-
A special file that simply points to the location of another file. Symbolic links are used to avoid data duplication when a file is needed in multiple locations.
- Tagfile
-
A file used by the Slackware setup program during installation, which describes a set of packages to be installed.
- Terminal
-
A human-computer interface consisting of at least a screen (or virtual screen) and some method of input (almost always at least a keyboard).
- Toolkit, GUI
-
A GUI toolkit is a collection of libraries that provide a programmer with code to draw “widgets” such as scrollbars, checkboxes, etc. and construct a graphical interface. The GUI toolkit used by a program often defines its “look and feel”.
- UID
-
User Identifier. A unique number that identifies a user to the system. UIDs are used by most programs instead of usernames because a number is easier to deal with; usernames are generally only used when the user has to see things happen.
- VESA
-
Video Electronics Standards Association. The term “VESA” is often used to denote a standard specified by said Association. Nearly all modern video adapters are VESA-compliant.
- Virtual terminal
-
The use of software to simulate multiple terminals while using only a single set of input/output devices (keyboard, monitor, mouse). Special keystrokes switch between virtual terminals at a single physical terminal.
- Window manager
-
An X program whose purpose is to provide a graphical interface beyond the simple rectangle-drawing of the X Window System. Window managers generally provide titlebars, menus for running programs, etc.
- Working directory
-
The directory in which a program considers itself to be while running.
- Wrapper program
-
A program whose sole purpose is to run other programs, but change their behavior in some way by altering their environments or filtering their input.
- X server
-
The program in the X Window System which interfaces with graphics hardware and handles the actual running of X programs.
- X Window System
-
Network-oriented graphical interface system used on most Unix-like operating systems, including Linux.
Appendix A. The GNU General Public License
GNU GENERAL PUBLIC LICENSE
Version 2, June 1991
Copyright (C) 1989, 1991 Free Software Foundation, Inc.
59 Temple Place, Suite 330, Boston, MA 02111-1307 USA
Everyone is permitted to copy and distribute verbatim copies of this
license document, but changing it is not allowed.
A.1. Preamble
The licenses for most software are designed to take away your freedom to share and change it. By contrast, the GNU General Public License is intended to guarantee your freedom to share and change free software--to make sure the software is free for all its users. This General Public License applies to most of the Free Software Foundation's software and to any other program whose authors commit to using it. (Some other Free Software Foundation software is covered by the GNU Library General Public License instead.) You can apply it to your programs, too.
When we speak of free software, we are referring to freedom, not price. Our General Public Licenses are designed to make sure that you have the freedom to distribute copies of free software (and charge for this service if you wish), that you receive source code or can get it if you want it, that you can change the software or use pieces of it in new free programs; and that you know you can do these things.
To protect your rights, we need to make restrictions that forbid anyone to deny you these rights or to ask you to surrender the rights. These restrictions translate to certain responsibilities for you if you distribute copies of the software, or if you modify it.
For example, if you distribute copies of such a program, whether gratis or for a fee, you must give the recipients all the rights that you have. You must make sure that they, too, receive or can get the source code. And you must show them these terms so they know their rights.
We protect your rights with two steps: (1) copyright the software, and (2) offer you this license which gives you legal permission to copy, distribute and/or modify the software.
Also, for each author's protection and ours, we want to make certain that everyone understands that there is no warranty for this free software. If the software is modified by someone else and passed on, we want its recipients to know that what they have is not the original, so that any problems introduced by others will not reflect on the original authors' reputations.
Finally, any free program is threatened constantly by software patents. We wish to avoid the danger that redistributors of a free program will individually obtain patent licenses, in effect making the program proprietary. To prevent this, we have made it clear that any patent must be licensed for everyone's free use or not licensed at all.
The precise terms and conditions for copying, distribution and modification follow.
A.2. TERMS AND CONDITIONS
TERMS AND CONDITIONS FOR COPYING, DISTRIBUTION AND MODIFICATION
-
This License applies to any program or other work which contains a notice placed by the copyright holder saying it may be distributed under the terms of this General Public License. The “Program”, below, refers to any such program or work, and a “work based on the Program” means either the Program or any derivative work under copyright law: that is to say, a work containing the Program or a portion of it, either verbatim or with modifications and/or translated into another language. (Hereinafter, translation is included without limitation in the term “modification”.) Each licensee is addressed as “you”.
Activities other than copying, distribution and modification are not covered by this License; they are outside its scope. The act of running the Program is not restricted, and the output from the Program is covered only if its contents constitute a work based on the Program (independent of having been made by running the Program). Whether that is true depends on what the Program does.
-
You may copy and distribute verbatim copies of the Program's source code as you receive it, in any medium, provided that you conspicuously and appropriately publish on each copy an appropriate copyright notice and disclaimer of warranty; keep intact all the notices that refer to this License and to the absence of any warranty; and give any other recipients of the Program a copy of this License along with the Program.
You may charge a fee for the physical act of transferring a copy, and you may at your option offer warranty protection in exchange for a fee.
-
You may modify your copy or copies of the Program or any portion of it, thus forming a work based on the Program, and copy and distribute such modifications or work under the terms of Section 1 above, provided that you also meet all of these conditions:
-
You must cause the modified files to carry prominent notices stating that you changed the files and the date of any change.
-
You must cause any work that you distribute or publish, that in whole or in part contains or is derived from the Program or any part thereof, to be licensed as a whole at no charge to all third parties under the terms of this License.
-
If the modified program normally reads commands interactively when run, you must cause it, when started running for such interactive use in the most ordinary way, to print or display an announcement including an appropriate copyright notice and a notice that there is no warranty (or else, saying that you provide a warranty) and that users may redistribute the program under these conditions, and telling the user how to view a copy of this License. (Exception: if the Program itself is interactive but does not normally print such an announcement, your work based on the Program is not required to print an announcement.)
These requirements apply to the modified work as a whole. If identifiable sections of that work are not derived from the Program, and can be reasonably considered independent and separate works in themselves, then this License, and its terms, do not apply to those sections when you distribute them as separate works. But when you distribute the same sections as part of a whole which is a work based on the Program, the distribution of the whole must be on the terms of this License, whose permissions for other licensees extend to the entire whole, and thus to each and every part regardless of who wrote it.
Thus, it is not the intent of this section to claim rights or contest your rights to work written entirely by you; rather, the intent is to exercise the right to control the distribution of derivative or collective works based on the Program.
In addition, mere aggregation of another work not based on the Program with the Program (or with a work based on the Program) on a volume of a storage or distribution medium does not bring the other work under the scope of this License.
-
-
You may copy and distribute the Program (or a work based on it, under Section 2) in object code or executable form under the terms of Sections 1 and 2 above provided that you also do one of the following:
-
Accompany it with the complete corresponding machine-readable source code, which must be distributed under the terms of Sections 1 and 2 above on a medium customarily used for software interchange; or,
-
Accompany it with a written offer, valid for at least three years, to give any third party, for a charge no more than your cost of physically performing source distribution, a complete machine-readable copy of the corresponding source code, to be distributed under the terms of Sections 1 and 2 above on a medium customarily used for software interchange; or,
-
Accompany it with the information you received as to the offer to distribute corresponding source code. (This alternative is allowed only for noncommercial distribution and only if you received the program in object code or executable form with such an offer, in accord with Subsection b above.)
The source code for a work means the preferred form of the work for making modifications to it. For an executable work, complete source code means all the source code for all modules it contains, plus any associated interface definition files, plus the scripts used to control compilation and installation of the executable. However, as a special exception, the source code distributed need not include anything that is normally distributed (in either source or binary form) with the major components (compiler, kernel, and so on) of the operating system on which the executable runs, unless that component itself accompanies the executable.
If distribution of executable or object code is made by offering access to copy from a designated place, then offering equivalent access to copy the source code from the same place counts as distribution of the source code, even though third parties are not compelled to copy the source along with the object code.
-
-
You may not copy, modify, sublicense, or distribute the Program except as expressly provided under this License. Any attempt otherwise to copy, modify, sublicense or distribute the Program is void, and will automatically terminate your rights under this License. However, parties who have received copies, or rights, from you under this License will not have their licenses terminated so long as such parties remain in full compliance.
-
You are not required to accept this License, since you have not signed it. However, nothing else grants you permission to modify or distribute the Program or its derivative works. These actions are prohibited by law if you do not accept this License. Therefore, by modifying or distributing the Program (or any work based on the Program), you indicate your acceptance of this License to do so, and all its terms and conditions for copying, distributing or modifying the Program or works based on it.
-
Each time you redistribute the Program (or any work based on the Program), the recipient automatically receives a license from the original licensor to copy, distribute or modify the Program subject to these terms and conditions. You may not impose any further restrictions on the recipients' exercise of the rights granted herein. You are not responsible for enforcing compliance by third parties to this License.
-
If, as a consequence of a court judgment or allegation of patent infringement or for any other reason (not limited to patent issues), conditions are imposed on you (whether by court order, agreement or otherwise) that contradict the conditions of this License, they do not excuse you from the conditions of this License. If you cannot distribute so as to satisfy simultaneously your obligations under this License and any other pertinent obligations, then as a consequence you may not distribute the Program at all. For example, if a patent license would not permit royalty-free redistribution of the Program by all those who receive copies directly or indirectly through you, then the only way you could satisfy both it and this License would be to refrain entirely from distribution of the Program.
If any portion of this section is held invalid or unenforceable under any particular circumstance, the balance of the section is intended to apply and the section as a whole is intended to apply in other circumstances.
It is not the purpose of this section to induce you to infringe any patents or other property right claims or to contest validity of any such claims; this section has the sole purpose of protecting the integrity of the free software distribution system, which is implemented by public license practices. Many people have made generous contributions to the wide range of software distributed through that system in reliance on consistent application of that system; it is up to the author/donor to decide if he or she is willing to distribute software through any other system and a licensee cannot impose that choice.
This section is intended to make thoroughly clear what is believed to be a consequence of the rest of this License.
-
If the distribution and/or use of the Program is restricted in certain countries either by patents or by copyrighted interfaces, the original copyright holder who places the Program under this License may add an explicit geographical distribution limitation excluding those countries, so that distribution is permitted only in or among countries not thus excluded. In such case, this License incorporates the limitation as if written in the body of this License.
-
The Free Software Foundation may publish revised and/or new versions of the General Public License from time to time. Such new versions will be similar in spirit to the present version, but may differ in detail to address new problems or concerns.
Each version is given a distinguishing version number. If the Program specifies a version number of this License which applies to it and “any later version”, you have the option of following the terms and conditions either of that version or of any later version published by the Free Software Foundation. If the Program does not specify a version number of this License, you may choose any version ever published by the Free Software Foundation.
-
If you wish to incorporate parts of the Program into other free programs whose distribution conditions are different, write to the author to ask for permission. For software which is copyrighted by the Free Software Foundation, write to the Free Software Foundation; we sometimes make exceptions for this. Our decision will be guided by the two goals of preserving the free status of all derivatives of our free software and of promoting the sharing and reuse of software generally.
-
NO WARRANTY
BECAUSE THE PROGRAM IS LICENSED FREE OF CHARGE, THERE IS NO WARRANTY FOR THE PROGRAM, TO THE EXTENT PERMITTED BY APPLICABLE LAW. EXCEPT WHEN OTHERWISE STATED IN WRITING THE COPYRIGHT HOLDERS AND/OR OTHER PARTIES PROVIDE THE PROGRAM “AS IS” WITHOUT WARRANTY OF ANY KIND, EITHER EXPRESSED OR IMPLIED, INCLUDING, BUT NOT LIMITED TO, THE IMPLIED WARRANTIES OF MERCHANTABILITY AND FITNESS FOR A PARTICULAR PURPOSE. THE ENTIRE RISK AS TO THE QUALITY AND PERFORMANCE OF THE PROGRAM IS WITH YOU. SHOULD THE PROGRAM PROVE DEFECTIVE, YOU ASSUME THE COST OF ALL NECESSARY SERVICING, REPAIR OR CORRECTION.
-
IN NO EVENT UNLESS REQUIRED BY APPLICABLE LAW OR AGREED TO IN WRITING WILL ANY COPYRIGHT HOLDER, OR ANY OTHER PARTY WHO MAY MODIFY AND/OR REDISTRIBUTE THE PROGRAM AS PERMITTED ABOVE, BE LIABLE TO YOU FOR DAMAGES, INCLUDING ANY GENERAL, SPECIAL, INCIDENTAL OR CONSEQUENTIAL DAMAGES ARISING OUT OF THE USE OR INABILITY TO USE THE PROGRAM (INCLUDING BUT NOT LIMITED TO LOSS OF DATA OR DATA BEING RENDERED INACCURATE OR LOSSES SUSTAINED BY YOU OR THIRD PARTIES OR A FAILURE OF THE PROGRAM TO OPERATE WITH ANY OTHER PROGRAMS), EVEN IF SUCH HOLDER OR OTHER PARTY HAS BEEN ADVISED OF THE POSSIBILITY OF SUCH DAMAGES.
END OF TERMS AND CONDITIONS
A.3. How to Apply These Terms to Your New Programs
If you develop a new program, and you want it to be of the greatest possible use to the public, the best way to achieve this is to make it free software which everyone can redistribute and change under these terms.
To do so, attach the following notices to the program. It is safest to attach them to the start of each source file to most effectively convey the exclusion of warranty; and each file should have at least the “copyright” line and a pointer to where the full notice is found.
<one line to give the program's name and a brief idea of what it does.> Copyright (C) <year> <name of author> This program is free software; you can redistribute it and/or modify it under the terms of the GNU General Public License as published by the Free Software Foundation; either version 2 of the License, or (at your option) any later version. This program is distributed in the hope that it will be useful, but WITHOUT ANY WARRANTY; without even the implied warranty of MERCHANTABILITY or FITNESS FOR A PARTICULAR PURPOSE. See the GNU General Public License for more details. You should have received a copy of the GNU General Public License along with this program; if not, write to the Free Software Foundation, Inc., 59 Temple Place, Suite 330, Boston, MA 02111-1307 USA |
Also add information on how to contact you by electronic and paper mail.
If the program is interactive, make it output a short notice like this when it starts in an interactive mode:
Gnomovision version 69, Copyright (C) year name of author Gnomovision comes with ABSOLUTELY NO WARRANTY; for details type `show w'. This is free software, and you are welcome to redistribute it under certain conditions; type `show c' for details. |
The hypothetical commands `show w' and `show c' should show the appropriate parts of the General Public License. Of course, the commands you use may be called something other than `show w' and `show c'; they could even be mouse-clicks or menu items--whatever suits your program.
You should also get your employer (if you work as a programmer) or your school, if any, to sign a “copyright disclaimer” for the program, if necessary. Here is a sample; alter the names:
Yoyodyne, Inc., hereby disclaims all copyright interest in the program `Gnomovision' (which makes passes at compilers) written by James Hacker. <signature of Ty Coon>, 1 April 1989 Ty Coon, President of Vice |
This General Public License does not permit incorporating your program into proprietary programs. If your program is a subroutine library, you may consider it more useful to permit linking proprietary applications with the library. If this is what you want to do, use the GNU Library General Public License instead of this License.